Sauce Mobile App Distribution (TestFairy) Connect
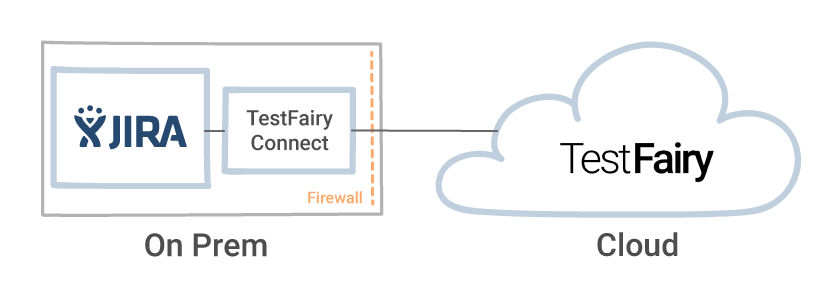
Sauce Mobile App Distribution Connect is a proxy server designed to facilitate the connection between your bug-tracking system (Jira Server) behind a firewall and the Sauce Mobile App Distribution cloud. By installing Sauce Mobile App Distribution Connect on-premise, companies can securely integrate their bug-tracking systems with Sauce Mobile App Distribution's web app, allowing for efficient and streamlined bug tracking and reporting.
You can install Sauce Mobile App Distribution Connect via a Docker image.
How does it work?
The core component of Sauce Mobile App Distribution Connect is the agent service. This service operates on a system within your firewall and establishes connections between Sauce Mobile App Distribution's web app and your bug-tracking system. Through this connection, bug reports and relevant data can be seamlessly exchanged between the two platforms:
Installation
To install Sauce Mobile App Distribution Connect, follow the steps below. The installation process is required only once, and the Docker will automatically download the latest version:
docker run -i -t -v $PWD:/etc/testfairy-connect testfairy/testfairy-connect:latest configure
You can replace $PWD with a directory of your choice to store your Sauce Mobile App Distribution Connect configuration.
If there are no issues, you can follow the interactive configuration wizard displayed on the screen.
Configuring Sauce Mobile App Distribution Connect
Before Sauce Mobile App Distribution Connect can function correctly, you need to provide specific configuration data. Ensure you have the following information:
- TestFairy API key. You can find at https://[your-subdomain].testfairy.com/settings/api-key/.
- The URL to your bug system.
- In the case of a Jira basic authentication - valid credentials (
UsernameandAPI Token) for the Jira user. - In the case of a Jira OAuth authentication - admin access to Jira/the ability to manage Application Links (as described in the configuration wizard script).
By default, your configuration file config.json is saved to .testfairy-connect under the Dockers Image home directory: ~/.testfairy-connect/config.json.
Running Sauce Mobile App Distribution Connect
Once you have completed the configuration, Sauce Mobile App Distribution Connect is ready to run. To start the Sauce Mobile App Distribution Connect server, use the following command:
docker run -d -v $PWD:/etc/testfairy-connect --restart=always testfairy/testfairy-connect:latest start
You can replace $PWD with a directory of your choice to store your Sauce Mobile App Distribution Connect configuration.
Sauce Mobile App Distribution Connect will be running in the background, and it is safe to close the ssh connection. Remember that stopping docker or rebooting the server will require you to run the start command again.
Troubleshooting
SELinux
If you have permission errors related to your docker volume, you can attach the volume in relaxed SELinux mode or disable SELinux enforcement entirely.
- Use these commands to attach volume in relaxed SELinux mode:
docker run -i -t -v $PWD:/etc/testfairy-connect:z testfairy/testfairy-connect:latest configure
docker run -d -v $PWD:/etc/testfairy-connect:z --restart=always testfairy/testfairy-connect:latest start - Alternatively, you can disable SELinux altogether by running the following:
sudo setenforce 0