Uploading dSyms
Sauce Mobile App Distribution can show you crash reports to help you identify the place in the code that is causing a problem. Sauce Mobile App Distribution crash reports are easier to understand when they show actual debug symbols instead of addresses.
Sauce Mobile App Distribution requires your app's debug symbols (dSYMs) to clearly show you the names of the methods in your code. DSYM files are created by Xcode when you build your app. There are a couple of ways to upload them to Sauce Mobile App Distribution.
Generating Symbols in Xcode
First, make sure your Xcode project is configured to generate the debug symbols:
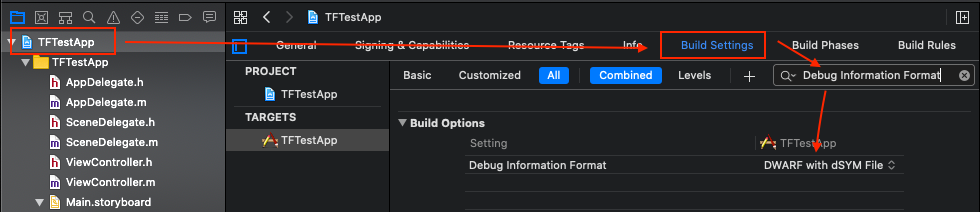
- Click on your project and select Build-Settings.
- In the search box, type Debug Information Format.
- Click on Debug Information Format and select DWARF with dSYM File:
To upload symbols to Sauce Mobile App Distribution, you'll need to have your UPLOAD_API_KEY ready, which can be found from your user preferences page.
Uploading multiple dSYMs
You can upload multiple dSYMs per build. Some developers have frameworks developed in-house, and these frameworks make it to the final .IPA file. In order to upload dSYM in your framework project, just repeat the above steps using pointing to your framework's settings.
Fatal: Can't find .dSYM folder!
If while compiling you get the error Fatal: Can't find .dSYM folder!, your
project is not configured to generate debug symbols.
Handling missing DSYMs
If you see a message in Sauce Mobile App Distribution about missing DSYMs or if you've published your app to the AppStore with Bitcode enabled, follow these instructions to locate and upload DSYMs.
Locating dSYMs on your hard-drive
If your build is missing dSYMs, you can find them and upload them manually to Sauce Mobile App Distribution.
-
Login to Sauce Mobile App Distribution and go to the App overview page by clicking the name of your app.
-
Click on the name of your app build to reach the build overview page.
-
Click on Settings from the Build menu, then select the Symbolication section.
-
This section lists several required UUIDs (representing binary app builds for different device architecture or binary builds for frameworks you're using). To see crash reports with your classes and method names, you'll need to upload dSYMs for each UUID that is specified as required.
-
Open a command line terminal and run the following command to locate the DSYMs folder name for one of the listed required UUIDs (replace
<UUID>with the actual UUID string):mdfind "com_apple_xcode_dsym_uuids == <UUID>" | grep dSYM -
Create a zip file with the content of the DSYM directory (you can call the zip file any name you like)
zip -r /tmp/symbols.zip <YOUR_DSYM_LOCATION>/* -
Proceed to upload the zip as described here.
If you can't locate your dSYMS using mfind, follow these instructions:
- In Xcode, open the organizer window.
- Control-Click the relevant build, and select "Show in Finder".
- In Finder, Control-Click the archive and select "Show Package Contents".
- The archive will contain a folder called dSYM.
- Create a zip with the contents of the folder and proceed to upload the zip to Sauce Mobile App Distribution as explained here.
Locating dSYMs for Bitcode builds.
If you enabled Bitcode for your build and released it to the store or submitted to TestFlight, take note that Apple will generate new dSYMs for your app and you'll need to download the new dSYMs from Xcode, and then upload them to Sauce Mobile App Distribution.
- In Xcode, open the organizer window.
- Click on the relevant build.
- From the right side menu, click "download dSYMs".
- Manually upload the dSYMs to Sauce Mobile App Distribution, as described here