Project Details Page
The Project Details page displays information about the selected project, including test cases, variables, and data. From here you can also create or upload new test cases, data, variables, flows, and test suites.
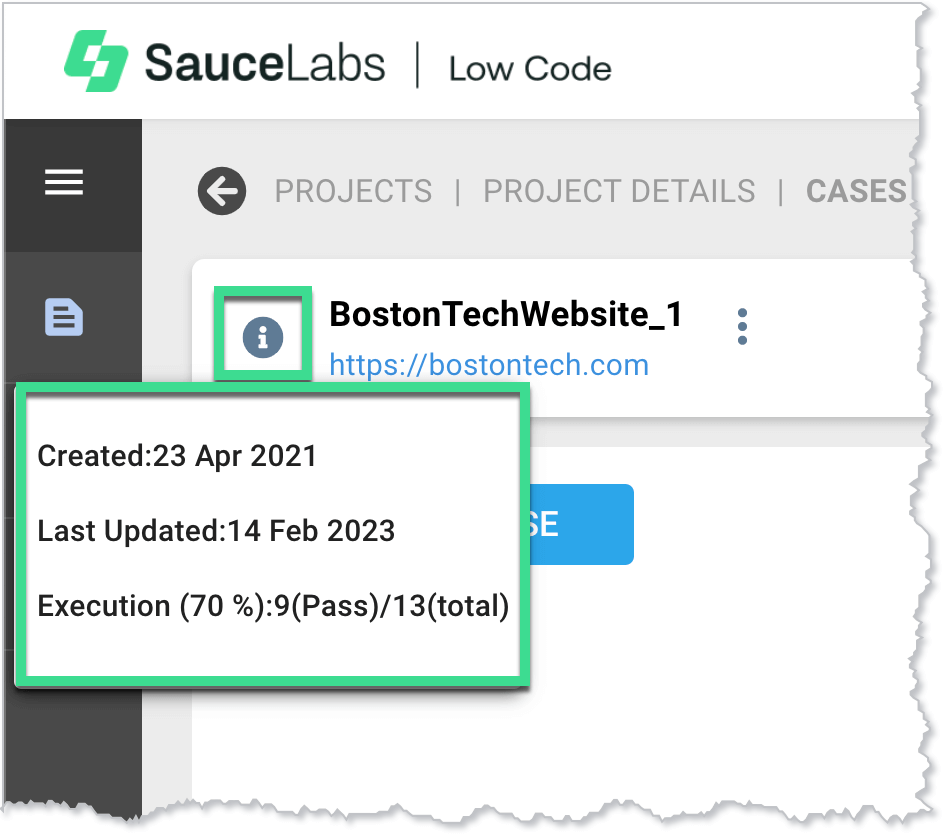
Click the information icon next to your test name to view the created and updated dates, and the project’s execution stats.

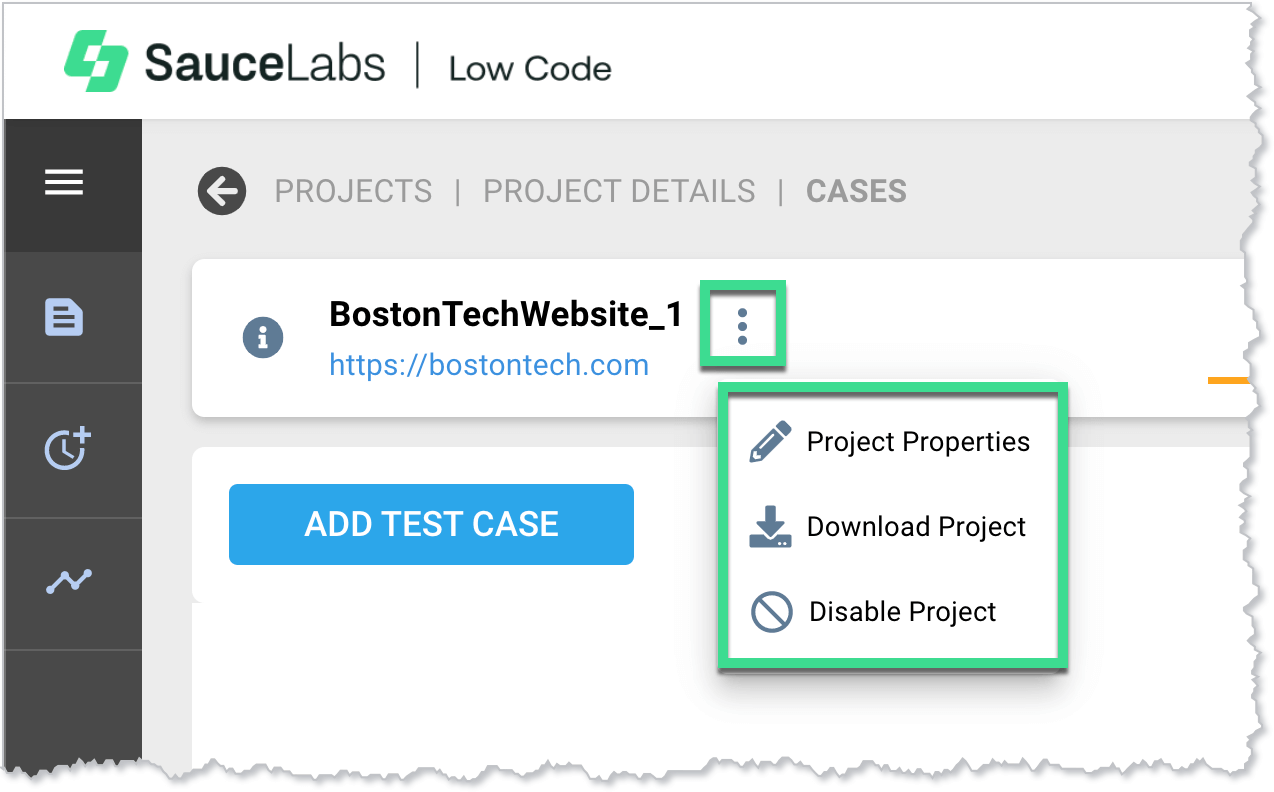
Click the more actions icon to view or modify the project properties, download the project details as a .xlsx file, or disable the project.

Test Cases Tab
The Test Cases tab consists of a table of information about the test cases that are part of the project. From this page you can also create a new test case.
Merging Test Cases
To merge multiple test cases into a new test case:
- On the dashboard, in the Projects card, click Go to Projects.
- On the Projects page, click the project card of the project whose test cases you want to merge.
- On the Project Details page, click the three dots to the far right of the ADD TEST CASE button.

- In the Merge Cases window, on the Merge tab, enter a name for the new test case, and select or deselect the cases to merge. Click Next.

- On the Arrange tab, drag the cases to arrange them in your preferred order, or click the X to remove them. Click Save.

Test Cases Table Columns
Column | Description | ||
Case | The name given to the test case. Click the test case name to open the step editor. Click the up or down arrow next to the column name to sort the table by case name. | ||
Uploaded | The date the test case was uploaded. Click the up or down arrow next to the column name to sort the table by the dates the cases were uploaded. | ||
Generation Status | The current status of the test case. Possible statuses:
| ||
Generated Last Run | The date the last run was generated. Click the up or down arrow next to the column name to sort the table by the dates the cases were last run. | ||
Generate | Hover under the column name next to the test case you want to generate a test for. Click the Generate button. See Generating a Test for more information. | ||
Execute | Hover under the column name next to the test case you want to execute a test for. Click the Execute button. See Executing a Test for more information. | ||
Clone | Hover under the column name next to the test case you want to clone and click the Clone button. | ||
Delete | Hover under the column name next to the test case you want to delete and click the Delete button. In the Delete Test Case window, click Delete or Cancel. | ||
More | Update Case | Update the name and description for the test case. | |
Copy URL> | Copy the URL of the test case. | ||
Disable Case | Disable the test case. | ||
Preview and Download | Test Case | Displays the steps in the test and gives you the option to download the information as a .csv or a .xlsx file. | |
Data | Displays a preview of the test data and gives you the option to download it as an .xlsx file. | ||
Script | Displays the script for the test and gives you the option to copy the script to clipboard or download the .java file. | ||
Generation report | Download the test’s .html report file. |
Adding a Test Case
There are three ways to add a test case. You can record the case using the recorder, upload the case as an .xls, .xlsx, or .csv file, or manually enter the case and its steps.
Using the Recorder
To record a test case you first have to download and install the recorder extension in Google Chrome.
Installing the Recorder
If you click the Record icon and do not have the recorder extension installed, you will be prompted to do so. To install the recorder without the prompt:
- Go to the AutonomIQ AI Enterprise Recorder extension page.
- Click Add to Chrome.
- In the Add “AutonomIQ AI Enterprise Recorder”? window, click Add extension.
- The recorder will now be available in your extensions. To launch the recorder, in Google Chrome, click the Extensions icon and then click AutonomIQ AI Enterprise Recorder.
Recording a Test Case
When you launch the recorder, it records the actions you perform and translates them into test steps that can be managed in the step editor (see Using the Step Editor for more information). The recording happens in the background and is displayed in the AI Test Studio window. The recorder will start recording as soon as it is launched.

AI Test Studio Window
Component | Description | |
Main Recorder | ||
Exit button | Closes the recorder. | |
More options | Show recorder always on top | When set to On, the recorder will remain positioned on top of all other windows. |
Record Hover | When enabled, actions in which you hover your mouse pointer over an item will be recorded as steps. Click to enable/disable. | |
Record Double Click | When enabled, double-clicking items will be recorded as steps. Click to enable/disable. | |
Add Test Case button | Opens the New Test Case window. Enter a name for the new test case and then click Save. | |
Edit Test Case Name button | Opens the Update Test Case Name window. Enter a new name for the test case and then click Update. | |
Save Test Case button | Saves the test case. Saved test cases can be viewed on the Plan -> Test Cases page. | |
Delete Test Case button | Deletes the test case. | |
Pause button | Pauses the recording of actions. The test case will remain in the recorder until you click Exit. | |
Steps | Action | The action that was performed in the step. |
Location | The URL of the action. | |
Add step | Click to manually add a step to the test case. | |
Delete step | Click to delete a step from the test case. | |
Test Case List | ||
Add Test Case button | Opens the New Test Case window. Enter a name for the new test case and then click Save. | |
Search bar | Enter text to search for in the list of test cases. | |
Test Cases checkbox | Select the checkbox next to Test Cases to select or deselect all test cases in the list. | |
Mass delete button | When multiple test case checkboxes are selected, click the delete button next to Test Cases to delete them. | |
Edit button | Click to edit the name of the test case. | |
Delete button | Click to delete the test case from the list. |
Uploading a Test Case
To upload a test case:
- On the dashboard, in the Projects card, click Go to Projects.
- On the Projects page, click the project card of the project you want to upload a test case to.
- On the Project Details page, click ADD TEST CASE and then click the Upload button.

In the Upload Test Case window:
- On the Test Case tab, drag and drop or navigate to the .xls, .xlsx, or .csv file to upload. Click Next.
- (Optional) On the Test Data tab, drag and drop or navigate to the .xls, .xlsx, or .csv file to upload. Click Next.
- (Optional) On the Artifacts tab, drag and drop or navigate to the file(s) to upload. Click Next.
- (Optional) On the Audio tab, drag and drop or navigate to the .wav file to upload. Click Next.
Click Submit.
Manually Creating a Test Case
To manually add a test case:
- On the dashboard, in the Projects card, click Go to Projects.
- On the Projects page, click the project card of the project you want to upload a test case to.
- On the Project Details page, on the Tests Cases tab, click ADD TEST CASE and then click the Create button. See Using the Step Editor for information about the next steps.

Using the Step Editor
The step editor utilizes Natural Language Processing (NLP) and allows you to manually enter test steps, as opposed to using the recorder. This method gives you more focused control over the actions to test, but it can also result in more errors and frustration for a less-experienced user. If you are new to AutonomIQ, or to testing in general, you can start with the recorder (see Recording a Test Case for more information).
Step Editor Page Components
Component | Description | |
Test case name and description | Click the pencil icon to open the Update Case Name and Description window. | |
Create Tags button | Click to open the Create Tags window. For more information about creating tags, see Tagging a Test Case. | |
Time elapsed | The time the steps take to complete. | |
Selected Steps | The number of steps in the test case that are selected. | |
Total Steps | The number of steps in the test case. | |
Execute button | Click to open the Execute Test window and begin the test execution process. For more information about test execution, see Executing a Test. | |
Mass checkbox | Click to select or deselect all steps in the list. | |
Paste steps from clipboard button | Adds the steps copied to the clipboard to the test case. | |
Copy selected steps to clipboard button | Copies the selected steps to the clipboard, which can then be pasted using the Paste steps from clipboard button. | |
New Flow button | Opens the New Flow window. For more information about flows, see Flows Tab. | |
Delete button | Deletes the selected steps from the test case. | |
Action column | The action performed in the step. | |
Data column | The data related to the action. | |
Expected Result column | The expected result of the action. | |
Generate button | Click to generate the test. For more information about generating tests, see Generating a Test. | |
Stop button | Stops the test being generated. | |
Save button | Saves the test steps. | |
Undo button | Undoes the most recent action. | |
Redo button | Redoes the most recently undone action. | |
Download Test Steps button | Click to download the test steps as a .csv or .xlsx file. | |
More Options | ||
Line view options | Switch between two views of the step editor: Current and Original Steps | |
Image view options | Screen displays a thumbnail of the step in test. Line View displays the steps as text only. | |
Auto Scroll | Toggle the auto scroll feature on or off. | |
Cache Steps On | Off | Toggle the step caching feature on or off. | |
Creation Mode On | Off | Toggle creation mode on or off. | |
Remove All Debug Steps | Click to remove the debug steps in the test case. | |
Create Tags | Click to open the Create Tags window. For more information about creating tags, see Tagging a Test Case. | |
Download Logs | Click to download the log file as a .zip. |
Creating a Step
The following are the basic instructions to add a step to a test case, but the step editor is a very robust tool that can perform much more complex functions. For more detailed information about using the step editor and NLP commands, see NLP Reference.
To create a new step in the step editor:
- On the dashboard, in the Projects card, click Go to Projects.
- On the Projects page, click the project card of the project you want to create a step for.
- On the Cases page, click the test case you want to create a step for. To create a new test case, see Adding a Test Case.
- To add a new step, click the blue plus sign.

- In the Action field, enter a command and any additional details. As you type, suggestions will be displayed; you can select one or continue entering the text manually.

- In the Data field, you can enter any data that is required for the action.

- You can add and edit step details in the list of steps, or you can click the expand button to open the editor in a separate window.

- To edit the step as code, click the Code button.

- To save the step, click the green checkmark.
Copying Excel Data
To paste copied data from an Excel spreadsheet into the step editor, on the Step Editor page, click the clipboard icon or use the CTRL+V or command+V keyboard shortcuts. The pasted steps will be added to the end of the list of steps.
Generating a Test
To generate a test:
- On the dashboard, in the Projects card, click Go to Projects.
- On the Projects page, click the project card of the project you want to generate a test for.
- On the Project Details page, on the Tests Cases tab, hover in the GENERATE column and then click the Generate button.

Executing a Test
To execute a test:
- On the dashboard, in the Projects card, click Go to Projects.
- On the Projects page, click the project card of the project you want to execute a test for.
- On the Project Details page, on the Tests Cases tab, hover in the EXECUTE column and then click the Execute button.

Data Tab
The Data tab displays the data uploaded to a project, in table form. From this screen you can also upload new data, and delete and download existing data.
Data Tab Columns
Column | Description |
Data | The data files that are uploaded to the project. Clicking a file name will open a test data preview window, which includes a download option. Click the up or down arrow next to the column name to sort the table alphabetically by file name. |
Last Used | The date the data file was last used. Click the up or down arrow next to the column name to sort the table by last used date. |
Uploaded | The date the data file was uploaded. Click the up or down arrow next to the column name to sort the table by uploaded date. |
Associated Test Cases | The number of test cases associated with the one you are viewing. Click View Details to open the Attach Case(s) to Data window. |
Delete | Hover in the Delete column and then click the Delete button. |
Download | Hover in the Download column and then click the Download button. |
Uploading New Data
To upload new data to your test case:
- On the dashboard, in the Projects card, click Go to Projects.
- On the Projects page, click the project card of the project you want to upload new data to.
- On the Project Details page, click the Data tab and then click the UPLOAD NEW DATA button.

- In the Upload window, on the Test Data tab, drag and drop or navigate to the .xls, .xlsx, or .csv file to upload. Click Next.

- On the Artifacts tab, drag and drop or navigate to the file(s) to upload. Click Next.

- On the Audio tab, drag and drop or navigate to the .wav file to upload. Click Next.

- On the Attach Cases to Data tab, select the test cases you want to associate with the data.

- Click Submit.
Variables Tab
For information about specific variables, see Variables.
Variables Tab Columns
Column | Description |
Variable | The variables associated with the project. Click a variable name to modify its name or value. Click the up or down arrow next to the column name to sort the table alphabetically by variable name. |
Value | Click the up or down arrow next to the column name to sort the table alphabetically by value. |
Clone | Hover in the Clone column and then click the Clone button. |
Delete | Hover in the Delete column and then click the Delete button. |
Adding a Variable
To add a variable to a test case:
- On the dashboard, in the Projects card, click Go to Projects.
- On the Projects page, click the project card of the project you want to upload new data to.
- On the Project Details page, click the Variables tab and then click the ADD VARIABLE button.

- In the New Variable window, enter a name and value for the new variable, and then click Save.

More Options
Click the more options button to the far right of the ADD VARIABLE button to download or delete all variables from the project.

Flows Tab
A flow is a set of steps that are linked for easy re-use. The Flows tab displays the flows associated with a project.
Flows Tab Columns
Column | Description |
Flow | The flows associated with the project. Click a flow name to open the List Flow window, where you can view and modify details about the flow. Click the up or down arrow next to the column name to sort the table alphabetically by flow name. |
Created | The date the flow was created. Click the up or down arrow next to the column name to sort the table by created date. |
Total Steps | The number of steps in the flow. Click the up or down arrow next to the column name to sort the table by number of steps. |
Clone | Hover in the Clone column and then click the Clone button. |
Delete | Hover in the Delete column and then click the Delete button. |
Download | Hover in the Download column and then click the Download button. |
Creating a Flow
To add a flow to a project:
- On the dashboard, in the Projects card, click Go to Projects.
- On the Projects page, click the project card of the project you want to create a flow for.
- On the Project Details page, click the Flows tab and then click the CREATE NEW FLOW button.

- In the New Flow window, add a name for the flow, and add the steps to include.

- Click Save.
Test Suites Tab
A test suite is a collection of test cases in a project. The Test Suites tab displays the test suites in a project, in table form. From this screen you can also create a new test suite, and clone, download, and disable existing test suites.
Test Suites Tab Columns
Column | Description | |
Suite | The test suites associated with the project. Click a test suite name to open the Update Suite window, where you can view and modify details about the test suite. Click the up or down arrow next to the column name to sort the table alphabetically by test suite name. | |
Created | The date the test suite was created. Click the up or down arrow next to the column name to sort the table by created date. | |
Last Run | The date the test suite was last run. Click the up or down arrow next to the column name to sort the table by last run date. | |
Last Status | The last status of the test suite. Click the up or down arrow next to the column name to sort the table by last status. | |
Execute | Hover in the Execute column and then click the Execute button. | |
Delete | Hover in the Delete column and then click the Delete button. | |
More | Go to Step Editor | Opens the step editor for the test suite. |
Go to execution | Opens the Execution Steps page for the test suite. | |
Download Execution Report | Downloads the Execution Report as an .html file. |
Creating a Test Suite
To create a test suite:
- On the dashboard, in the Projects card, click Go to Projects.
- On the Projects page, click the project card of the project you want to create a test suite for.
- On the Project Details page, click the Test Suites tab and then click the CREATE TEST SUITE button.

- In the New Test Suite window, on the Name and Info tab, enter a name for the test suite and an email to send reports to. Click Next.

- On the Test Cases tab, select the test cases to include in the test suite. Click Next.

- On the Arrange tab, drag to reorder the test cases in the test suite. Click Next.

For information about the Post Action tab, see Post Processing.
- Click Finish.
Post Processing
You can set a test suite or suites to be triggered after the completion of the parent test suite. Post processing suites can be from the same project or from different projects. Suites can be made to trigger based on different conditions. They can be also triggered at desired time intervals by using the Delay feature.