Storybook Integration
An extension for Storybook's test-runner powered by Jest and Playwright to integrate effortless visual testing with Sauce Visual.
Introduction
This guide requires an existing Storybook setup.
You can alternatively take a look to our example repository.
All tests are run in a headless browser on your local machine or CI pipeline, so you don't need to worry about setting up a browser driver.
Compatibility
This package leverage's Storybook's test-runner and metadata generation system for enabling automatic testing of Storybook stories. We recommend running Storybook ^10.0.0 and an up-to-date / compatible version of the Storybook test-runner (>=0.24.0 at time of writing).
Users running on Storybook versions 6-8 can use the previous major release, @saucelabs/visual-storybook@^0.10.x, until they're able to upgrade.
Getting Started
Step 1 - Install and Configure the Test Runner
Follow Storybook's instructions for setting up, installing, and configuring the test-runner if you haven't done so already. Alternatively you can use the line below for a quick installation with the default settings. If you have already used or enabled the test-runner, you can skip this step.
npm i --save-dev @storybook/test-runner
Step 2 - Install the Visual Package
Install this plugin in an existing project from the root:
npm i --save-dev @saucelabs/visual-storybook
If you don't have Playwright as a dev dependency in your project, you'll need to install it as well:
npm i --save-dev playwright
Step 3 - Eject and Configure The Jest Test Runner
If you already have a custom jest config file for the test-runner, typically in test-runner-jest.config.js, you can skip the below command. If not see below or read through the storybook-runner docs to eject the default test configuration.
npx @storybook/test-runner --eject
The above should have created a file in the root directory, test-runner-jest.config.js. Edit this file and add an import for the sauce visual plugin:
import { getVisualTestConfig } from '@saucelabs/visual-storybook';,
then append
...getVisualTestConfig(),
below the jest config spread. Your file should look similar to the example below:
import { getJestConfig } from '@storybook/test-runner';
import { getVisualTestConfig } from '@saucelabs/visual-storybook';

/**
 * @type {import('@jest/types').Config.InitialOptions}
 */
export default {
  ...getJestConfig(),
  // The configuration for Sauce Lab's Visual Integration
  ...getVisualTestConfig(),
  /** Add your own overrides below, and make sure
   *  to merge testRunnerConfig properties with your own
   * @see https://jestjs.io/docs/configuration
   */
};
Step 4 - Configure the Storybook Test Runner
Create a test-runner.ts file in your storybook configuration directory (<root>/.storybook by default) if you do not already have one, and append our preVisit and postVisit hooks into it. You can read more about this file in the hook API section. It should look something like below:
// .storybook/test-runner.ts
import { postVisit, preVisit  } from "@saucelabs/visual-storybook";

export default {
  preVisit,
  postVisit,
};
Step 5 - Authenticate Your Session
Sauce Visual relies on environment variables for authentication.
Both SAUCE_USERNAME and SAUCE_ACCESS_KEY need to be set prior starting your Storybook Testrunner job.
Username and Access Key can be retrieved from https://app.saucelabs.com/user-settings.
export SAUCE_USERNAME=__YOUR_SAUCE_USER_NAME__
export SAUCE_ACCESS_KEY=__YOUR_SAUCE_ACCESS_KEY__
Step 6 - Run Storybook and the Test Runner
Run your Storybook instance (or point to a built one), set the required environment variables (see here for all available / required fields), and run the test-runner. We'll take snapshots of all known Storybook stories and upload them into Sauce Visual.
# Spin up your storybook instance in a separate terminal window if you're not using a live /
# hosted one
npm run storybook

# Export your username and access key or set them in your CI variables. You can get these from
# app.saucelabs.com
export SAUCE_USERNAME=__YOUR_SAUCE_USER_NAME__
export SAUCE_ACCESS_KEY=__YOUR_SAUCE_ACCESS_KEY__

# Run the storybook command! Note: if you're running against a non-standard port or URL, you'll
# need to supply the --url parameter followed by the root url for your storybook instance. See the
# test-runner docs for more details / examples of config parameters.
# ex: --url http://localhost:6006
npx @storybook/test-runner
Step 7 - Review Your Build
Review your changes in the Sauce Visual Dashboard.
Customizing Your Builds (Environment Variables)
Below are the environment variables available in the visual-storybook plugin. Keep in mind that the variables defined in Storybook configuration have precedence over these.
| Variable Name | Description | |
|---|---|---|
SAUCE_USERNAME | required | Your Sauce Labs username. You can get this from the header of app.saucelabs.com |
SAUCE_ACCESS_KEY | required | Your Sauce Labs access key. You can get this from the header of app.saucelabs.com |
SAUCE_REGION | The region you'd like to run your Visual tests in. Defaults to us-west-1 if not supplied. Can be one of the following: 'eu-central-1', 'us-west-1' or 'us-east-4' | |
SAUCE_VISUAL_BUILD_NAME | The name you would like to appear in the Sauce Visual dashboard. | |
SAUCE_VISUAL_BRANCH | The branch name you would like to associate this build with. We recommend using your current VCS branch in CI. | |
SAUCE_VISUAL_DEFAULT_BRANCH | The main branch name you would like to associate this build with. Usually main or master or alternatively the branch name your current branch was derived from. Follow me to learn more | |
SAUCE_VISUAL_PROJECT | The label / project you would like to associate this build with. | |
SAUCE_VISUAL_BUILD_ID | For advanced users, a user-supplied SauceLabs Visual build ID. Can be used to create builds in advance using the GraphQL API. This can be used to parallelize tests with multiple browsers, shard, or more. By default, this is not set and we create / finish a build during setup / teardown. | |
SAUCE_VISUAL_CUSTOM_ID | For advanced users, a user-supplied custom ID to identify this build. Can be used in CI to identify / check / re-check the status of a single build. Usage suggestions: CI pipeline ID. |
Story / Global Configuration
Additional configuration options are exposed via the sauceVisual Storybook parameters. You can use these to tweak settings on a global, component, or per-story basis -- see the Storybook docs for details on how to apply them to each.
The below configuration options are also exported as the type SauceVisualParams from @saucelabs/visual-storybook if you'd like TypeScript types for them.
Parameters key: sauceVisual
| Key | Type | Default | Description |
|---|---|---|---|
captureDom | boolean | true | Toggles DOM snapshot capture. |
clip | boolean | true | If the story & layout supports it, will automatically clip to the clipSelector to remove extraneous whitespace. Recommended to be used in conjunction with centered layout. Currently defaults to false, however, will default to true in a future version. |
clipSelector | string | #storybook-root | The selector to clip to when clip = true. Defaults to Storybook's default root element, #storybook-root. |
delay | number | 0 (no delay) | A number, in ms, that we should delay the snapshot by. Useful if the beginning of the story has unavoidable / javascript animations. |
ignoreRegions | (RegionIn | string)[] | [] (empty) | An array of manually created ignore regions, or CSS selectors in string form to ignore. See the snipped below for a commented out example. |
variations | StoryVariation[] | [] (empty) | An array of Story variations to test. See Testing Variations below for details. |
Component-level Example:
const meta = {
  title: 'Example/Button',
  component: Button,
  parameters: {
    // ... Your other Storybook parameters here
    sauceVisual: {
      // Add storybook visual configuration options here
      clip: true,
      // clipSelector: '#custom-root-element',
      // delay: 200,
      // ignoreRegions: ['.some-css-selector', '#another-css-selector', {x: 50, y: 50, width: 100, height: 100}],
    },
  },
};

export default meta;
Different Browsers and Devices
By default, the tests are run on your local machine/in your pipeline with Chromium. You have the option to run them on different browser and device configurations preconfigured by playwright or define your own device, a combination or all of them. To do so, you need to add the following to your test-runner-jest.config.js file:
import { getJestConfig } from '@storybook/test-runner';
import { getVisualTestConfig } from '@saucelabs/visual-storybook';

/**
 * @type {import('@jest/types').Config.InitialOptions}
 */
export default {
  ...getJestConfig(),
  // The configuration for Sauce Lab's Visual Integration
  ...getVisualTestConfig(),
  /** Add your own overrides below, and make sure
   *  to merge testRunnerConfig properties with your own
   * @see https://jestjs.io/docs/configuration
   */

  // Add this to your config
  testEnvironmentOptions: {
    'jest-playwright': {
      // With this option tests will be run against the defaultBrowserType of the devices, otherwise
      // they run in a matrix against the default browser(s) configured below (chromium, if omitted)
      useDefaultBrowserType: true,
      // we still need to specify the browsers used by the devices
      browsers: ['chromium', 'webkit', 'firefox'],
      // this is actually the important part, we need to specify the devices we want to test against
      devices: [ 'Desktop Edge', 'Desktop Firefox', 'Desktop Chrome', 'Desktop Safari', 'Pixel 5', 'iPhone 14 Pro Max']
  },
};
If you'd like to configure your own devices, please follow the configuration steps inside the playwright docs.
Testing Interactions
Utilizing the Test Runner, Interactions Addon, and our Storybook integration you can interact with stories and take snapshots along the way. This exposes the ability to both do component testing and visual testing in a single location. Follow the steps on the Storybook Component Testing for installing and writing component tests in storybook.
You'll need the following:
- The Interactions Addon installed and setup
- Version 0.9.0+ of our Storybook integration
- The
preVisithook added in your.storybook/test-runner.(js|ts)setup. See Step 4 in our guide if you're updating to use this feature or are missing the hook - (optional) You'll also likely need to increase your test
testTimeoutin yourtest-runner-jest.config.jsto account for the additional time it will take to both complete the interaction tests and take snapshots. Configure / tweak this as necessary.
After updating and configuring Storybook, you can add an import to your story for our takeVisualSnapshot function from the new play entrypoint which can only be used in a Test Runner play context.
import { takeVisualSnapshot } from "@saucelabs/visual-storybook/play";
Once setup, you can use the play function in a story to interact with a component and take snapshots of individual states. See the full example below of a 'Button' component -- paying specific attention to the play property in the story declaration.
import type { Meta, StoryObj } from '@storybook/react-vite';
import { takeVisualSnapshot } from '@saucelabs/visual-storybook/play';
import type { SauceVisualParams } from '@saucelabs/visual-storybook';
import { expect, fn, userEvent, within } from 'storybook/test';

const meta = {
  title: "Example/Button",
  component: Button,
  // Our interaction _and_ Visual test, combined in one.
  play: async ({ canvasElement }) => {
    const canvas = within(canvasElement);
    const button = canvas.getByRole('button');
    await userEvent.hover(button);

    // focus the button, so we can see the 'focus' outline behavior in all browsers
    await button.focus();
    await expect(button).toHaveFocus();
    // Take a screenshot of the focus styles
    await takeVisualSnapshot('Button Focused');

    await userEvent.click(button);
    await takeVisualSnapshot('Button Clicked / Active');

    // Unfocus / reset the element to reset it for the remaining screenshots / variations.
    await button.blur();
  },
  parameters: {
    layout: "centered",
  },
} satisfies Meta<typeof Button>;
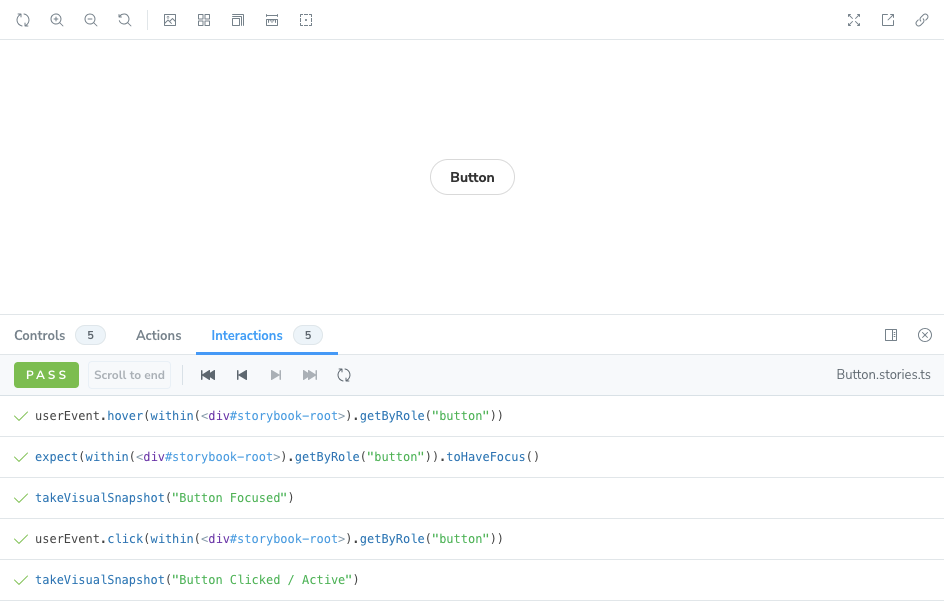
To assist in debugging and writing tests, we've also integrated this with the Interactions UI in Storybook -- giving you insight when your screenshots will be taken, and allowing you to replay the history up to those points.
Testing Variations
Variations of a story can be tested using the variations key inside the sauceVisual Storybook parameter. Passing an array of values (see structure below) in this param will instruct the Storybook test-runner to take additional snapshots of a story while updating or changing one or more arguments.
Structure:
export interface StoryVariation<Args> {
  /**
   * A string to prepend prior to the story name when taking a snapshot.
   */
  prefix?: string;
  /**
   * A string to append after the story name when taking a snapshot.
   */
  postfix?: string;
  /**
   * One or more Args to overwrite in your Storybook stories. Will take a screenshot for each
   * requested variation and upload it to Sauce Labs.
   */
  args?: Args;
  /**
   * A name to optionally use instead of the default story name.
   */
  name?: string;
}
Example:
import type { Meta, StoryObj } from '@storybook/react-vite';
import type { SauceVisualParams } from '@saucelabs/visual-storybook';
import { Button, ButtonProps } from "./Button";

const meta = {
  title: "Example/Button",
  component: Button,
  parameters: {
    sauceVisual: {
      // An array of StoryVariations that Sauce Visual should capture.
      variations: [
        {
          // Prefixes the story name with `[disabled]` -- eg: `Example/Button/[disabled] Button`.
          prefix: '[disabled] ',
          args: {
            disabled: true,
          },
        },
        // Examples to test multiple sizes of a single component
        {
          prefix: '[small] ',
          args: {
            size: "small",
          },
        },
        {
          prefix: '[medium] ',
          args: {
            size: "medium",
          },
        },
        {
          prefix: '[large] ',
          args: {
            size: "large",
          },
        },
        {
          // postfixes the story name with ` Primary` -- eg: `Example/Button/Button Primary`.
          postfix: ' Primary',
          args: {
            primary: true,
          },
        },
        {
          // Overrides the name completely. -- eg `Example/Button/Btn primary=true`
          name: 'Btn primary=true',
          args: {
            primary: true,
          },
        },
      ],
    } satisfies SauceVisualParams<ButtonProps>,
  },
} satisfies Meta<typeof Button>;
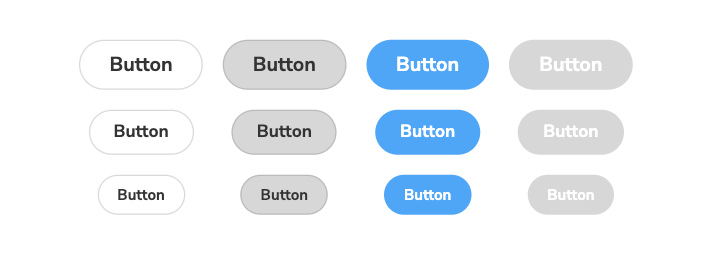
Storybook Variants Plugin
We also have a separate Storybook plugin, @saucelabs/storybook-variants, available for rendering all variants of a component in a grid to ease the testing and development process. This can be used for smaller components, but can be limited with large components or many variations. Read the full README on NPM for installation & usage.
Example
An example project is available here.