Live Cross Browser Testing
With Sauce Labs, you can perform live cross-browser testing of your web applications across a wide range of desktop browsers, operating systems, browser versions, and mobile browsers. Live testing allows you to interact with your website in real time, validate user workflows, identify browser-specific issues, and verify responsive behavior without writing automation scripts.
You can launch live testing sessions on desktop browsers, Android devices, and iOS devices using either physical devices or virtual devices, depending on your testing requirements.
Prerequisites
Before starting a live cross-browser testing session, ensure the following requirements are met:
-
You must have a valid Sauce Labs account. (Log in or sign up for a free trial license)
-
You have the URL of the website you want to test.
-
If your website is hosted on a private or internal network, configure Sauce Connect Proxy.
Select a Testing Platform
| Platform | Description |
|---|---|
| Desktop Browser | Test your website across different desktop browsers, browser versions, operating systems, and screen resolutions. |
| Mobile Browser | Test your website using native browsers running on Android and iOS on real devices or virtual devices. |
Test on a Desktop Browser
Desktop Browser Testing allows you to verify how your website behaves across different browser and operating system combinations. Before launching a session, configure the browser, operating system, screen resolution, and optional network settings.
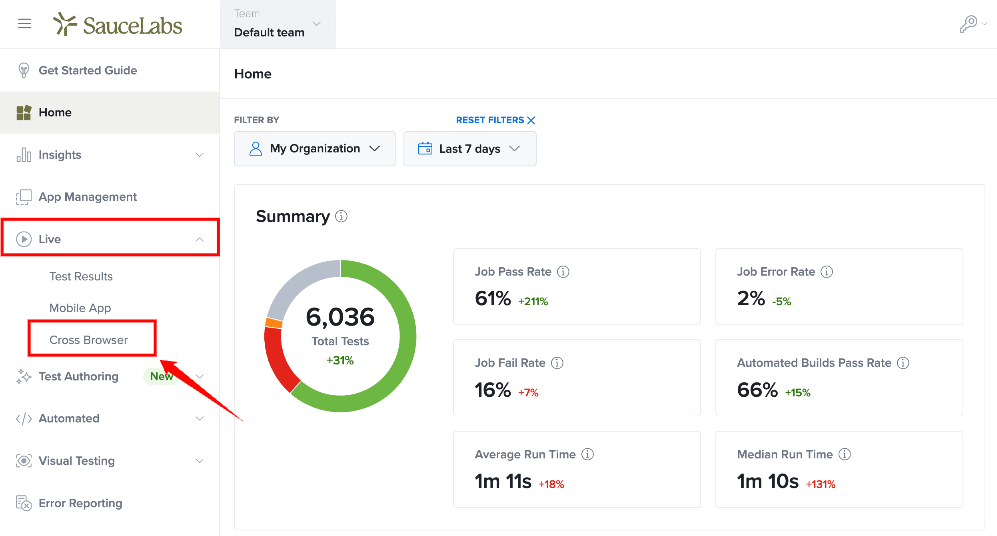
Step 1: From the left navigation menu, click Live, then select Cross Browser.
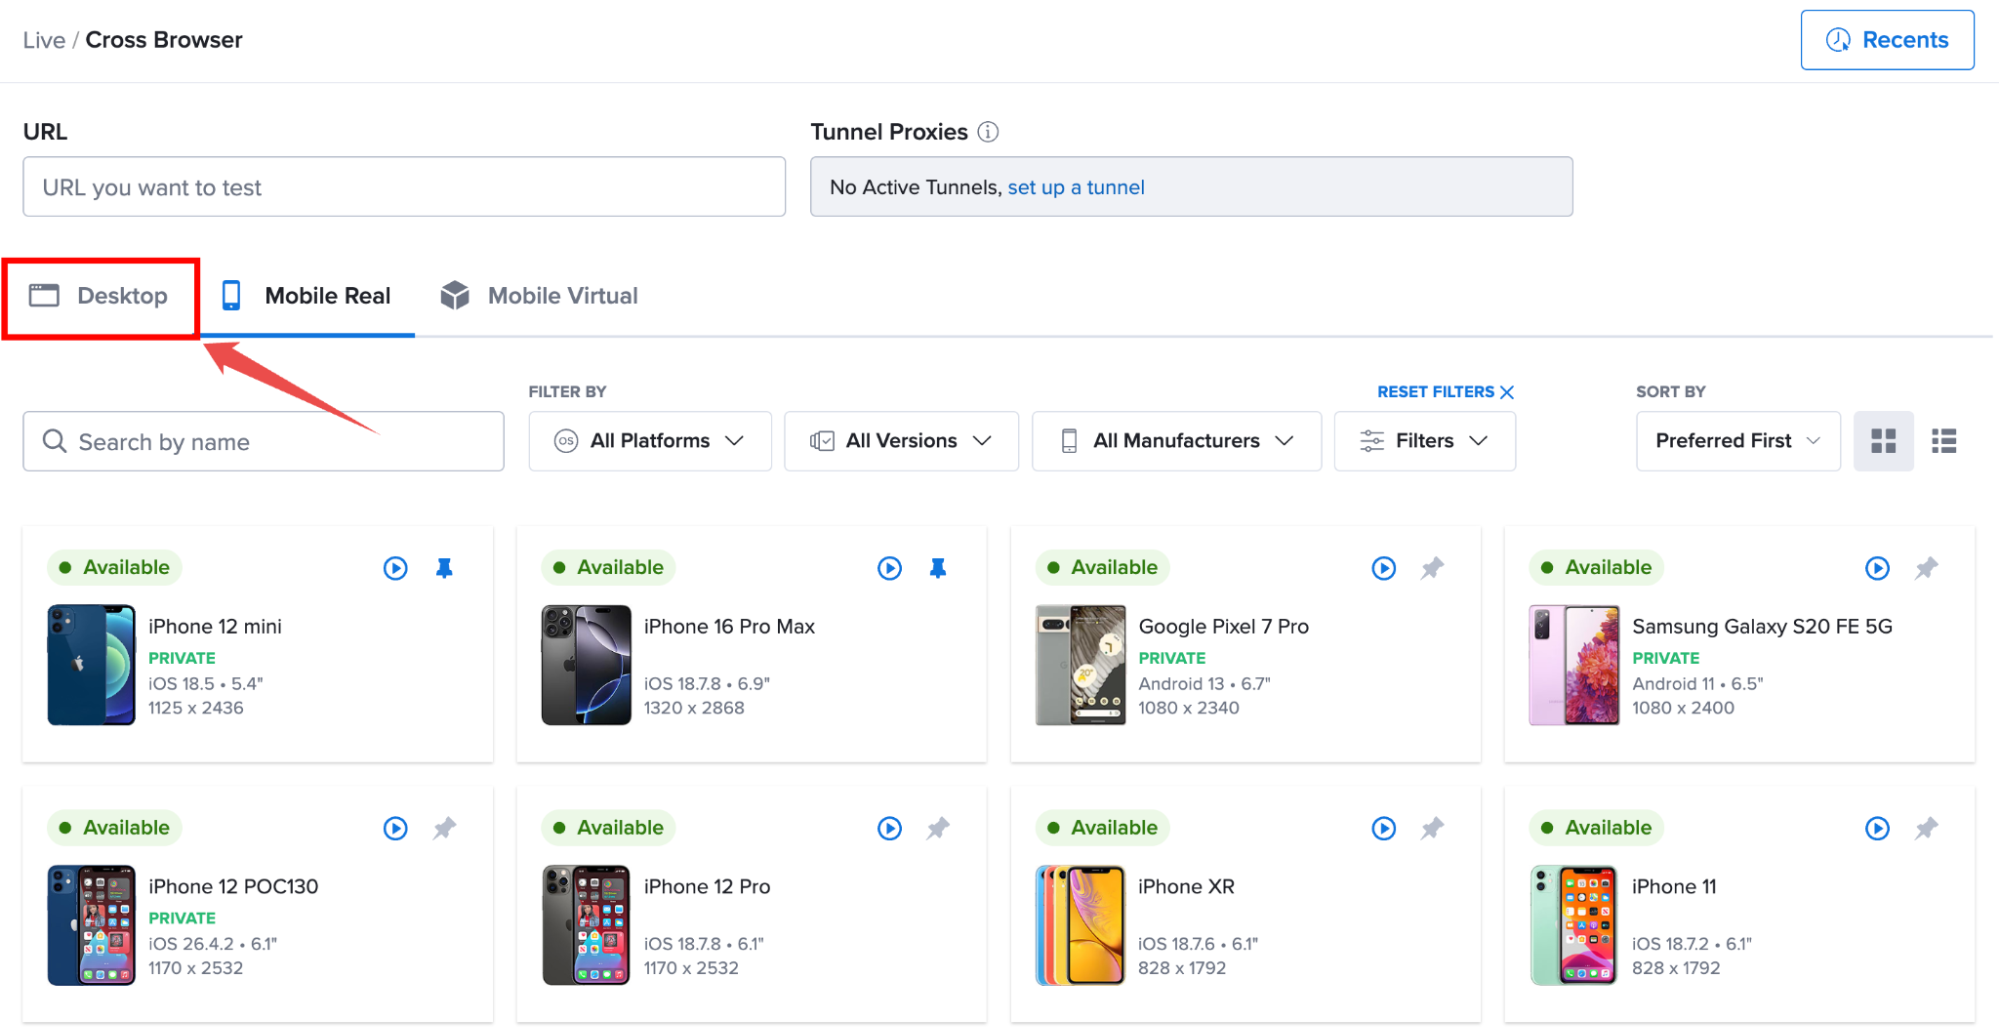
Step 2: By default, the Mobile Browser tab is displayed. Click the Desktop tab to switch to desktop browser testing.
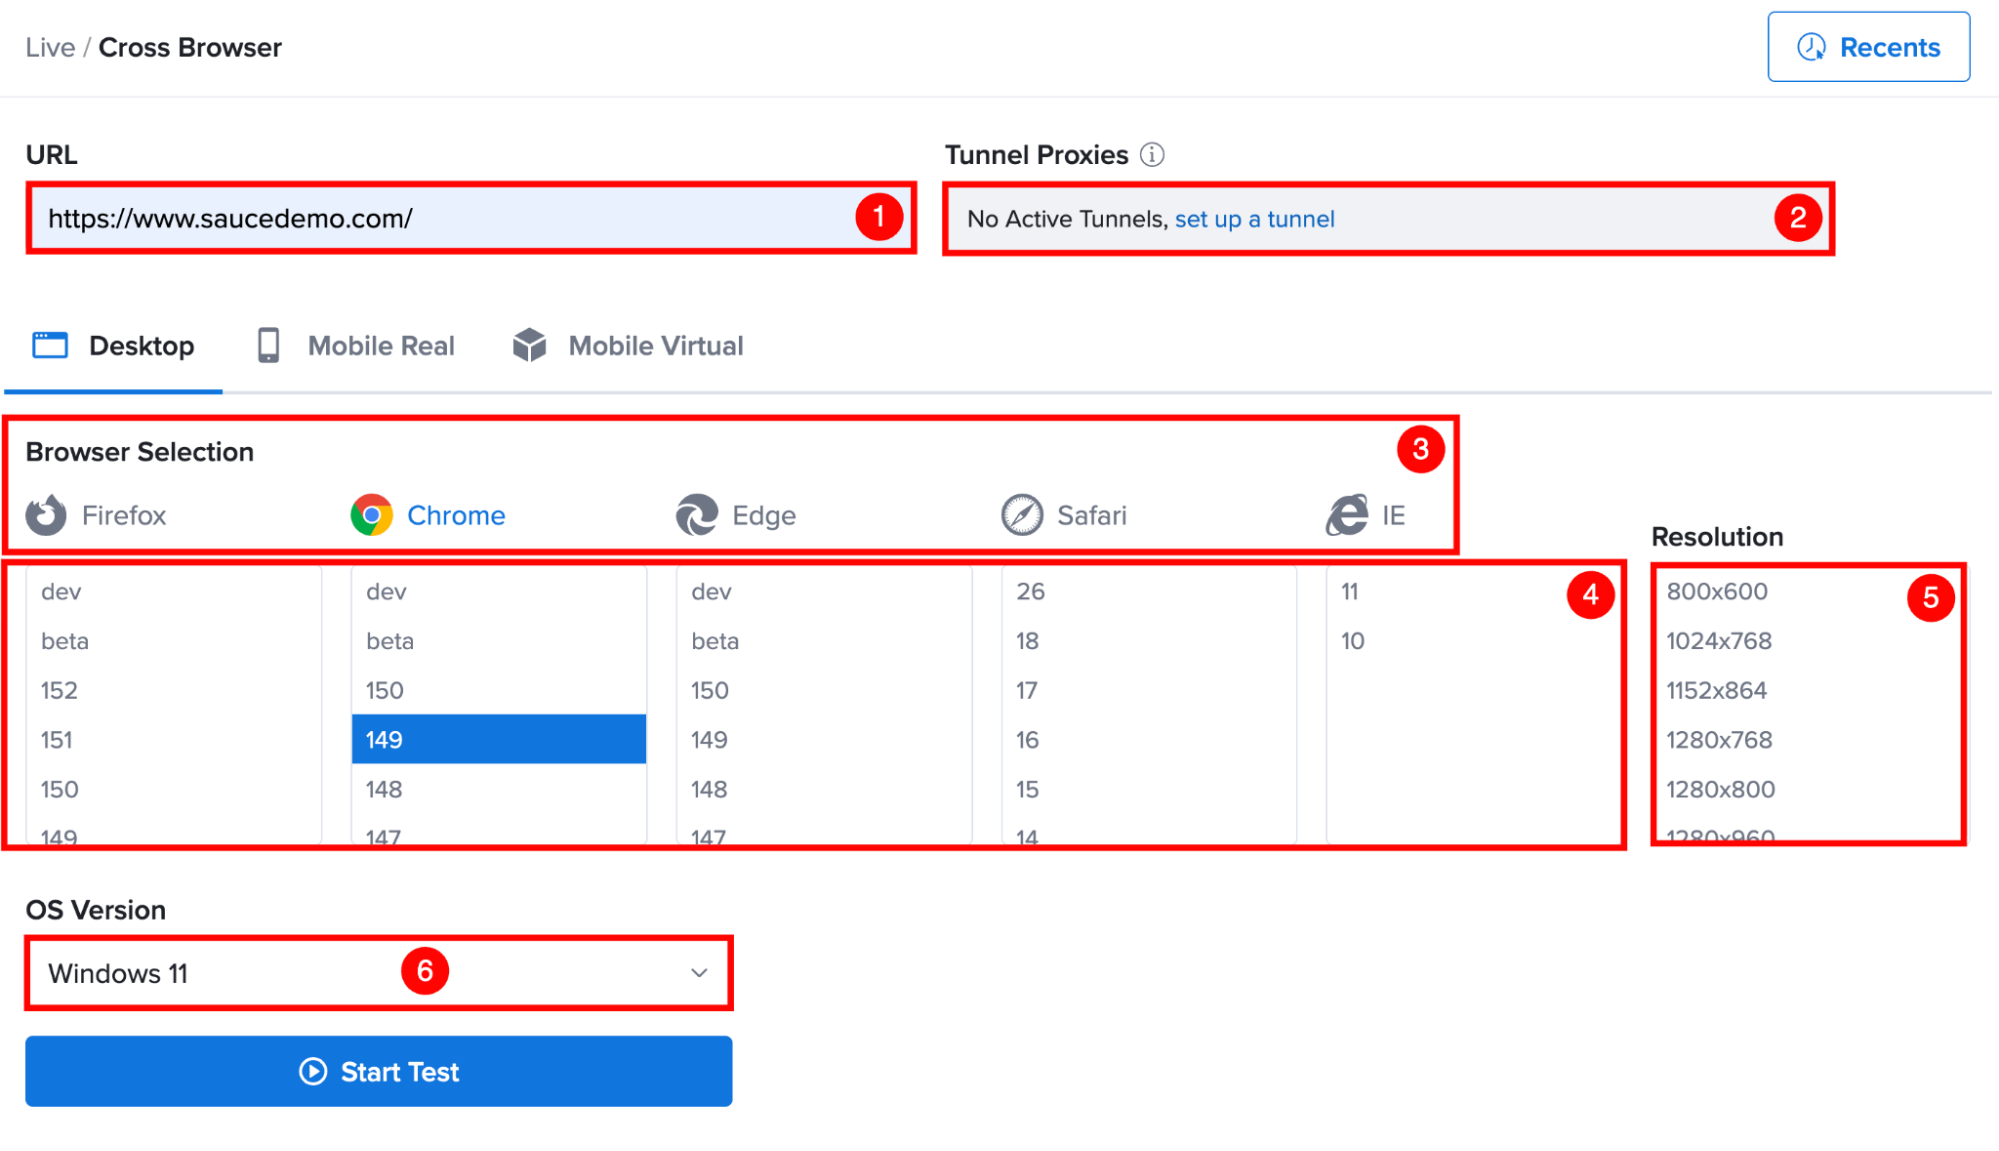
Step 3: Configure the desktop browser testing environment using the available options.
| Ref. | Setting | Description |
|---|---|---|
| 1 | Website URL | Enter the complete URL of the website or web application you want to test. |
| 2 | Sauce Connect Proxy (Optional) | Select a Sauce Sauce Connect Proxy if your website is hosted on a private network, localhost, or behind a firewall. |
| 3 | Browser Selection | Select the browser you want to use during the live testing session. |
| 4 | Browser Version | Select the browser version to validate compatibility with different browser releases. |
| 5 | Operating System | Select the operating system on which the browser will run. |
| 6 | Screen Resolution | Select the screen resolution to verify how your website renders on different desktop display sizes. |
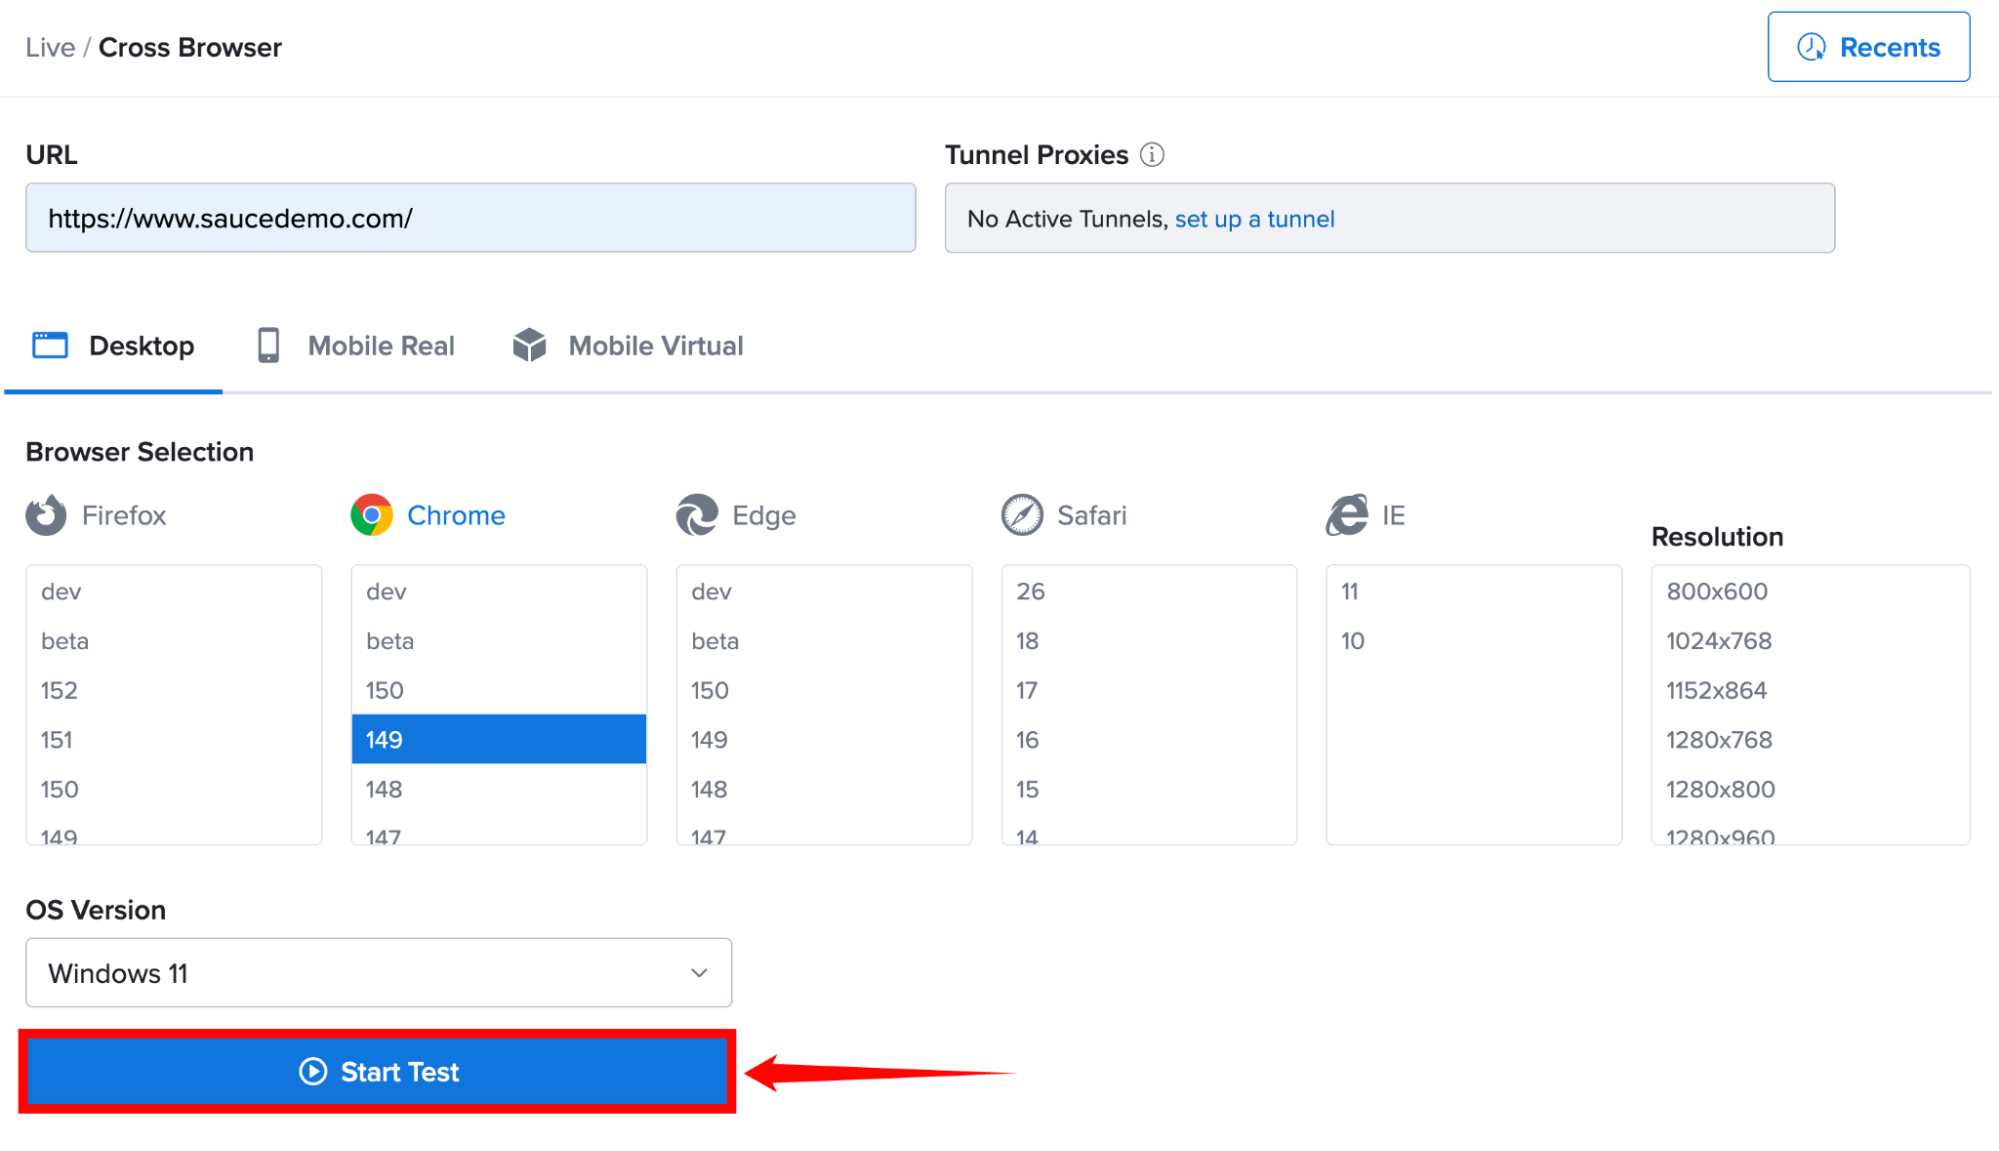
Step 4: After configuring the required settings, click Start Test.
A loading screen is displayed while Sauce Labs provisions the selected browser environment. Once initialization is complete, the website automatically opens in a live browser testing session.
Test on a Mobile Browser
Mobile Browser Testing allows you to validate websites using the native browsers available on Android and iOS devices. Depending on your testing requirements, you can run tests on either physical devices or virtual devices.
If your website is hosted on a private or internal network, configure Sauce Connect Proxy before launching the testing session.
Before launching a mobile browser session, choose the type of device you want to use.
| Device Type | Description |
|---|---|
| Real Devices | Launches the website on a physical Android or iOS device hosted by Sauce Labs. This option is recommended when validating real-world browser behavior and hardware interactions. |
| Virtual Devices | Launches the website on an Android Emulator or iOS Simulator. Virtual devices support functional testing and quick browser validation without requiring physical hardware. |
Real Devices
Use this method to launch a live browser testing session on a physical Android or iOS device.
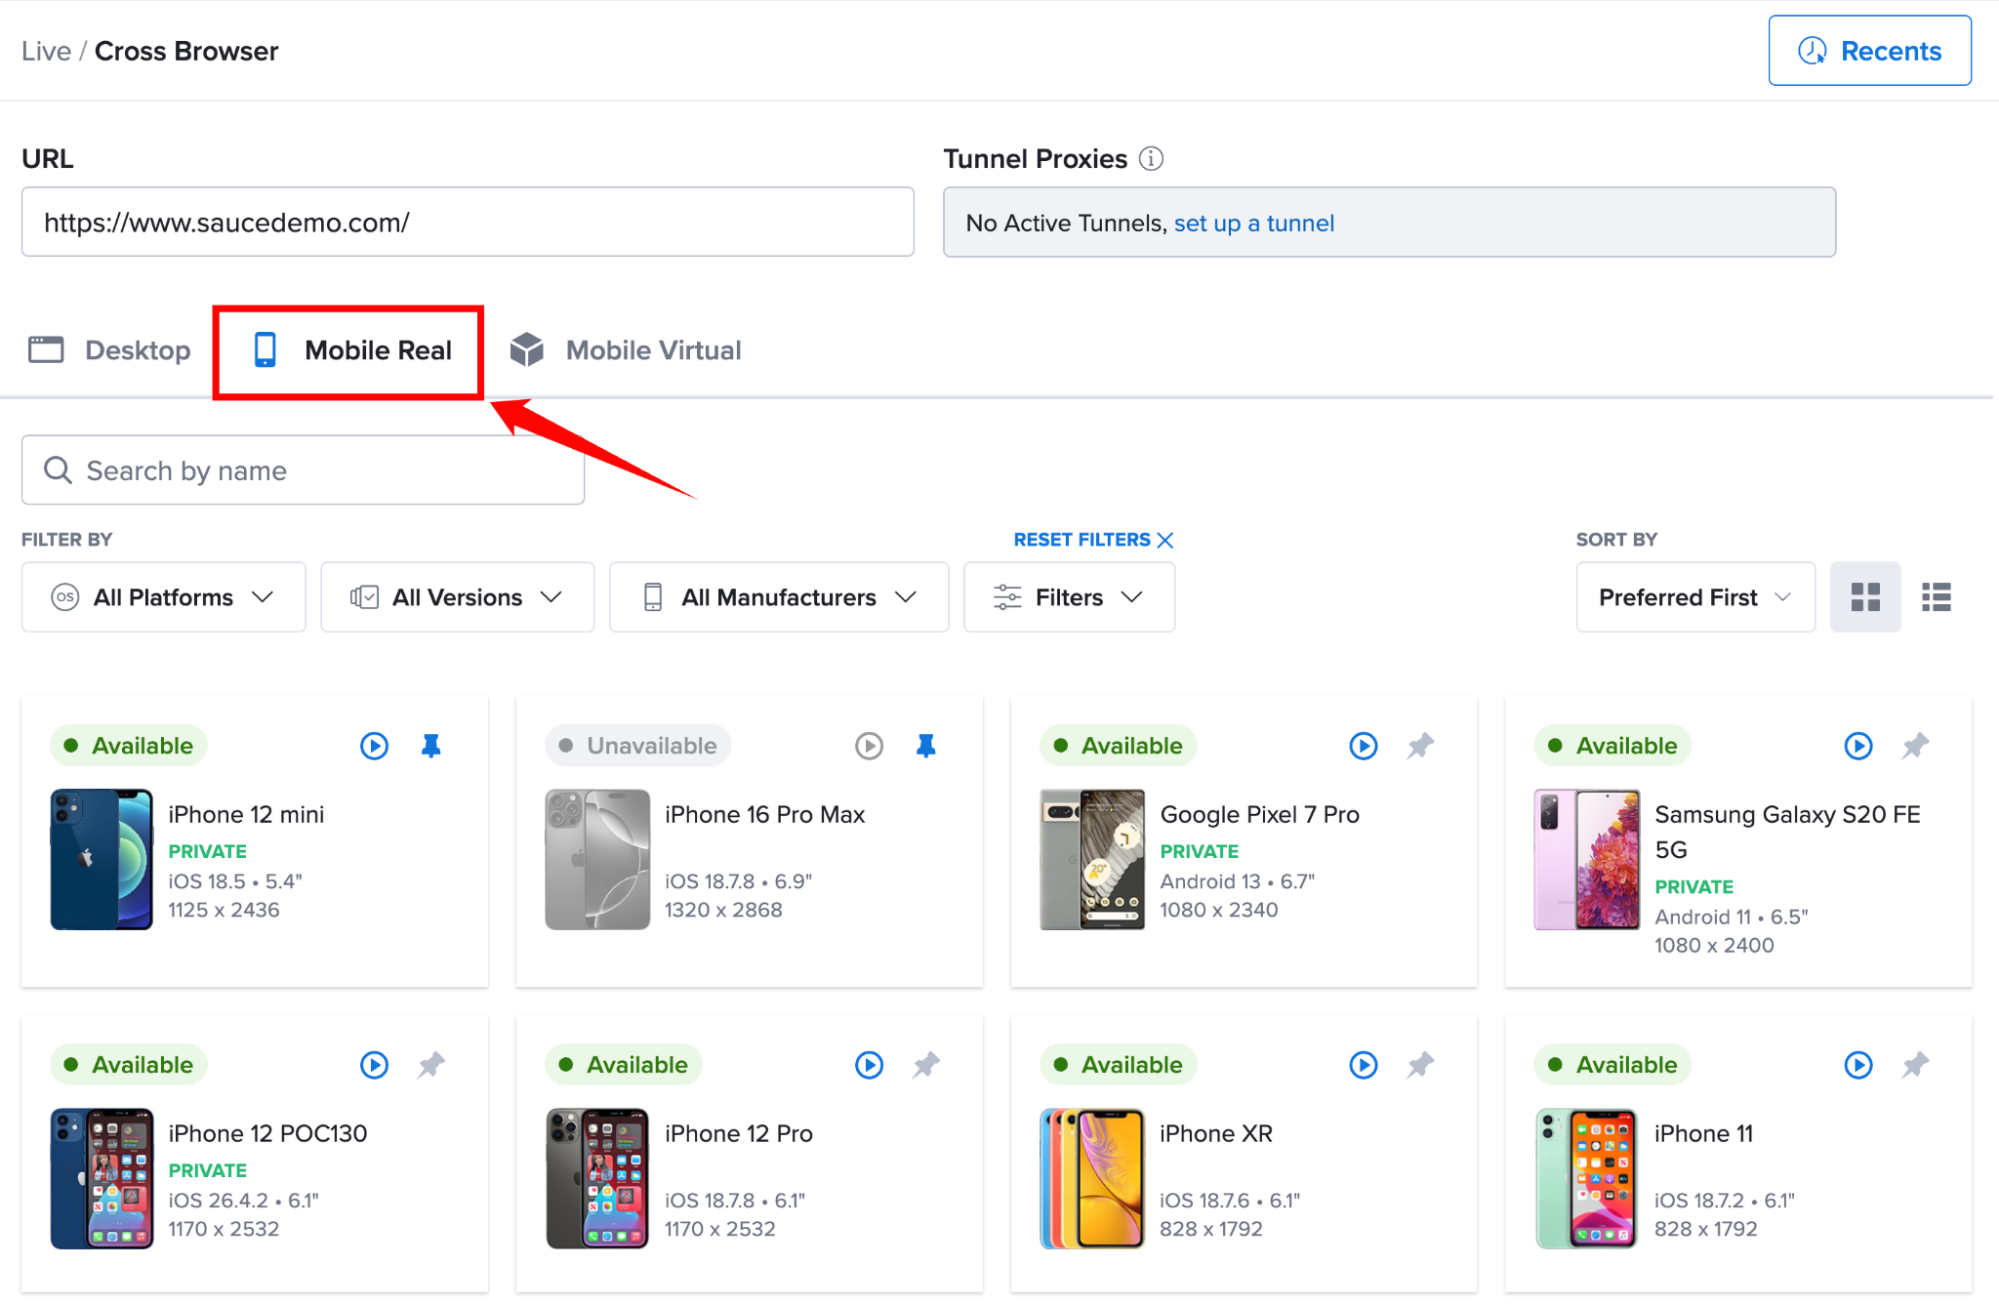
Step 1: From the Cross Browser page, click the Mobile Real tab to display the list of available physical devices.
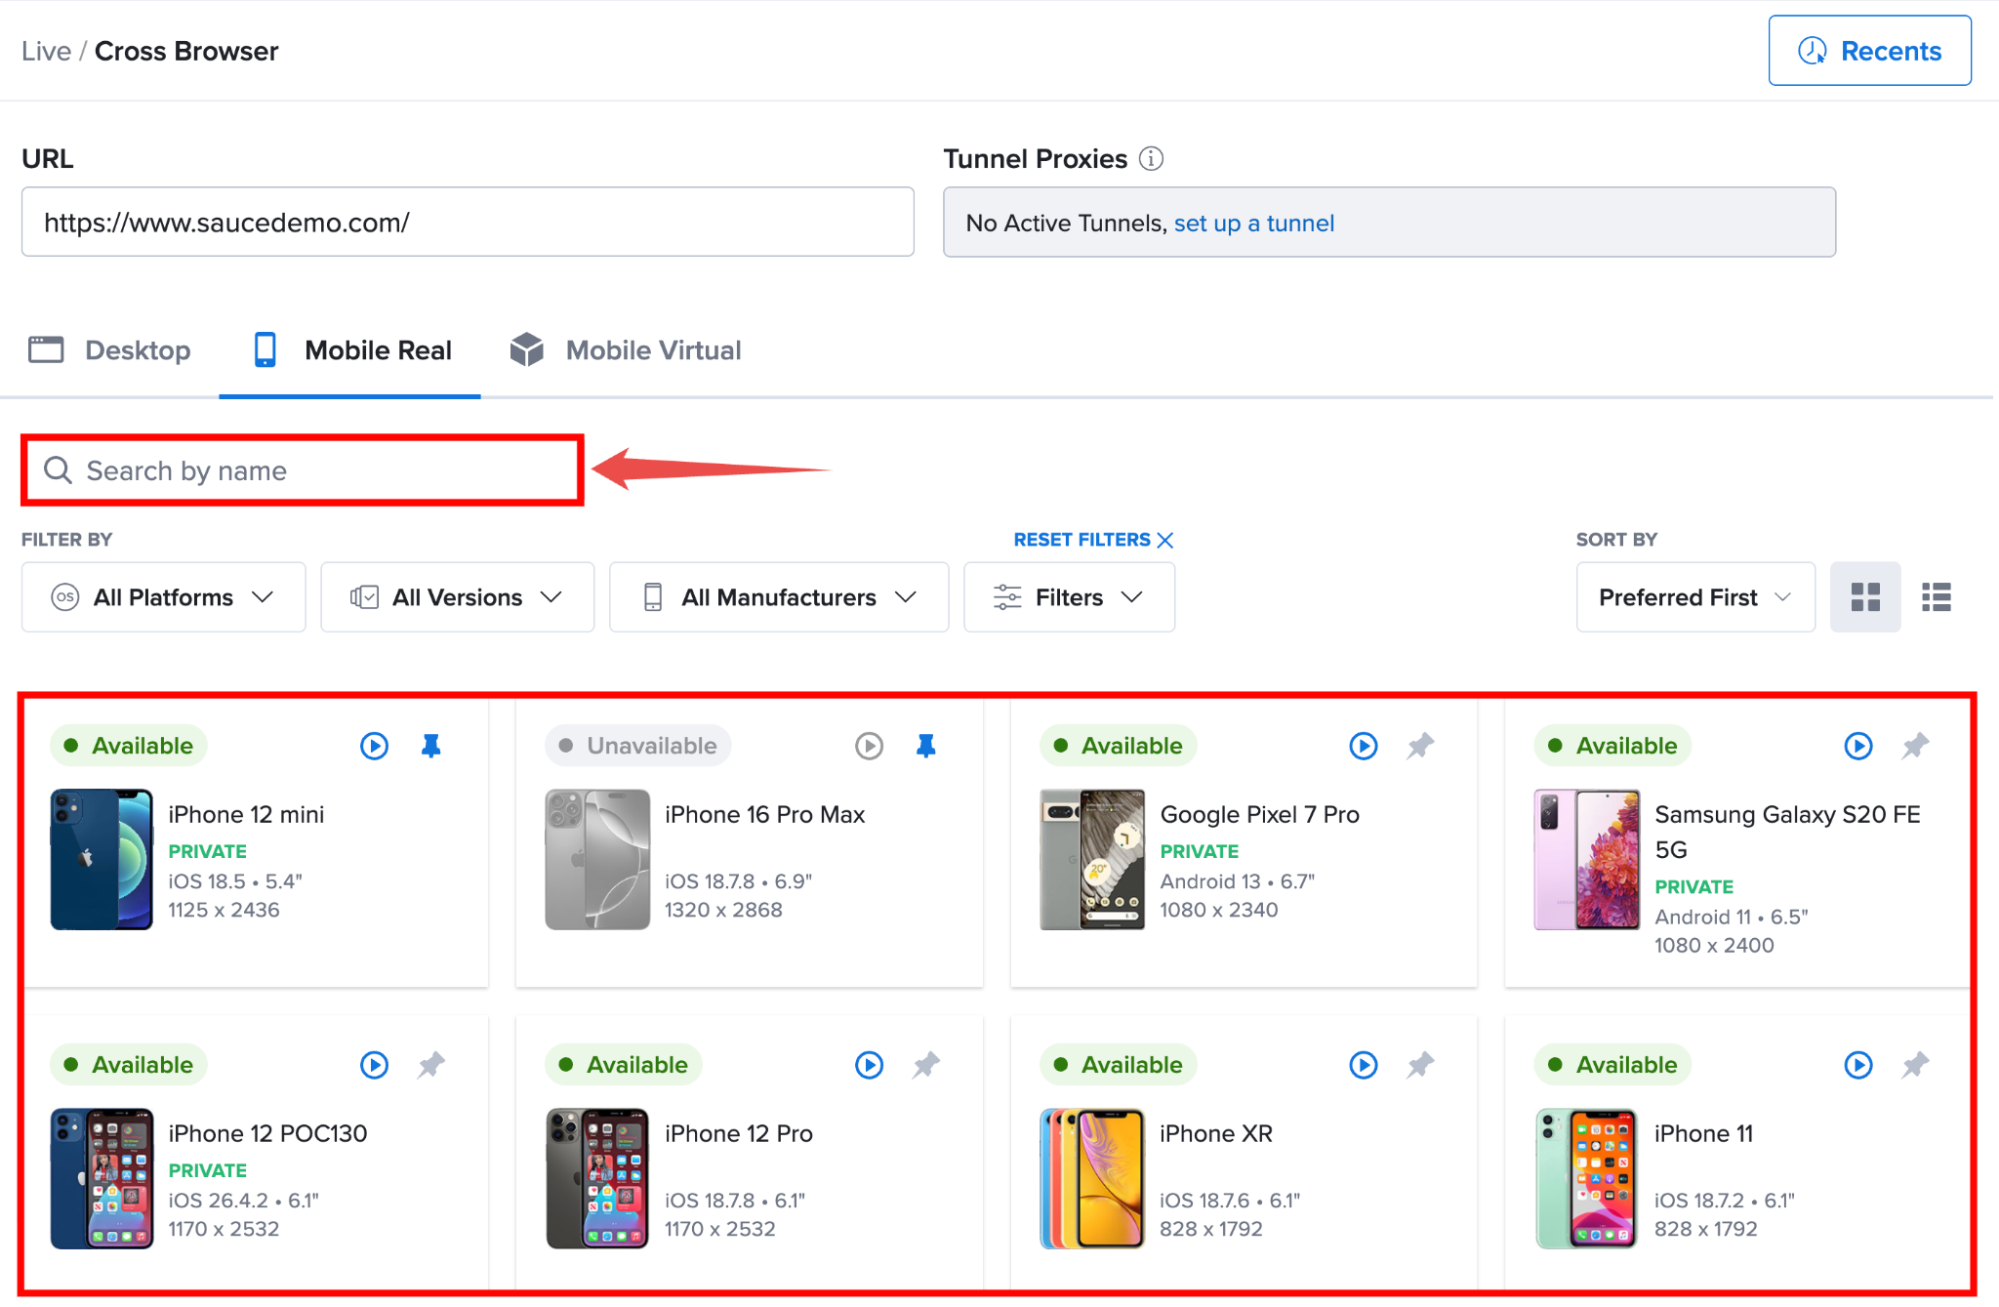
Step 2: Browse the available devices using the device grid, or use the Search box and available filters to locate a specific device.
Review the device information, including:
- Device model
- Operating system version
- Availability
After you find the required device, select it from the device grid.
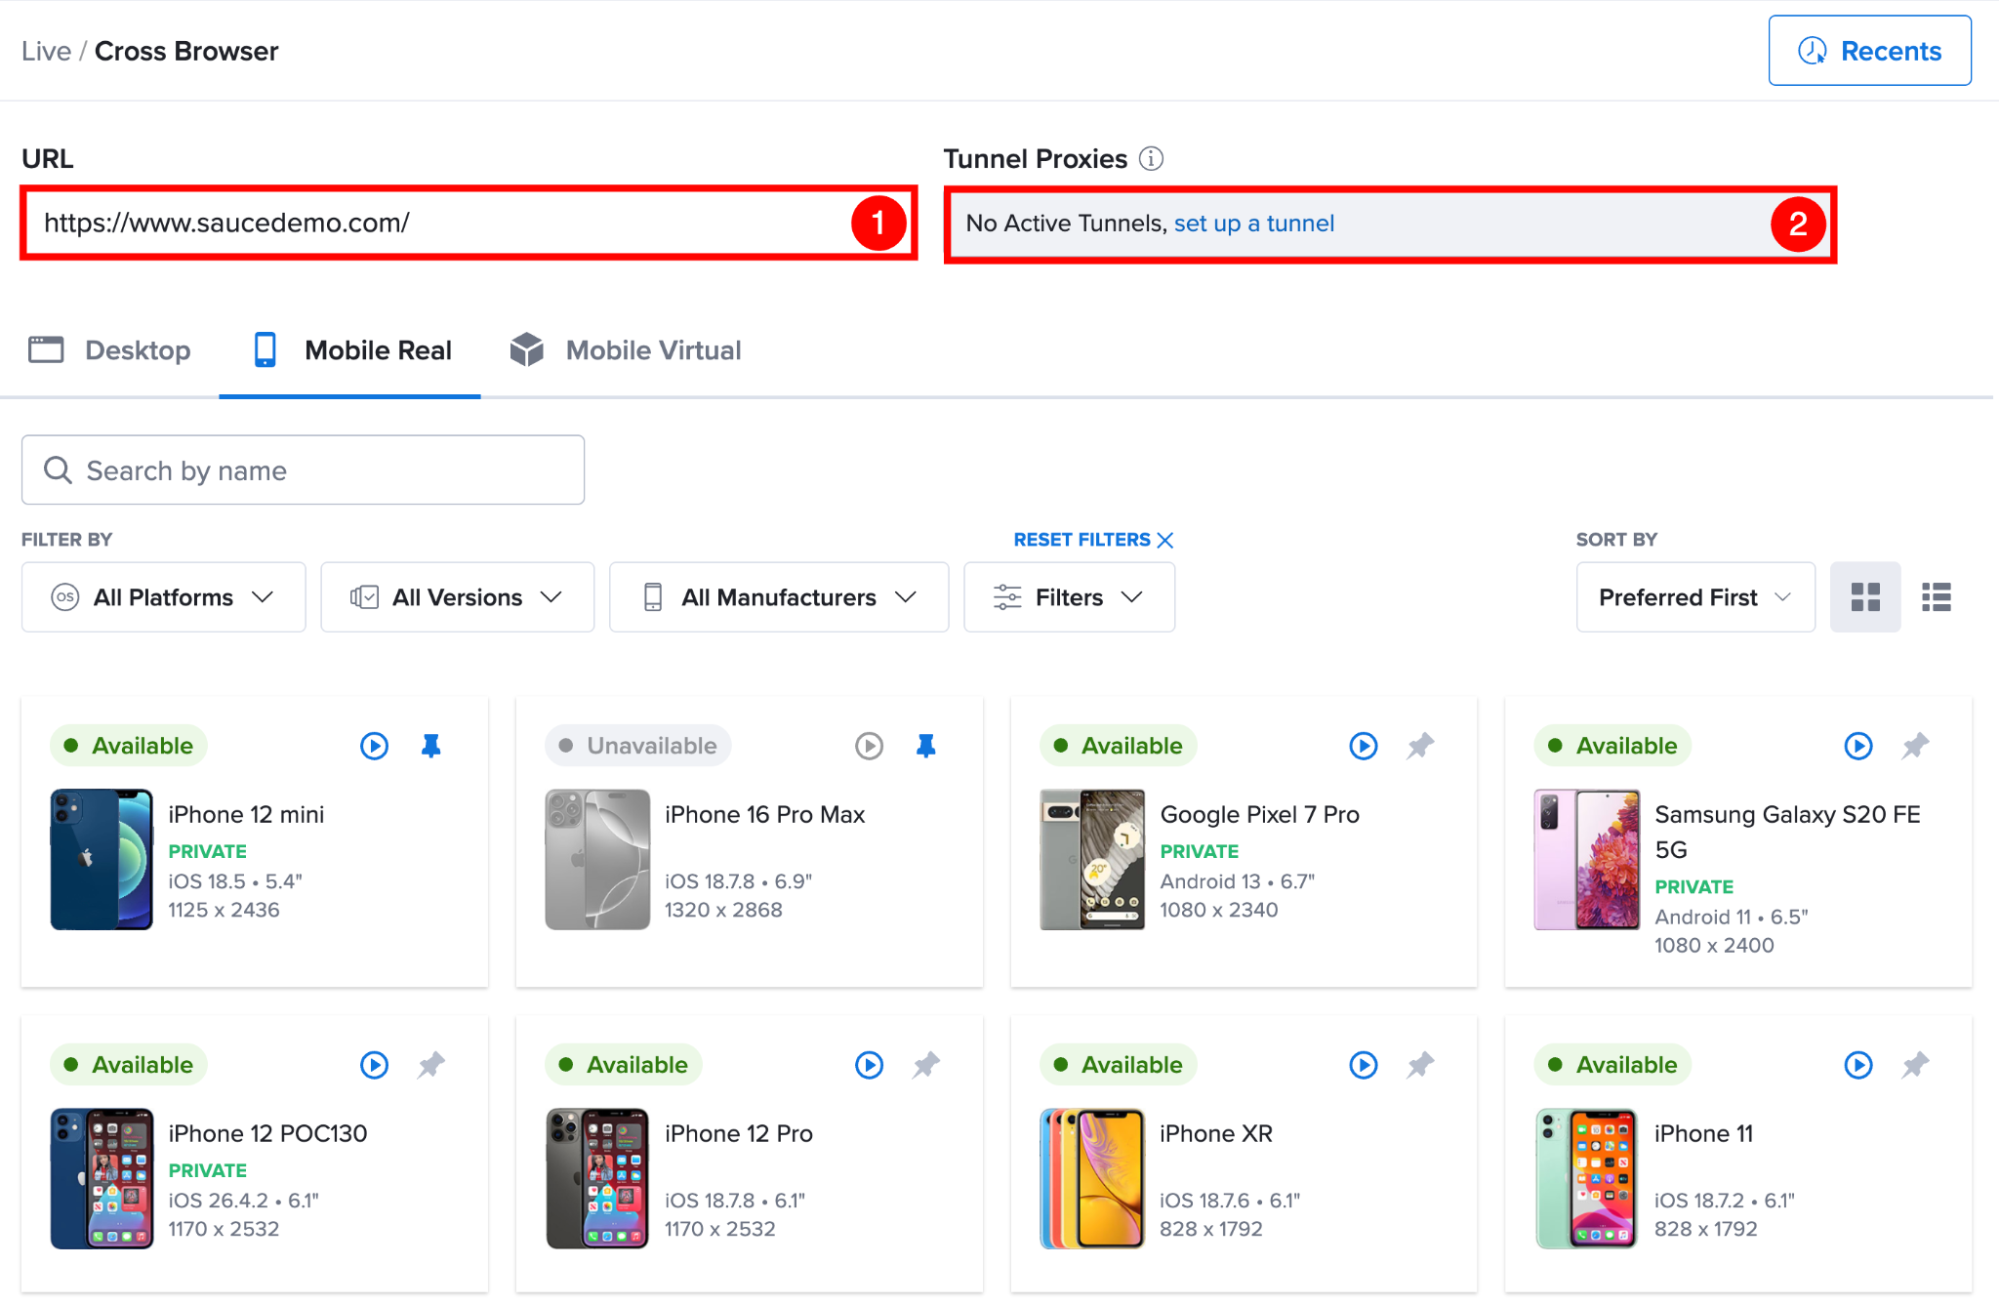
Step 3: Configure the testing session.
| Ref. | Setting | Description |
|---|---|---|
| 1 | Website URL | Enter the URL of the website you want to test. |
| 2 | Sauce Connect Proxy (Optional) | Select the Sauce Connect Proxy tunnel if the website is hosted on a private network. |
Step 4: After you have selected a device and verified its details, start the live testing session using one of the following methods:
-
Hover over the device in the grid and then click Start Test.
-
Click the device card to open the Device Details page. On the Details screen, click Start Test.
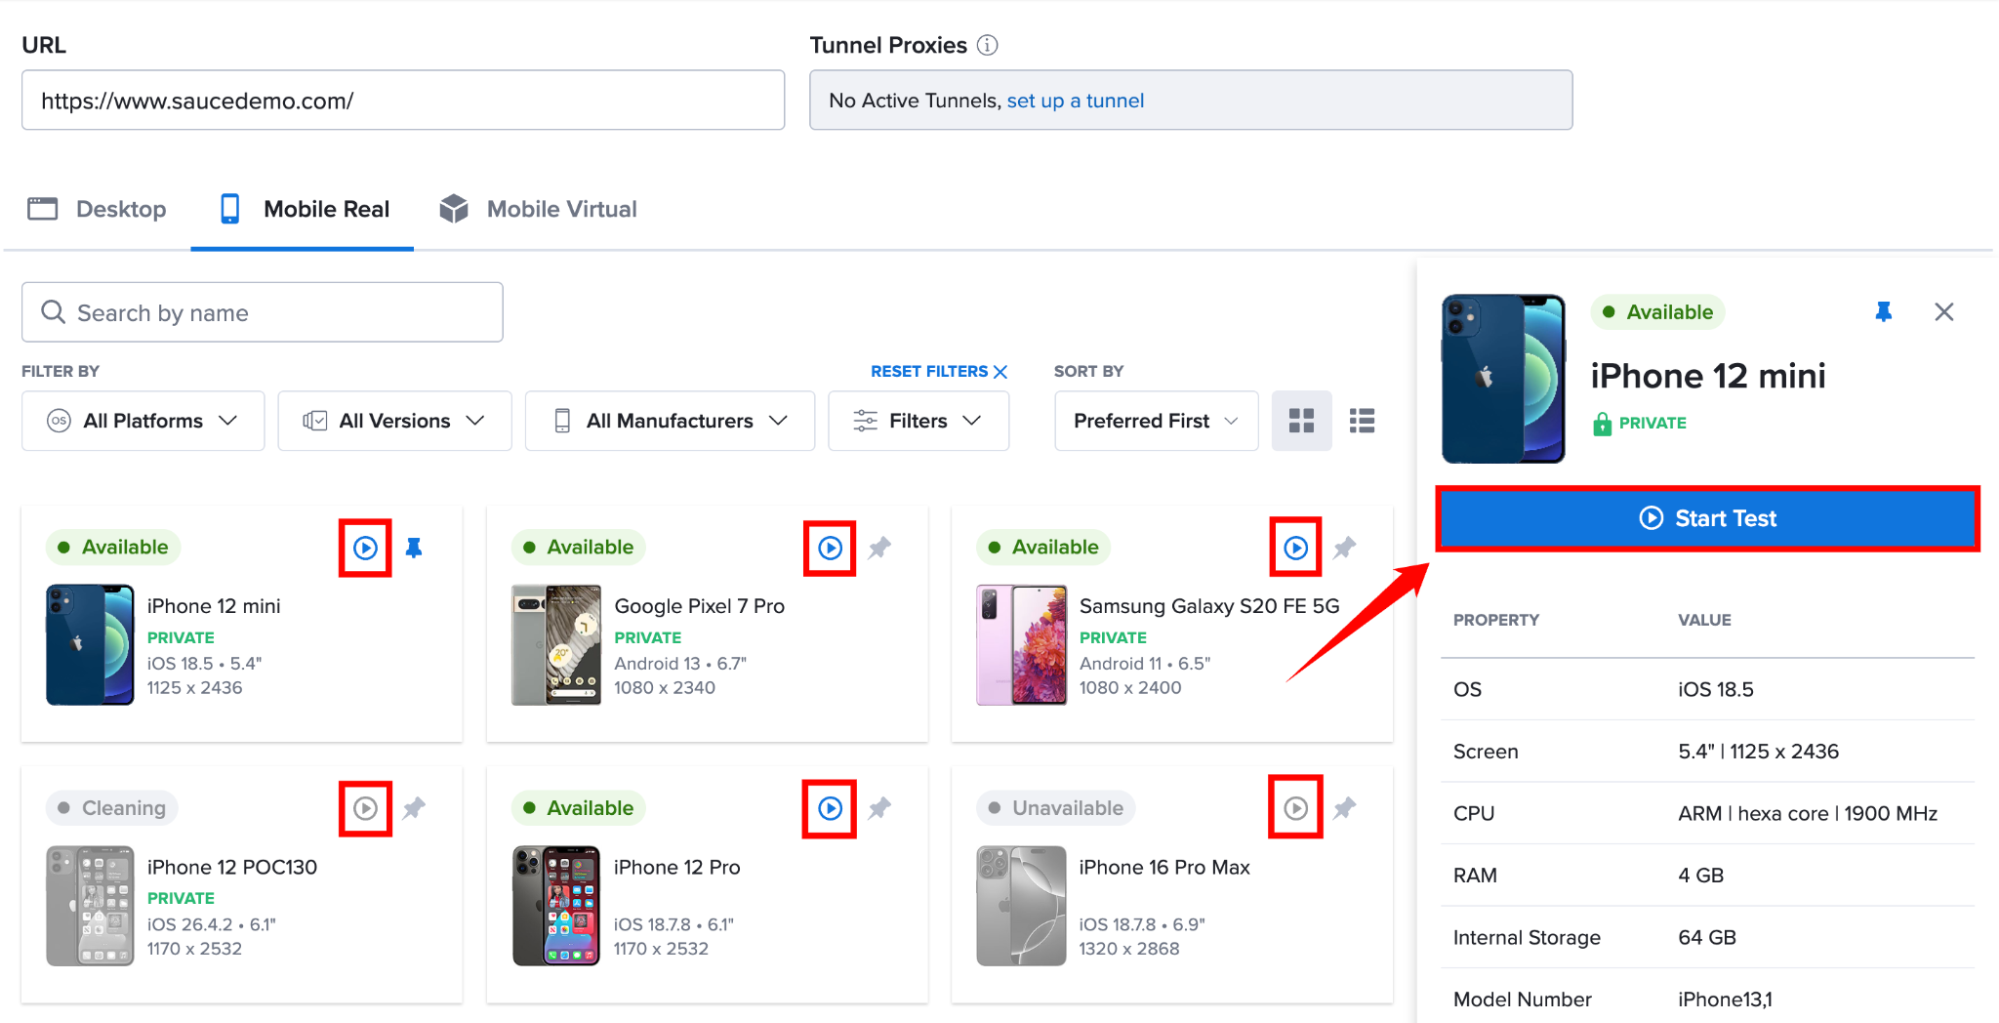
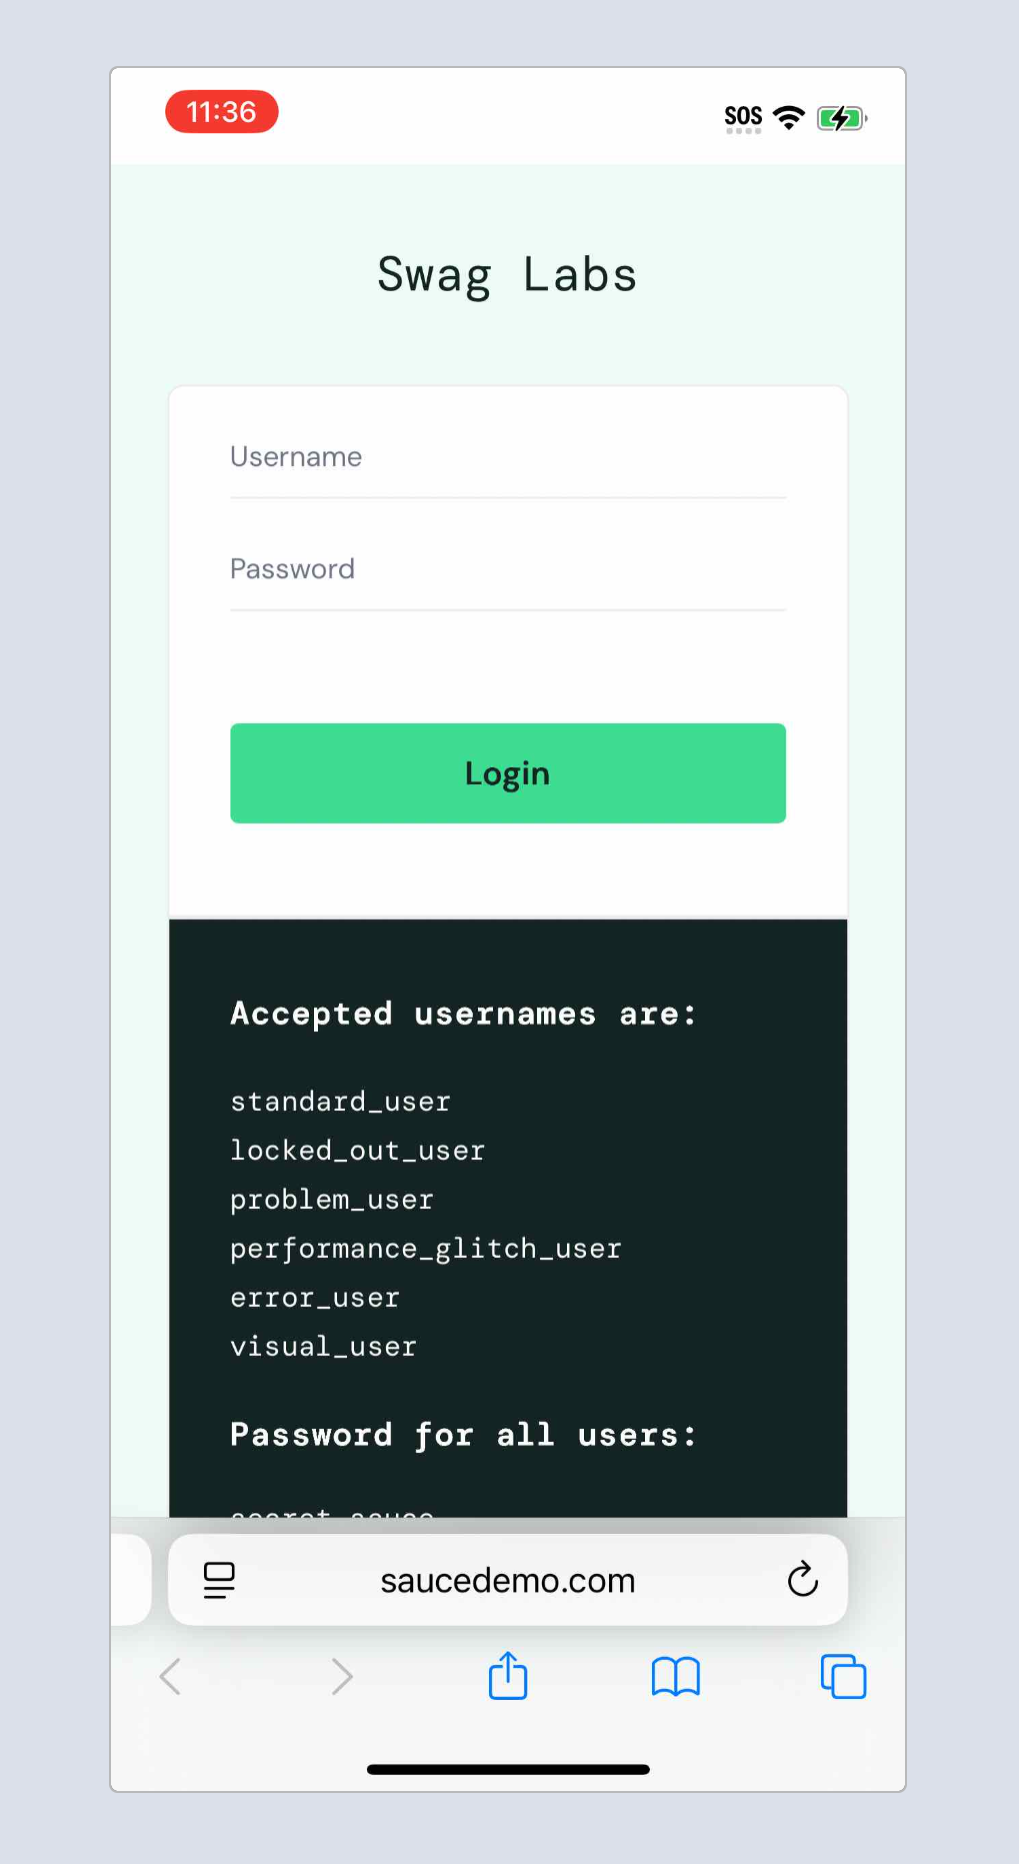
Step 5: After the device is ready, the website automatically launches in the device's native browser, allowing you to begin testing immediately.
Virtual Devices
Use this method to launch a live browser testing session using an Android Emulator or an iOS Simulator.
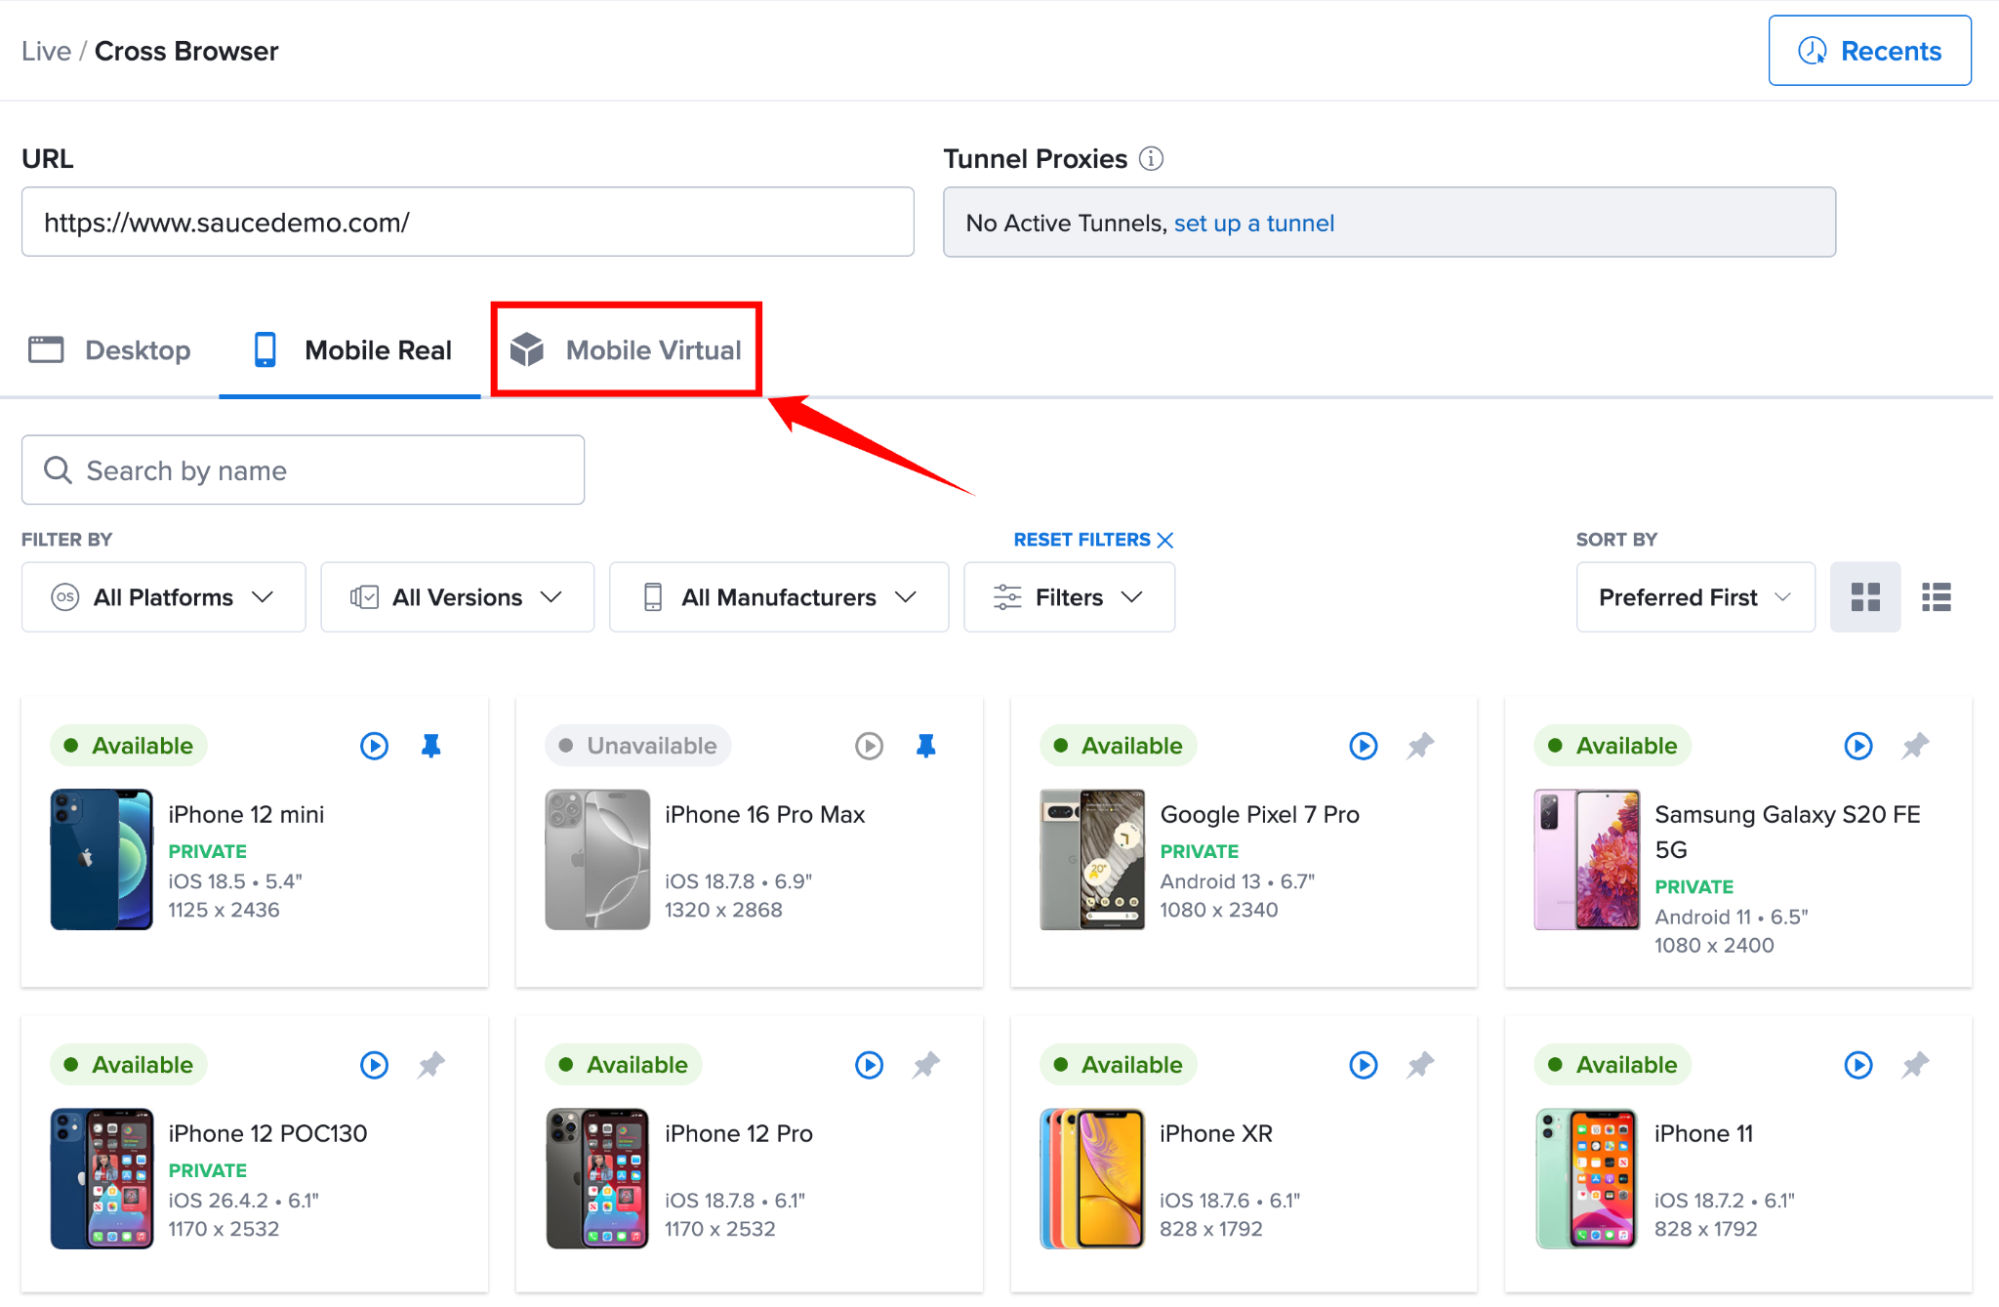
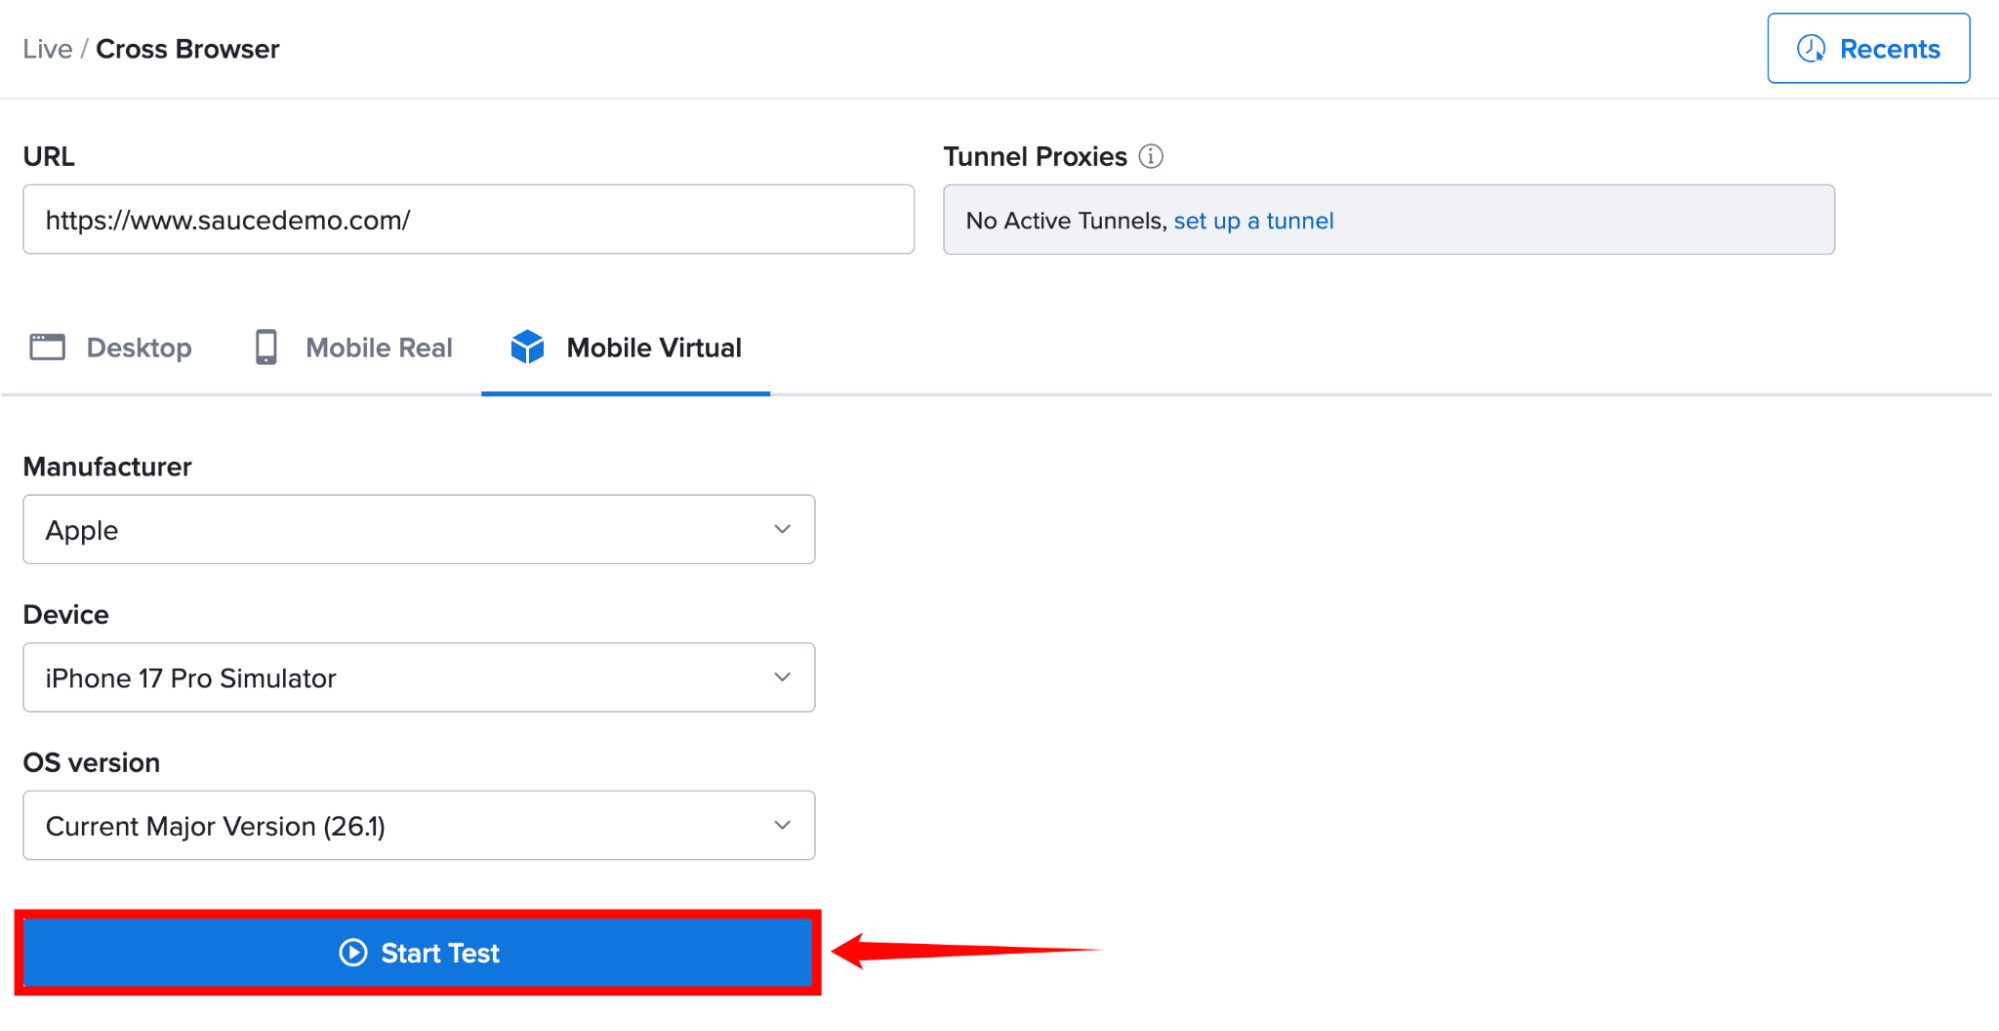
Step 1: From the Cross Browser page, click the Mobile Virtual tab to display the available Android Emulators and iOS Simulators.
Step 2: Configure your testing environment by selecting the required platform, operating system version, and virtual device model from the available dropdown lists.
| Ref. | Field | Description |
|---|---|---|
| 1 | Manufacturer | Select the device manufacturer for the virtual device (for example, Google or Samsung). |
| 2 | Device | Select the virtual device model you want to use for testing. |
| 3 | OS Version | Select the operating system version for the virtual device. |
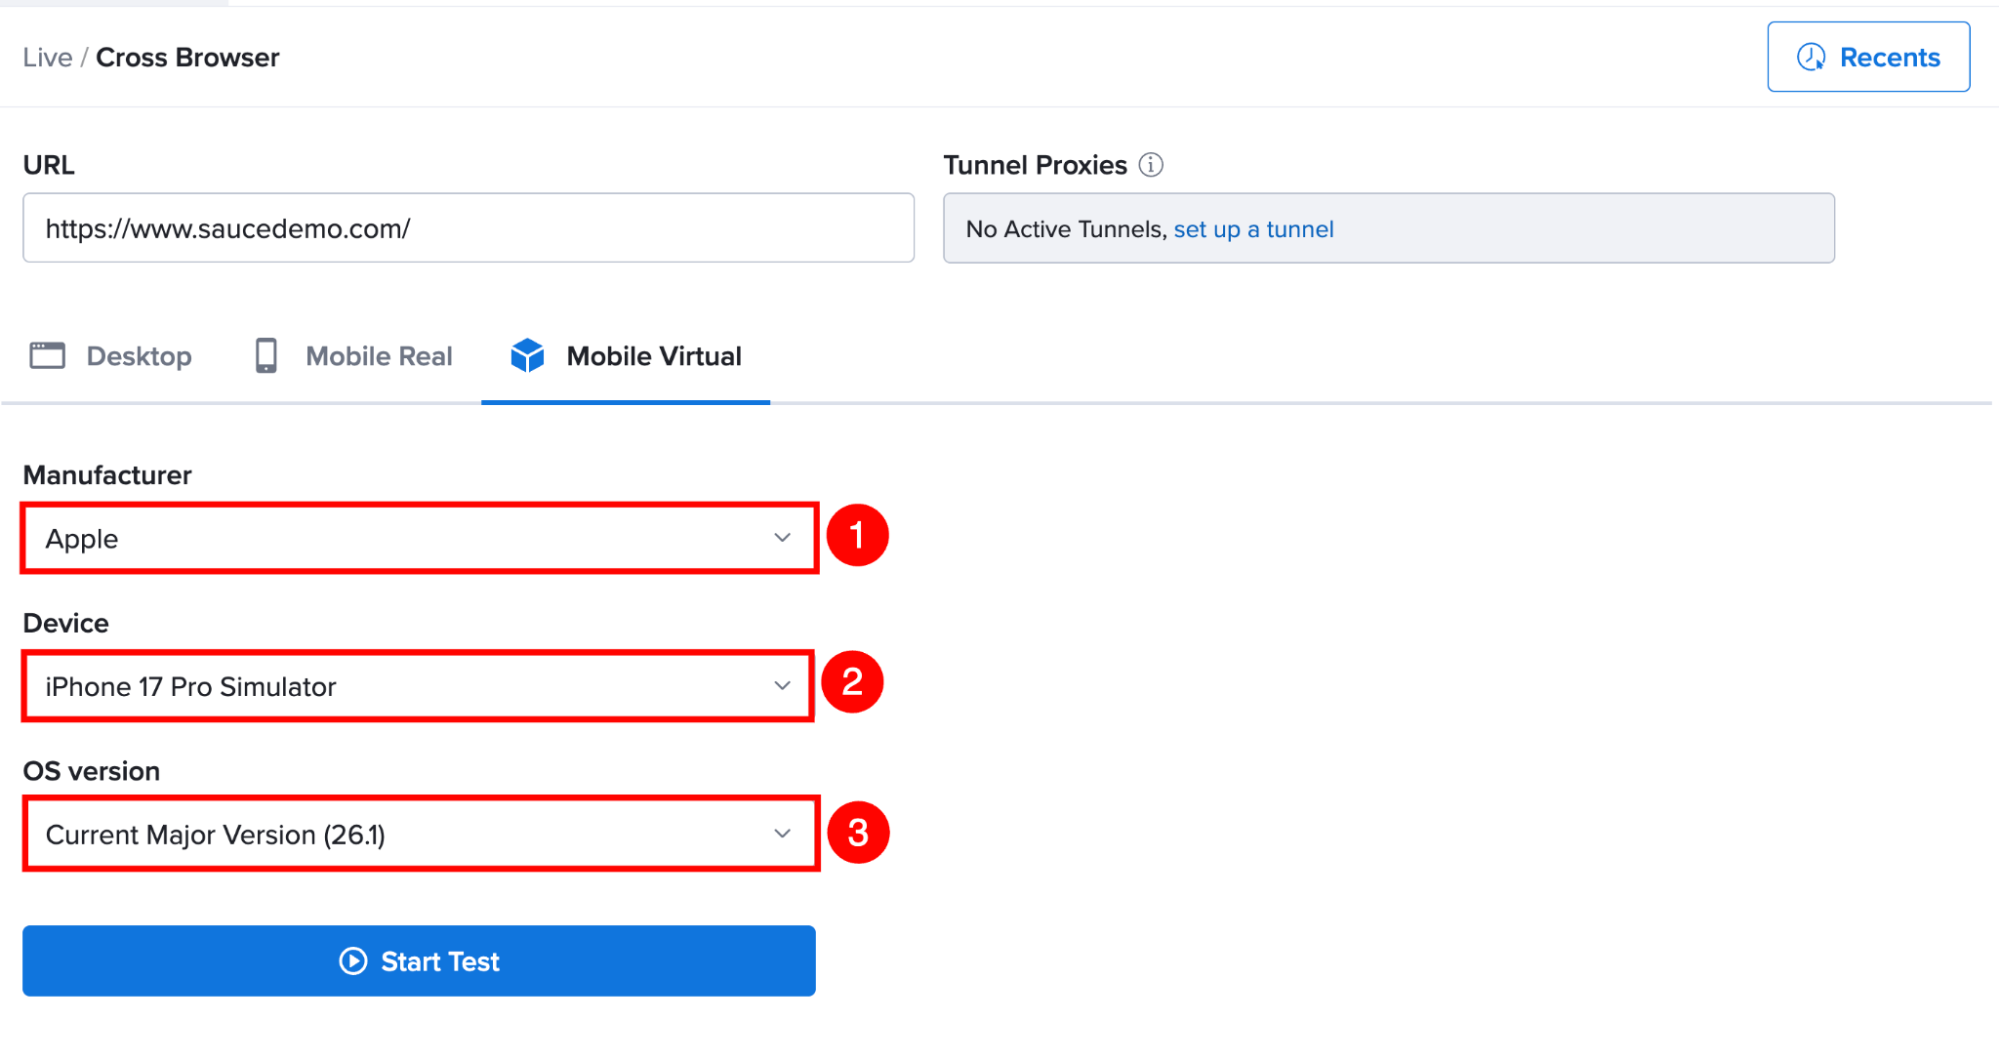
Step 3: Click Start Test. Sauce Labs provisions the selected virtual device and launches the website automatically once initialization is complete.
Step 2: After the device is ready, the website automatically launches in the device's native browser, allowing you to begin testing immediately.
Live Testing Interface
Sauce Labs provides different testing interfaces depending on the platform and device type you are using. Each interface includes controls that help you interact with the browser or device during a live testing session.
Desktop Browser Interface
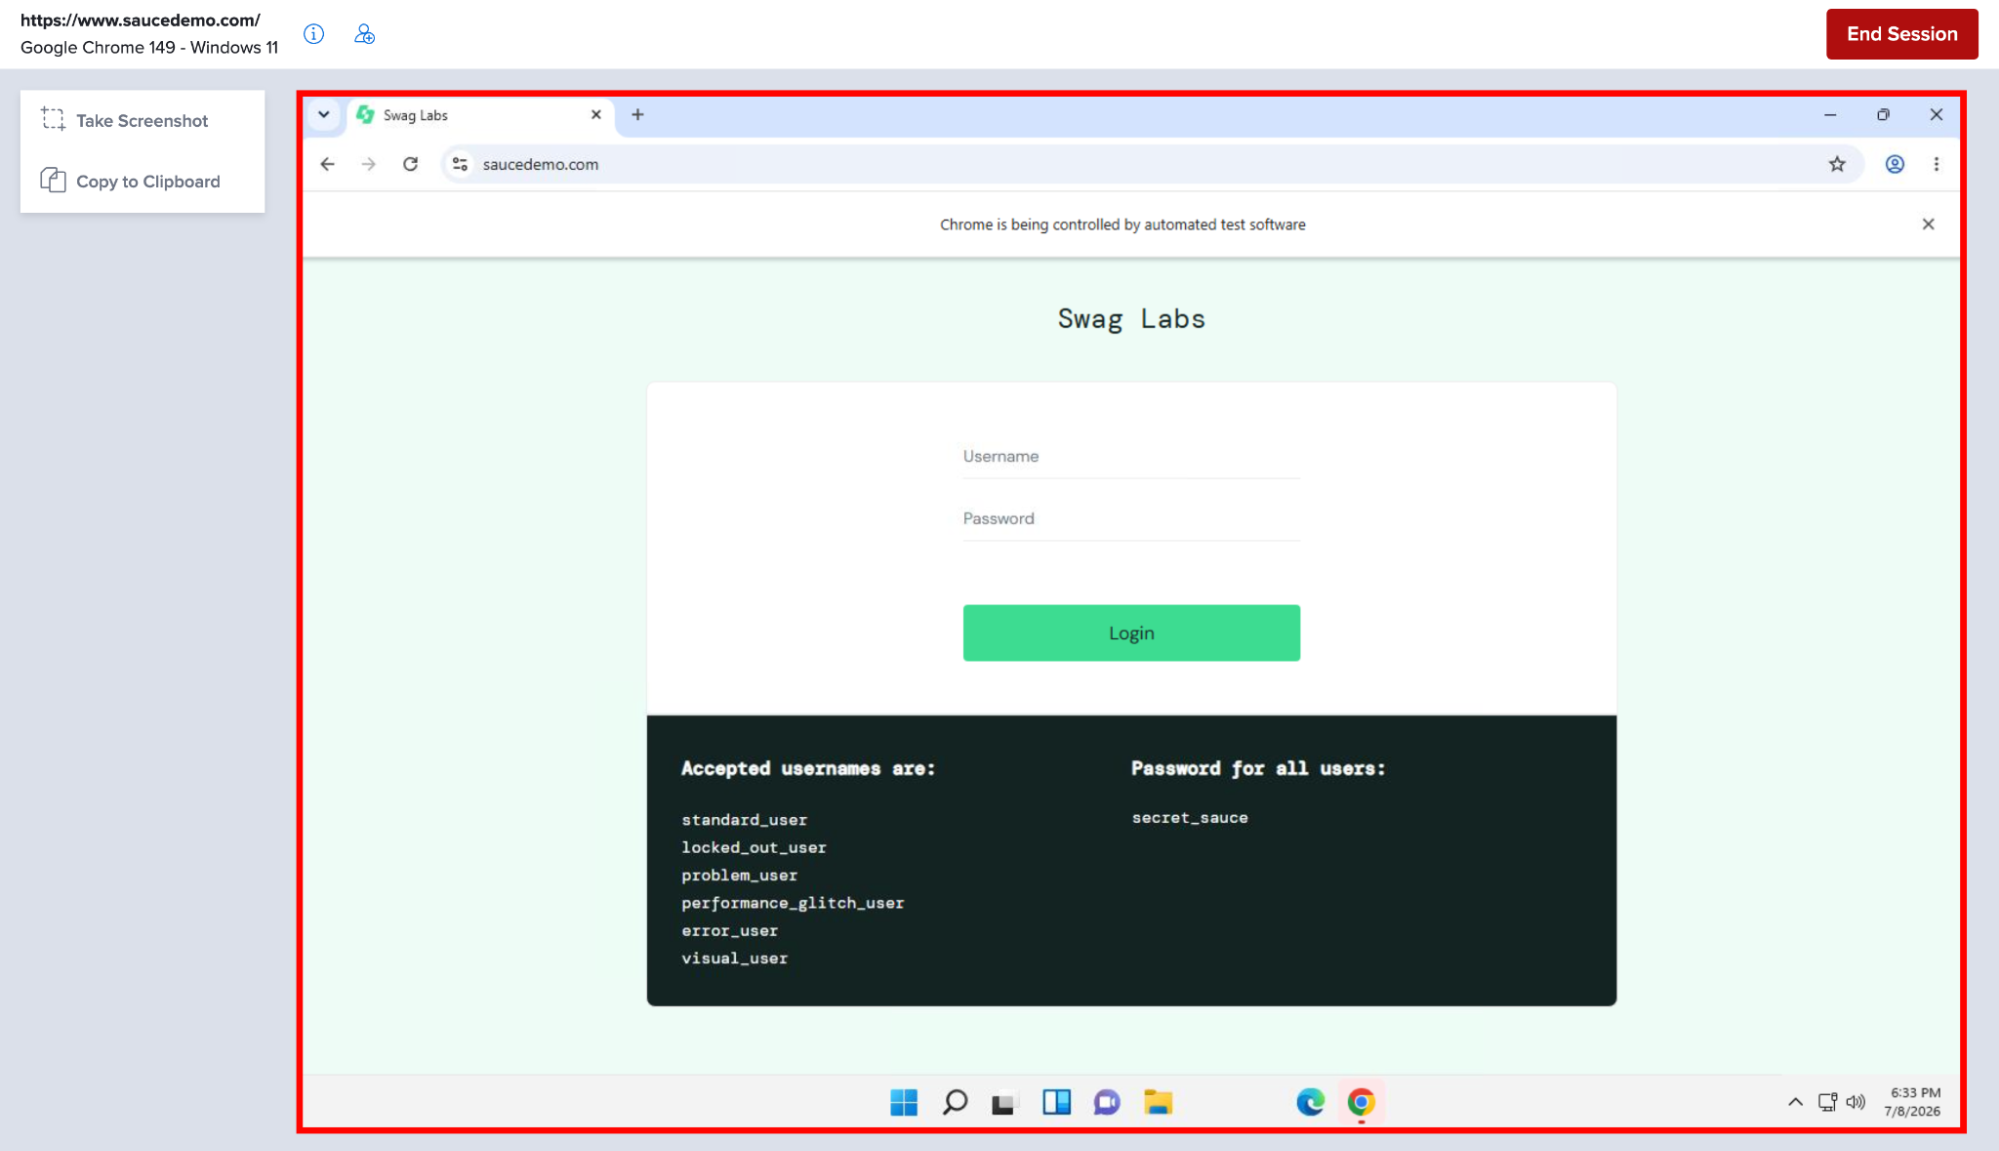
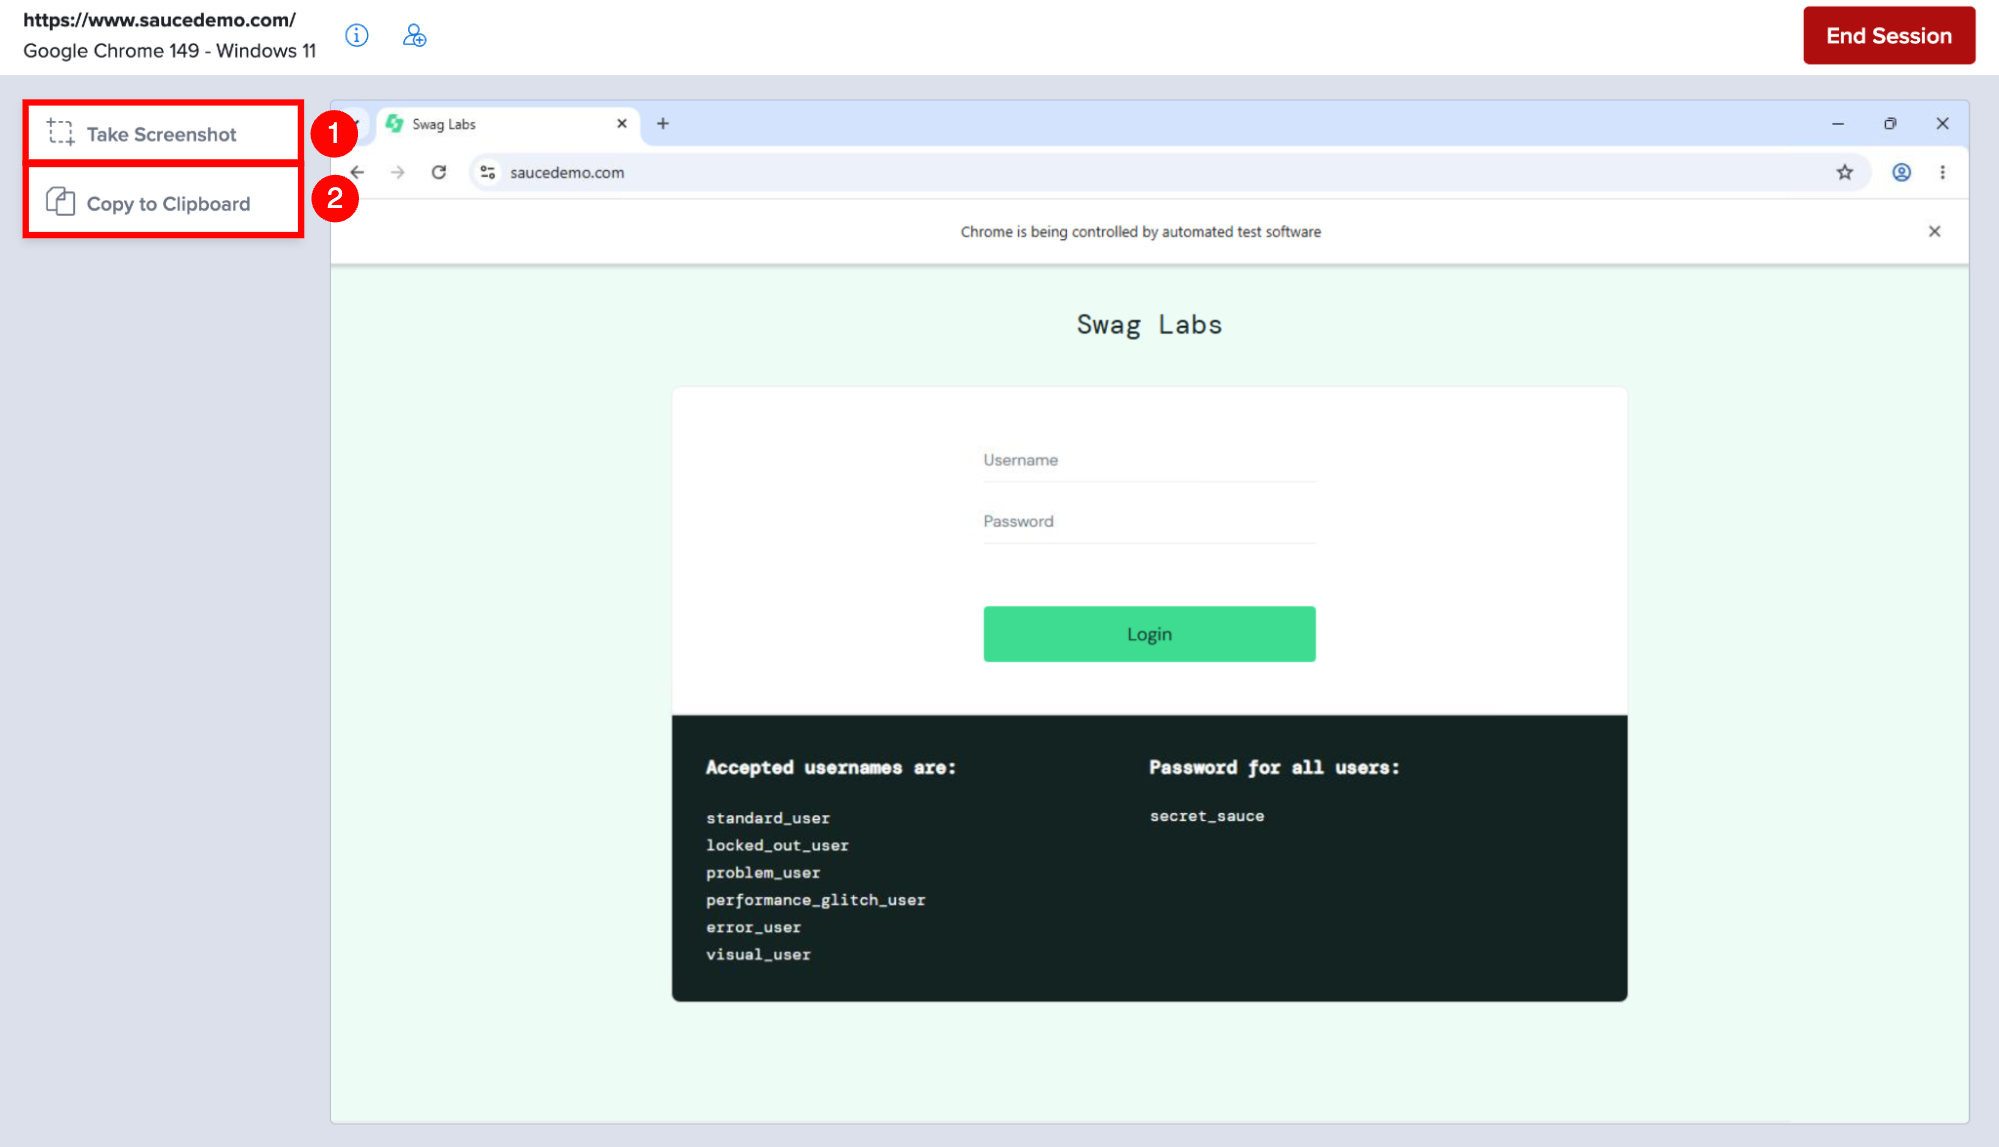
The Desktop Browser Interface provides quick access to the essential controls required during a live desktop browser testing session.
| Ref. | Control | Description |
|---|---|---|
| 1 | Take Screenshot | Captures the current browser window and automatically downloads it as a PNG image. |
| 2 | Copy to Clipboard | Opens the clipboard window, allowing you to copy text to the remote browser during the testing session. |
Mobile Real Device Interface
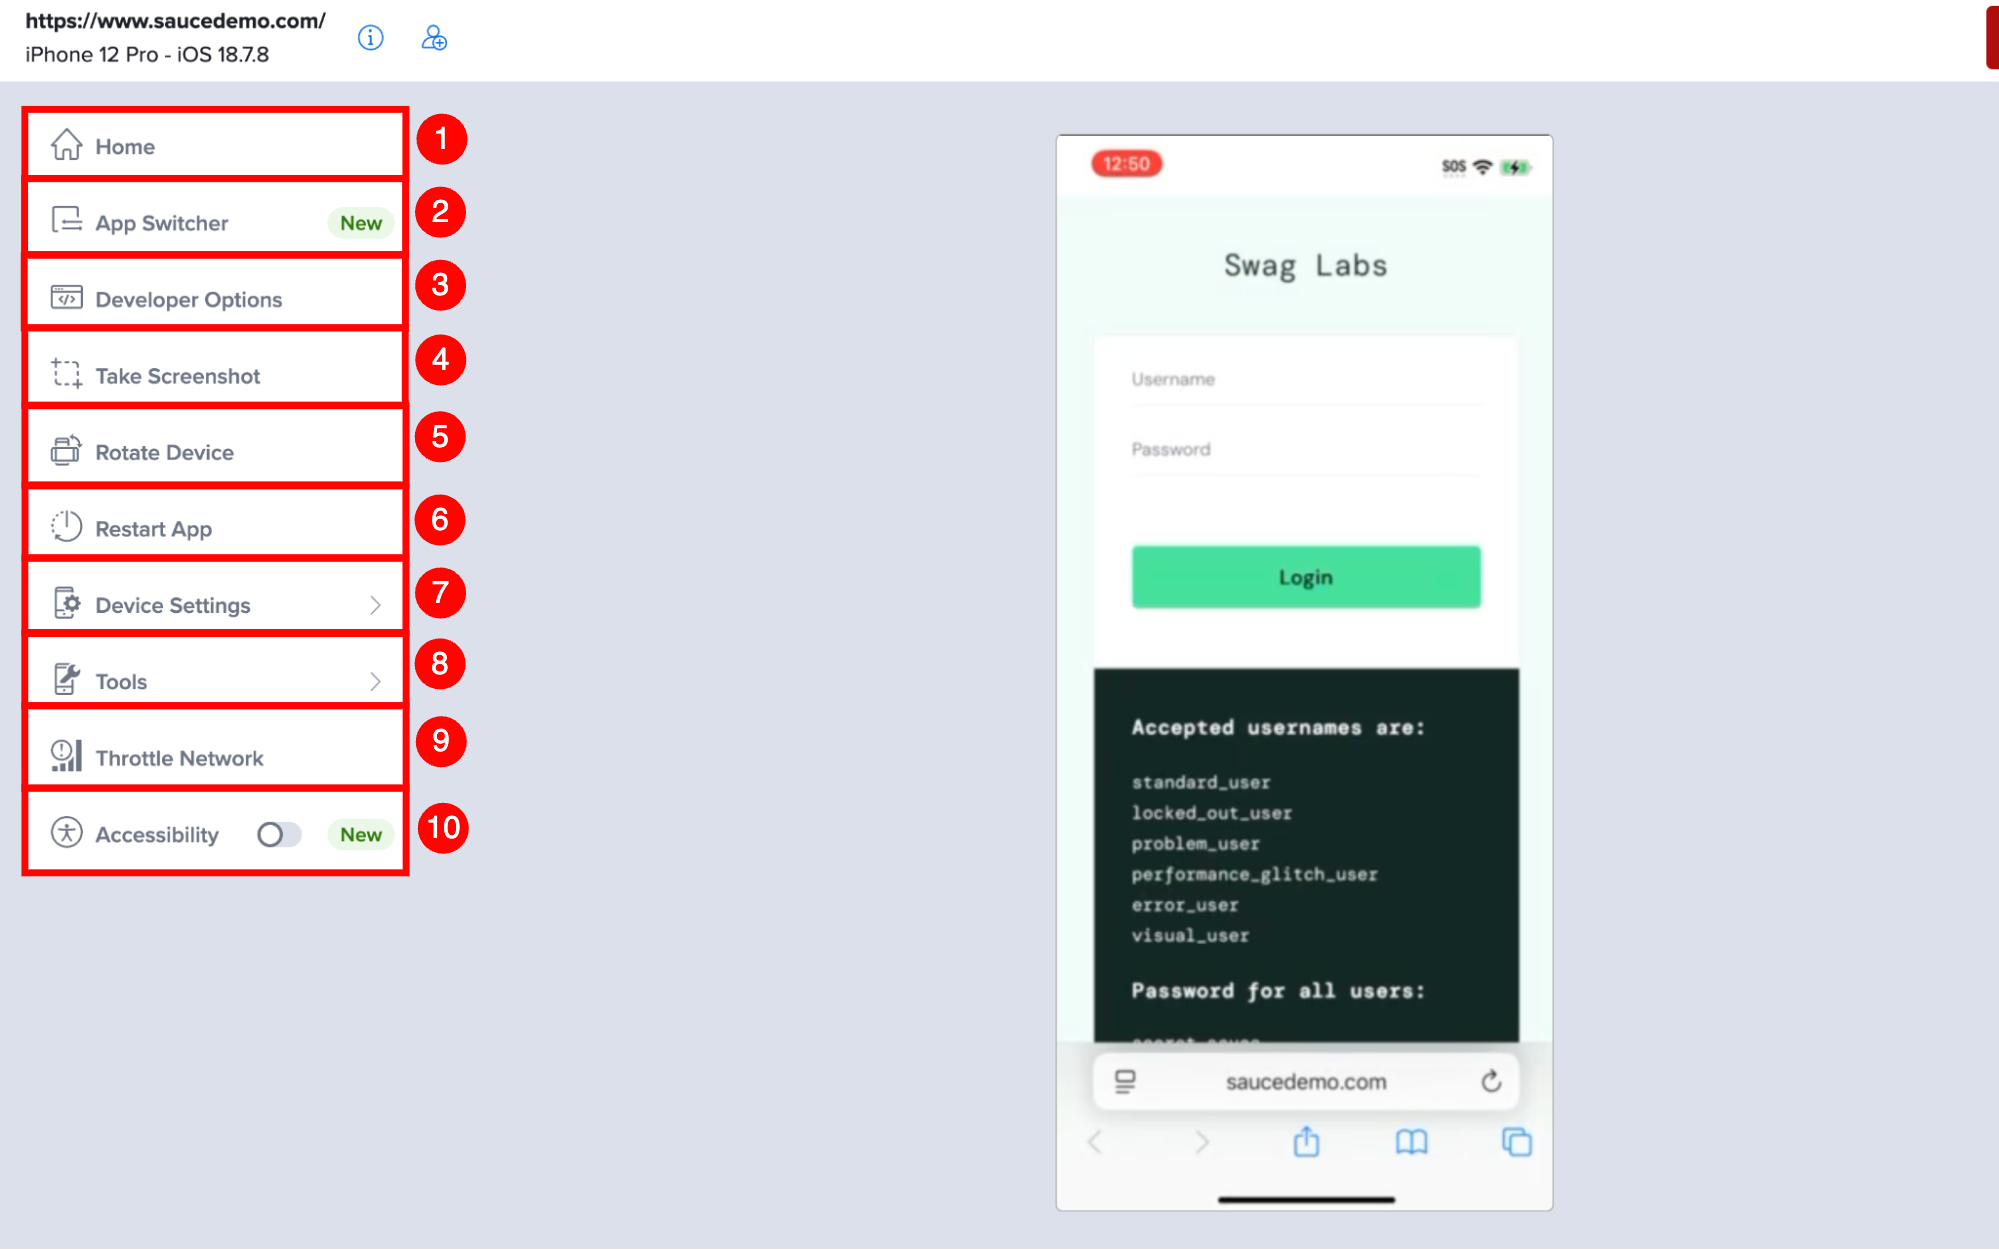
The Mobile Real Device Interface provides controls for interacting with physical Android and iOS devices during a live browser testing session.
| Ref. | Control | Description |
|---|---|---|
| 1 | Home | Returns the device to the home screen without ending the current testing session. |
| 2 | App Switcher (iOS Only) | Opens the recent apps view, allowing you to switch between applications running on the device. |
| 3 | Developer Options | Open developer tools such as Device Log, DevTools, ADB Shell, and Network logs for debugging. |
| 4 | Take Screenshot | Captures the current device screen and downloads it as a PNG image. |
| 5 | Rotate Device | Switches the device orientation between portrait and landscape. |
| 6 | Restart App | Restarts the current browser or application without ending the testing session. |
| 7 | Device Settings | Opens the Device Settings menu to configure language, Wi-Fi, audio, animations, performance mode, and passcode settings. |
| 8 | Tools | Opens additional testing utilities such as GPS simulation, ADB Shell, clipboard access, file upload, and biometric authentication. |
| 9 | Throttle Network | Simulates different network conditions to test website performance under varying connection speeds. |
| 10 | Accessibility | Enables accessibility testing tools to help evaluate the website's accessibility during the testing session. |
Mobile Virtual Device Interface
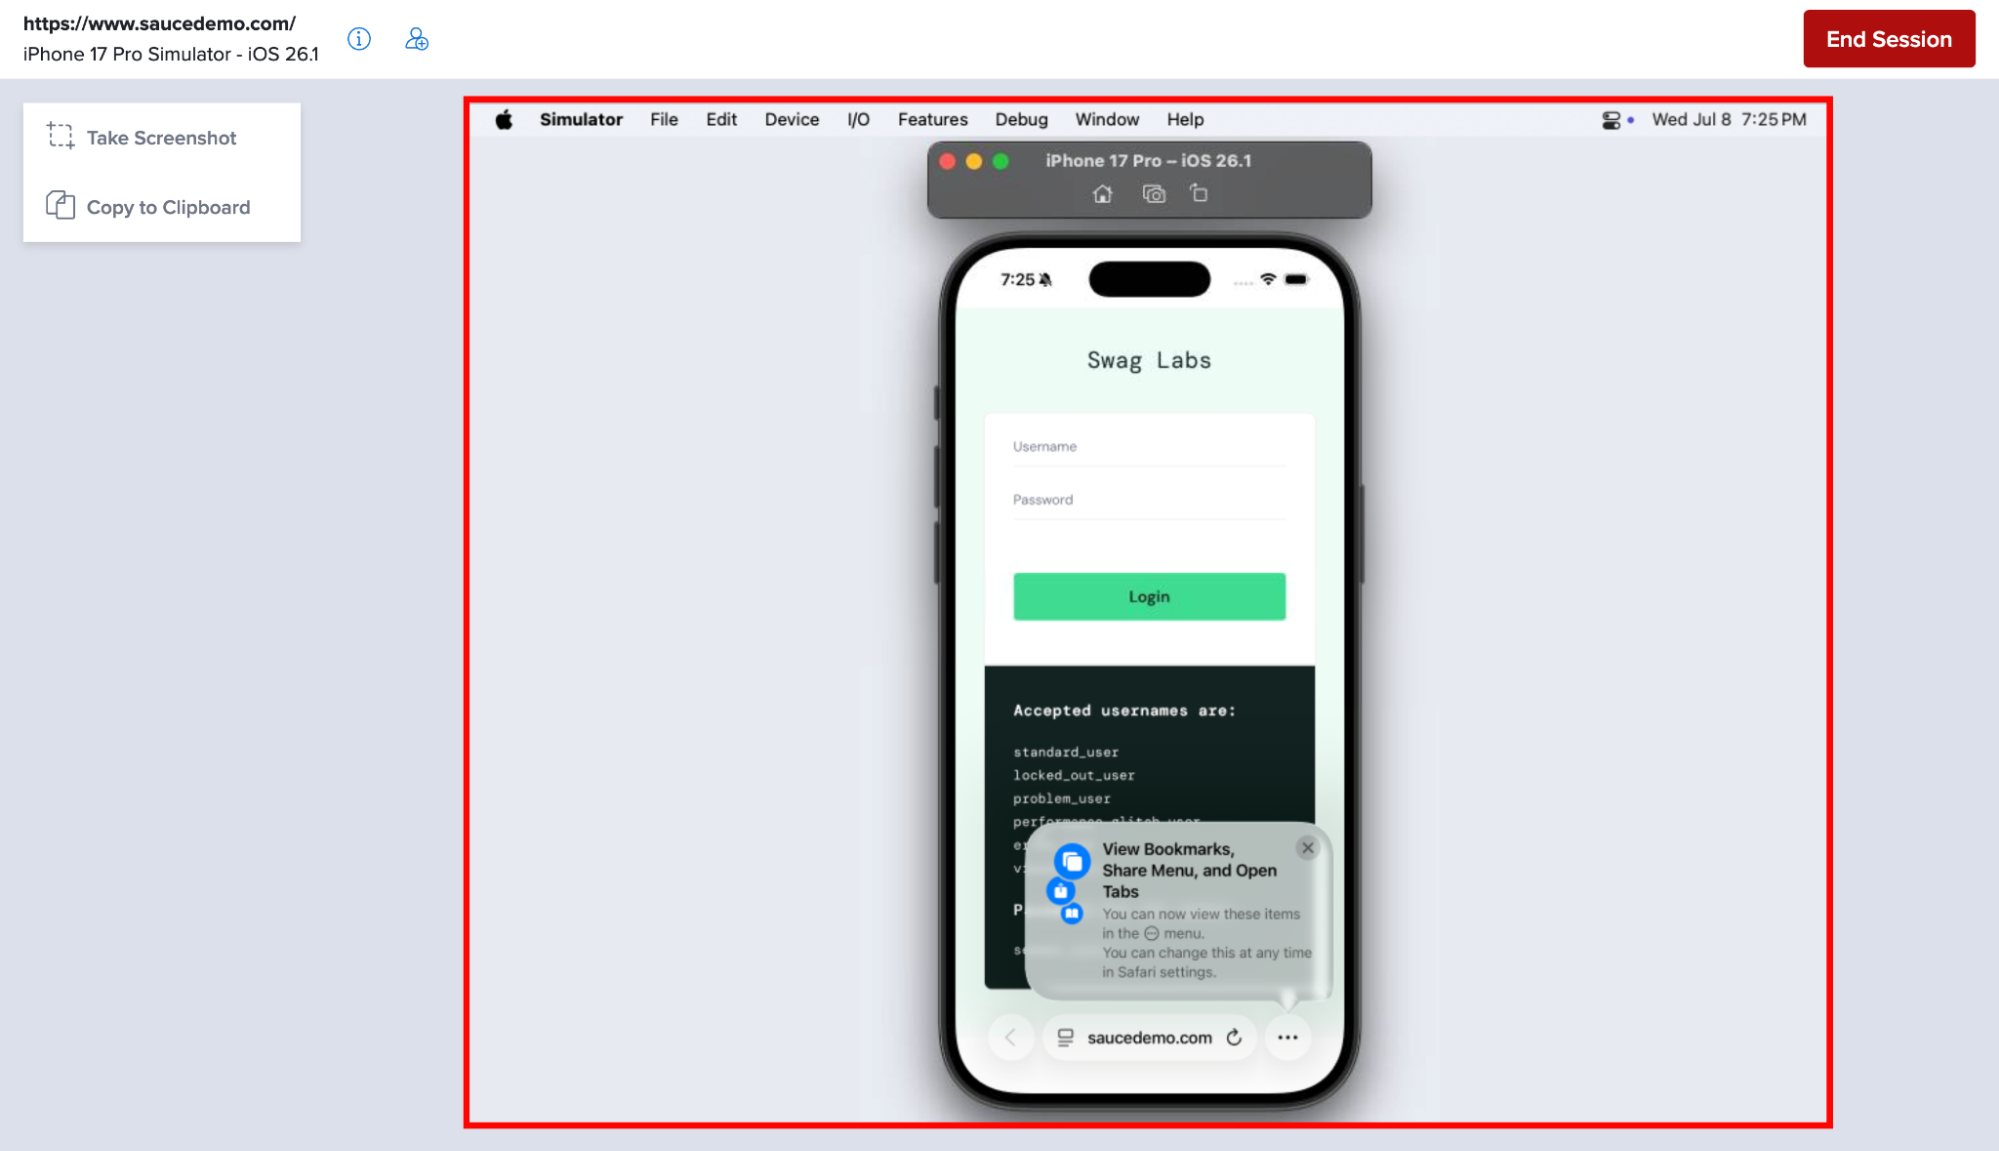
The Mobile Virtual Device Interface provides the controls required to interact with Android Emulators and iOS Simulators during a live browser testing session.
| Ref. | Control | Description |
|---|---|---|
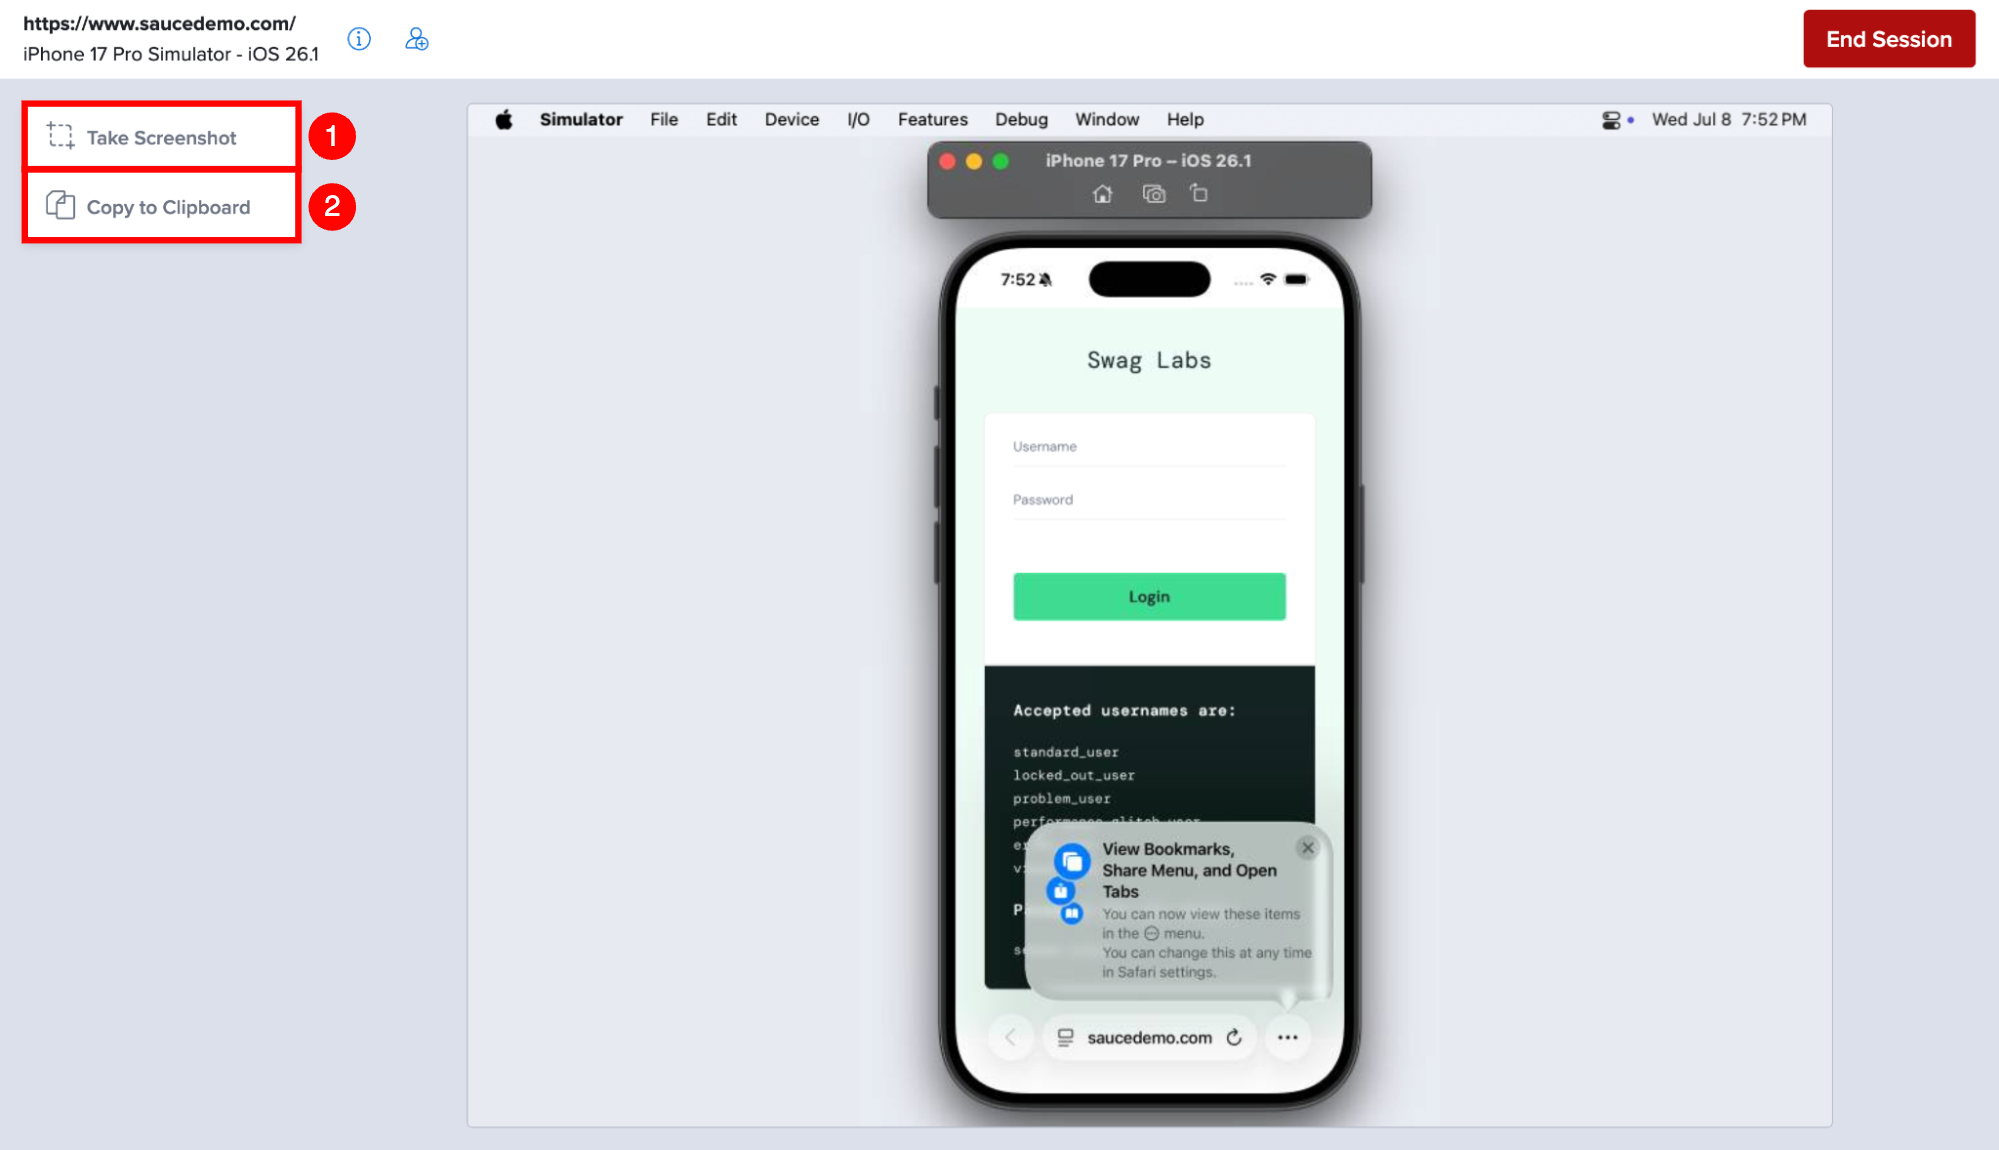
| 1 | Take Screenshot | Captures the current Simulator or Emulator screen and downloads it as a PNG image. |
| 2 | Copy to Clipboard | Opens the clipboard window, allowing you to copy text into the virtual device during testing. |
Public vs. Private Devices
Sauce Labs provides two types of real devices for mobile browser testing.
| Device Type | Description |
|---|---|
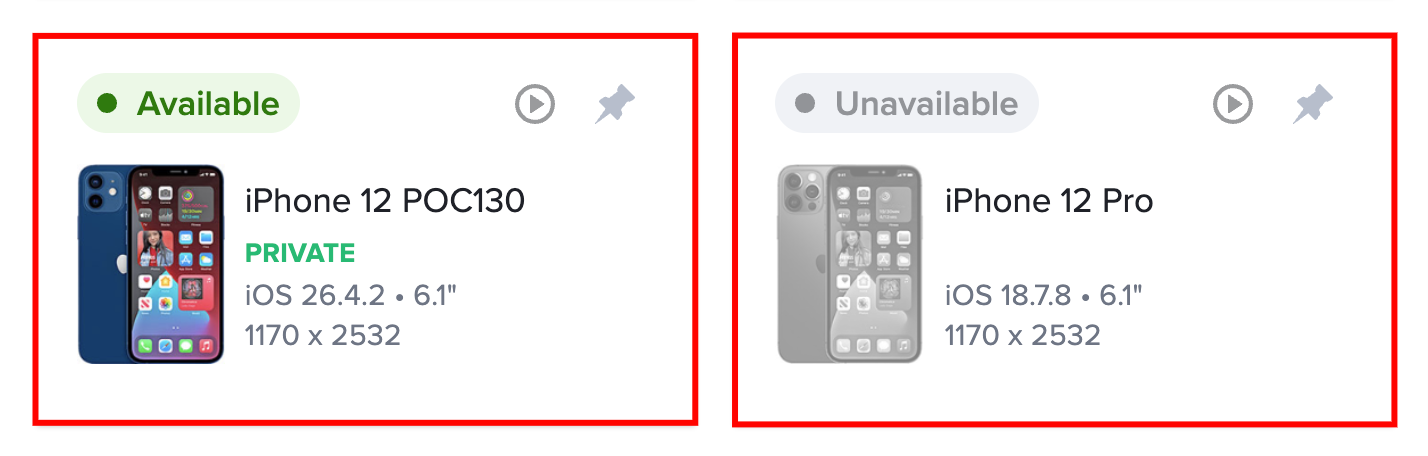
| Public Devices | Public devices are shared across Sauce Labs users and are available based on current device availability. If a device is already in use, it is marked as UNAVAILABLE in the device grid. |
| Private Devices | Private devices are dedicated to your organization and are available only with Enterprise plans. They are identified by the PRIVATE label in the device grid and are accessible only to authorized users in your organization. |
To learn more about Enterprise plans or private device access, contact your Sauce Labs Sales Engineer or Customer Success Manager.
Pin a Device
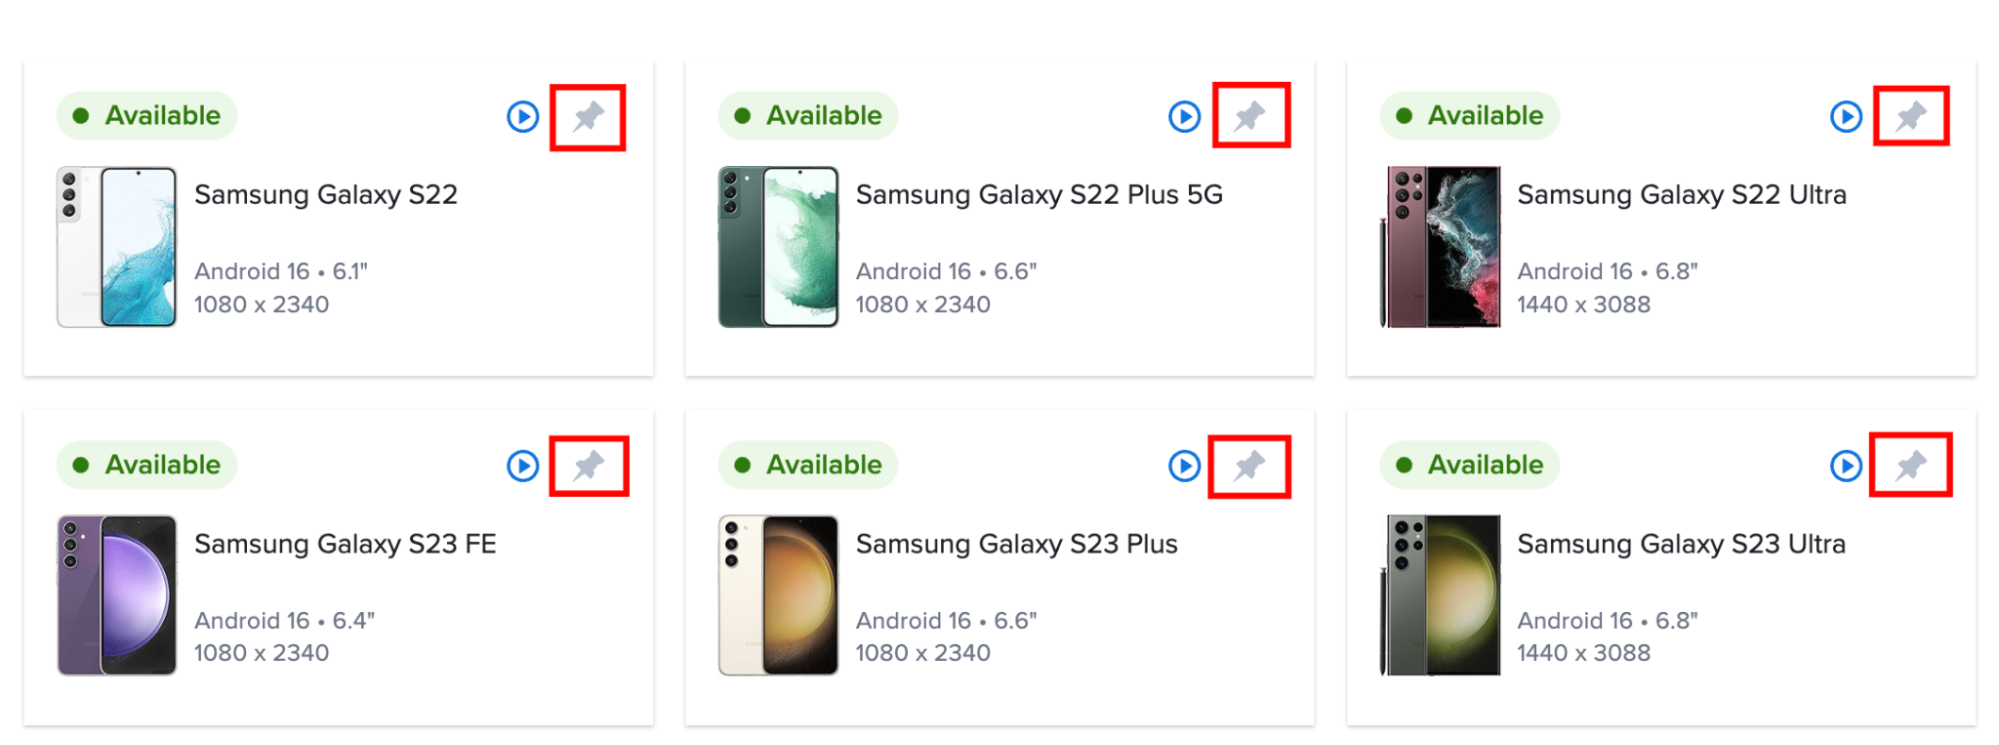
To quickly access frequently used devices, click the Pin (📌) icon displayed on the device card.
Pinned devices automatically appear at the top of the device list, making them easier to locate in future testing sessions.
View Recent Configurations
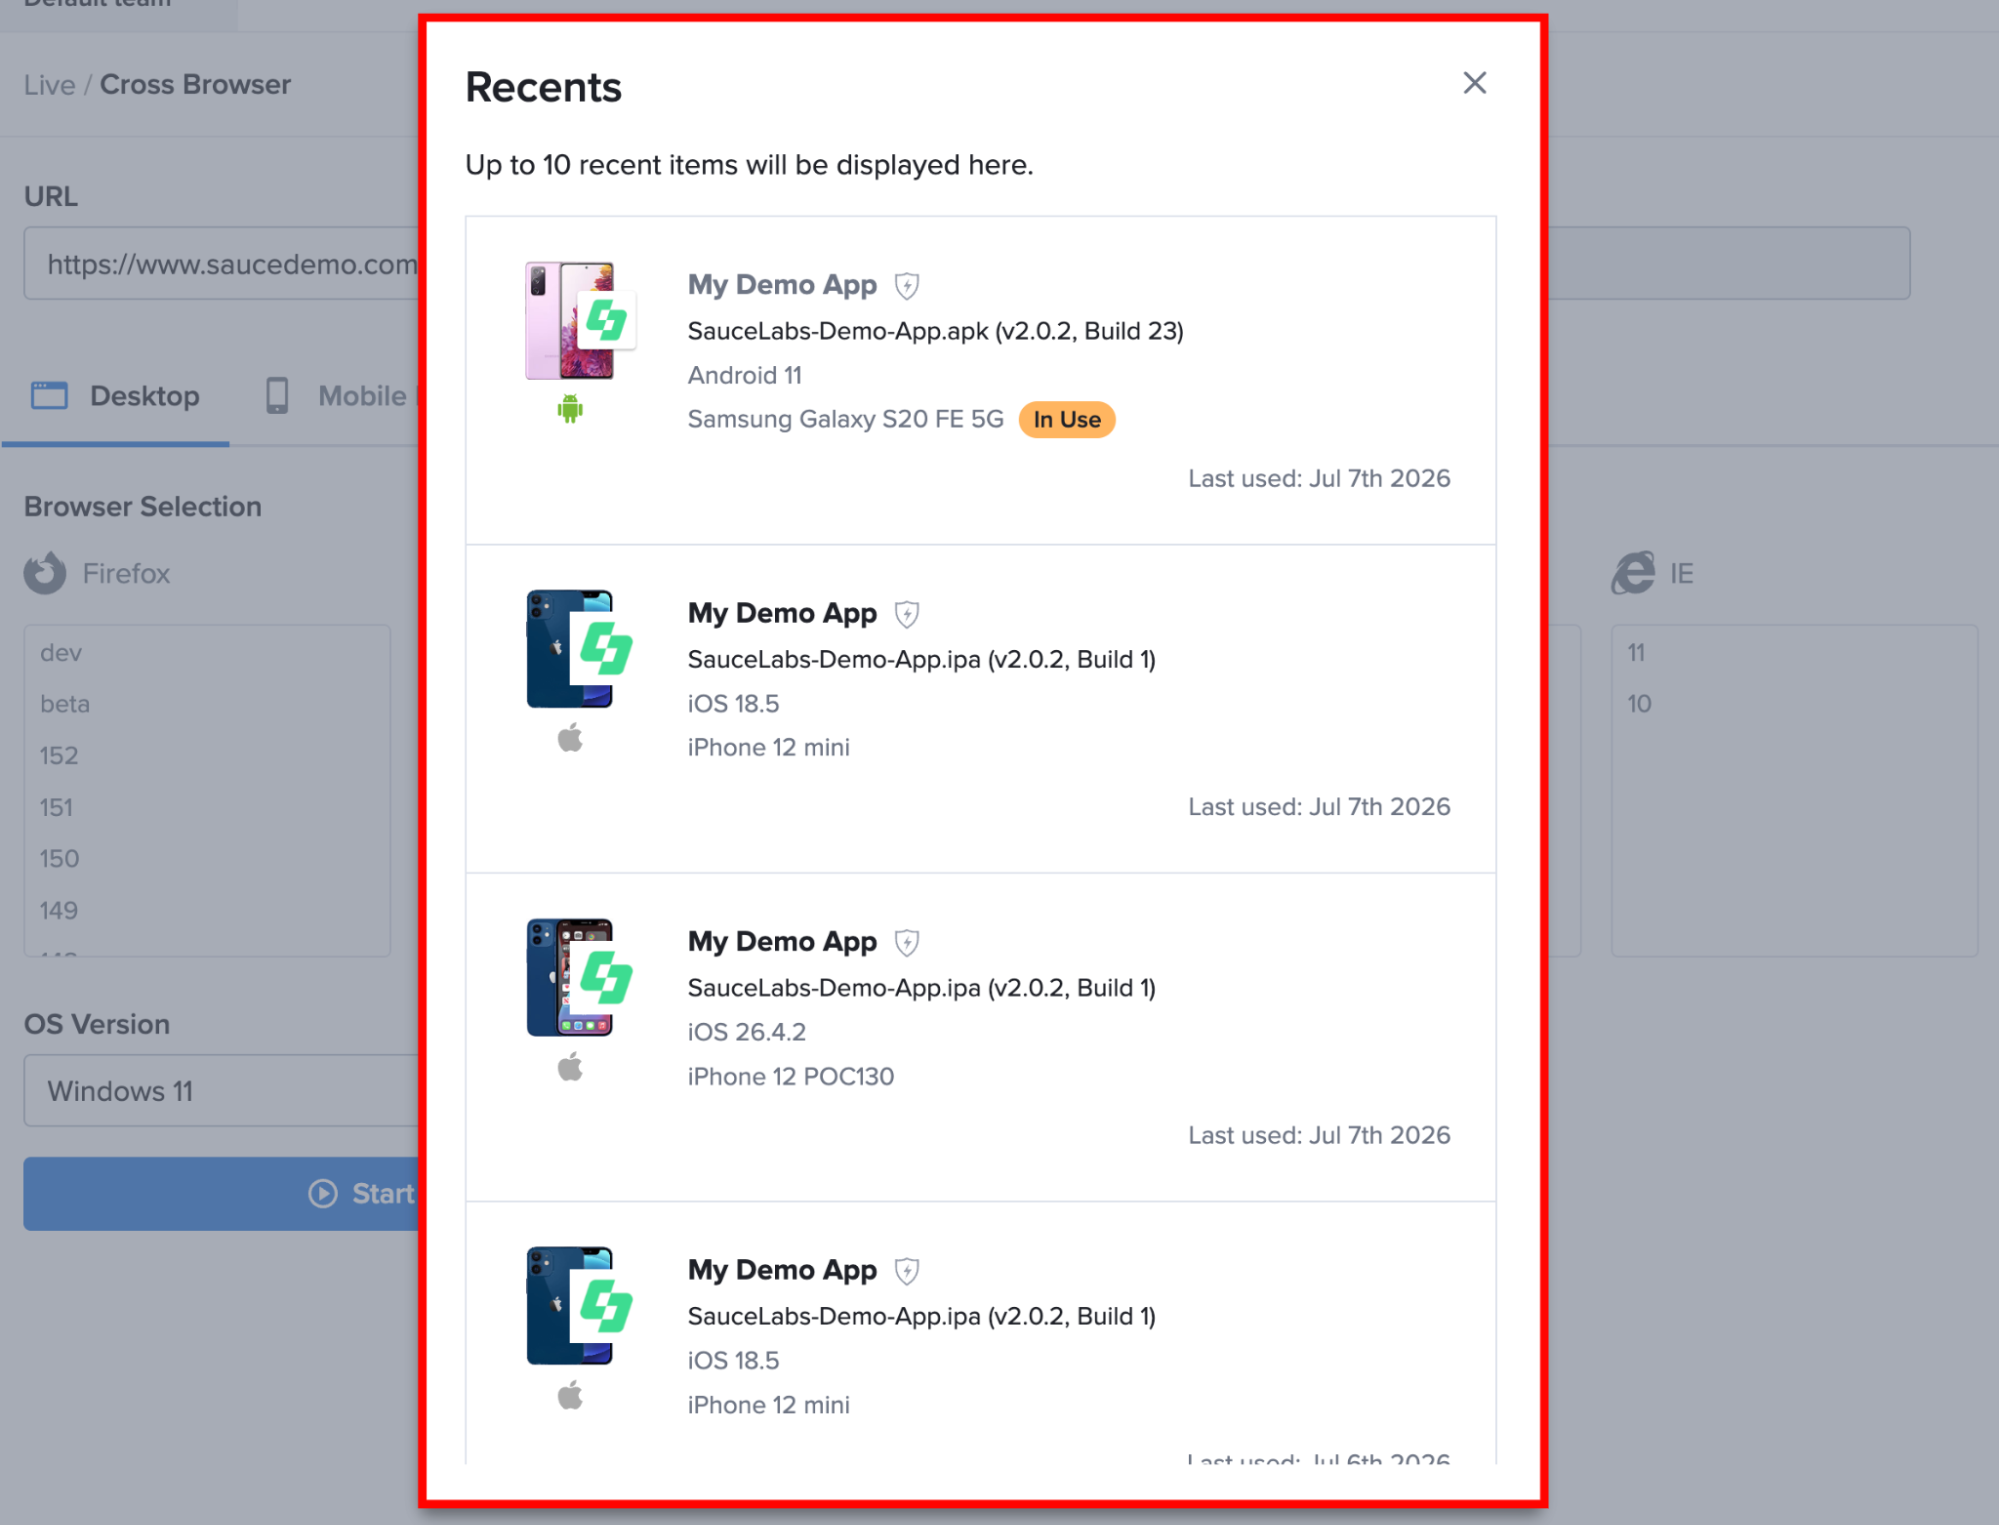
Click Recents to display your recently used testing configurations. The Recents section includes previously used combinations of devices and browser configurations, allowing you to quickly restart testing sessions without selecting the same options again.
Add a Test Name and Outcome
After completing a live testing session, you can assign a descriptive name and record the test outcome (Passed or Failed). Adding meaningful names makes it easier to locate tests, organize results, and identify testing activities later.
You can use test names to:
- Quickly identify completed tests.
- Record the purpose or scenario of each test.
- Reference Jira issues, user stories, or release versions.
Test names can contain a maximum of 255 characters. Emojis are not supported.
You can update the test name using either of the following methods.
Method I: From the End Session Dialog
Use this method to add the test name immediately after completing a live testing session.
Step 1: Complete the live testing session, then click End on the testing toolbar.
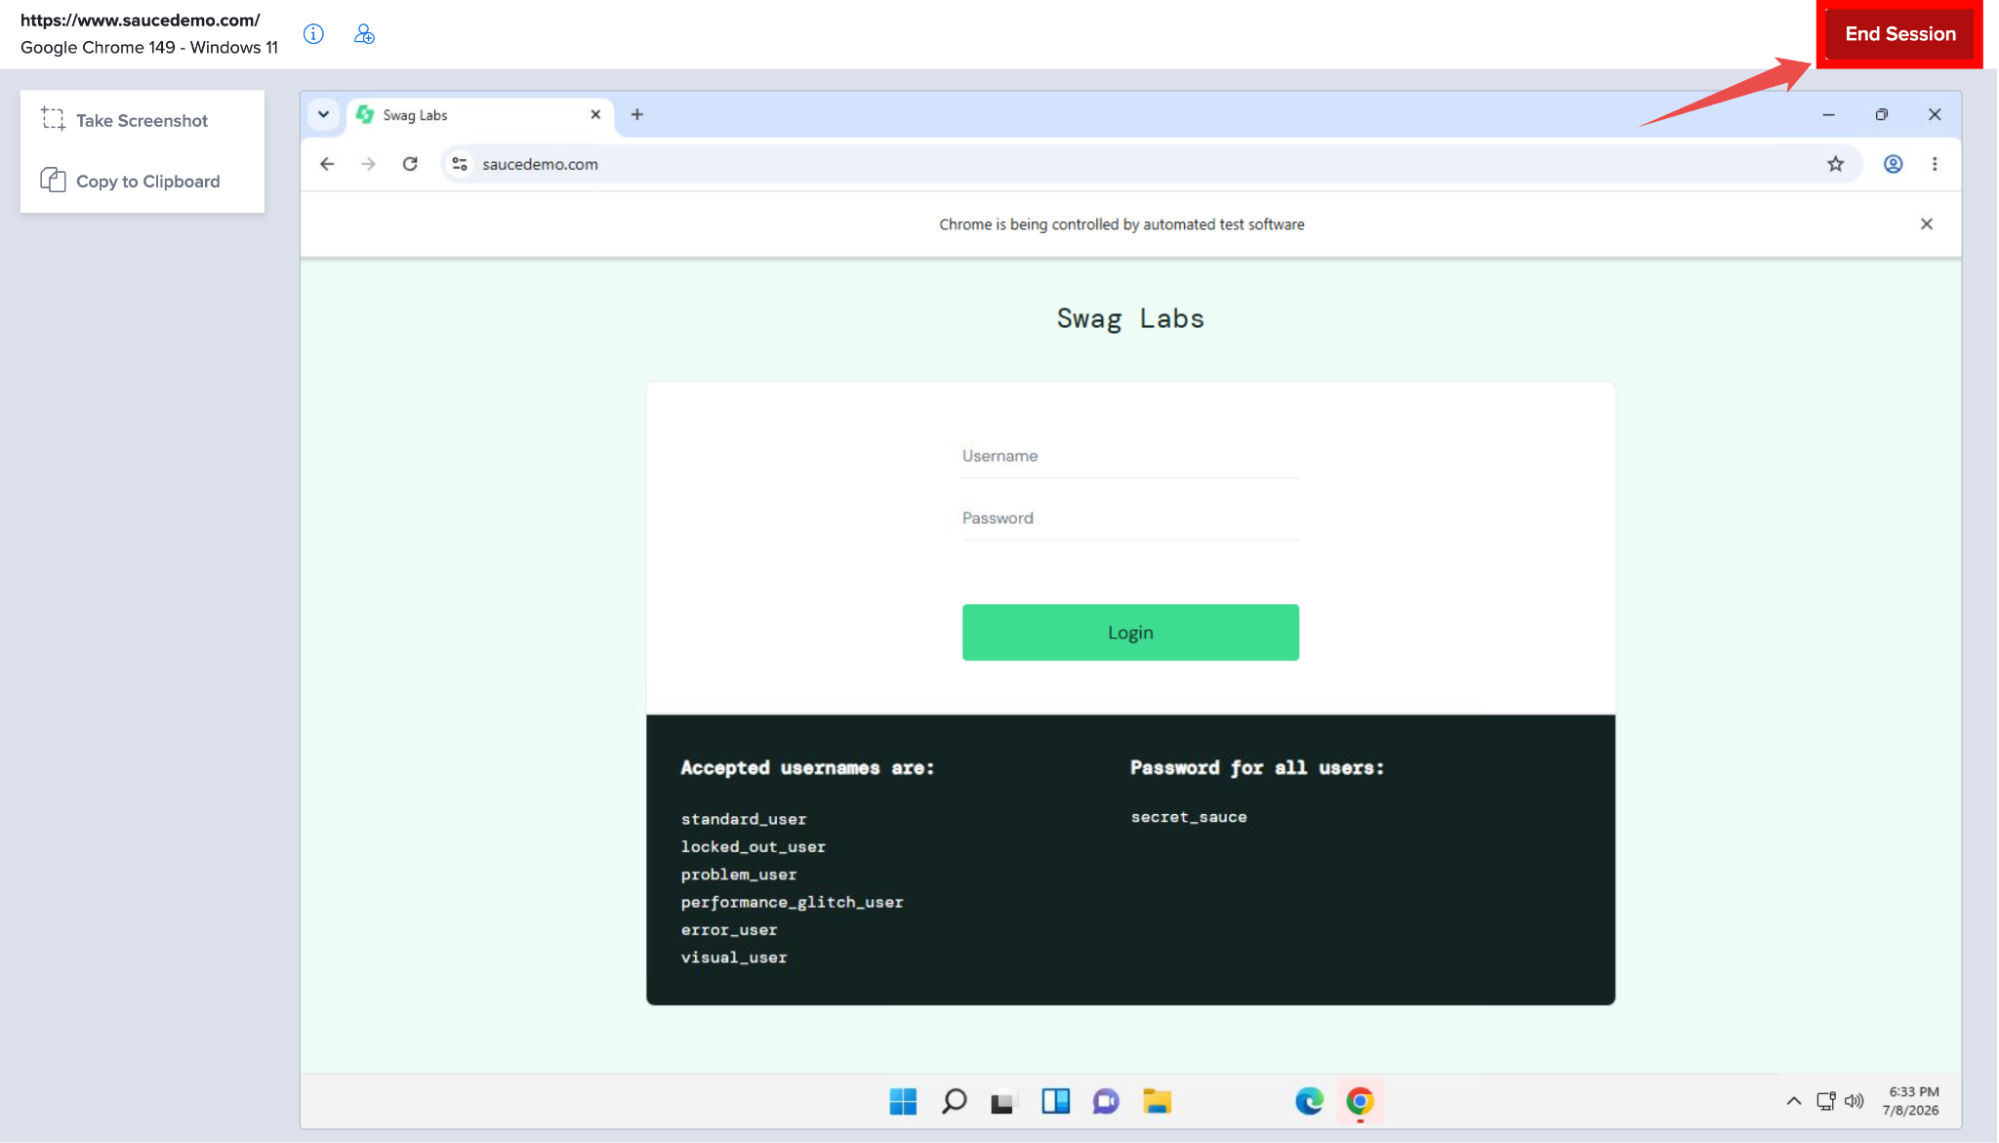
Step 2: When the End Session dialog appears, enter a descriptive name in the Test Name field, select the appropriate Test Outcome (Passed or Failed), and save the changes.
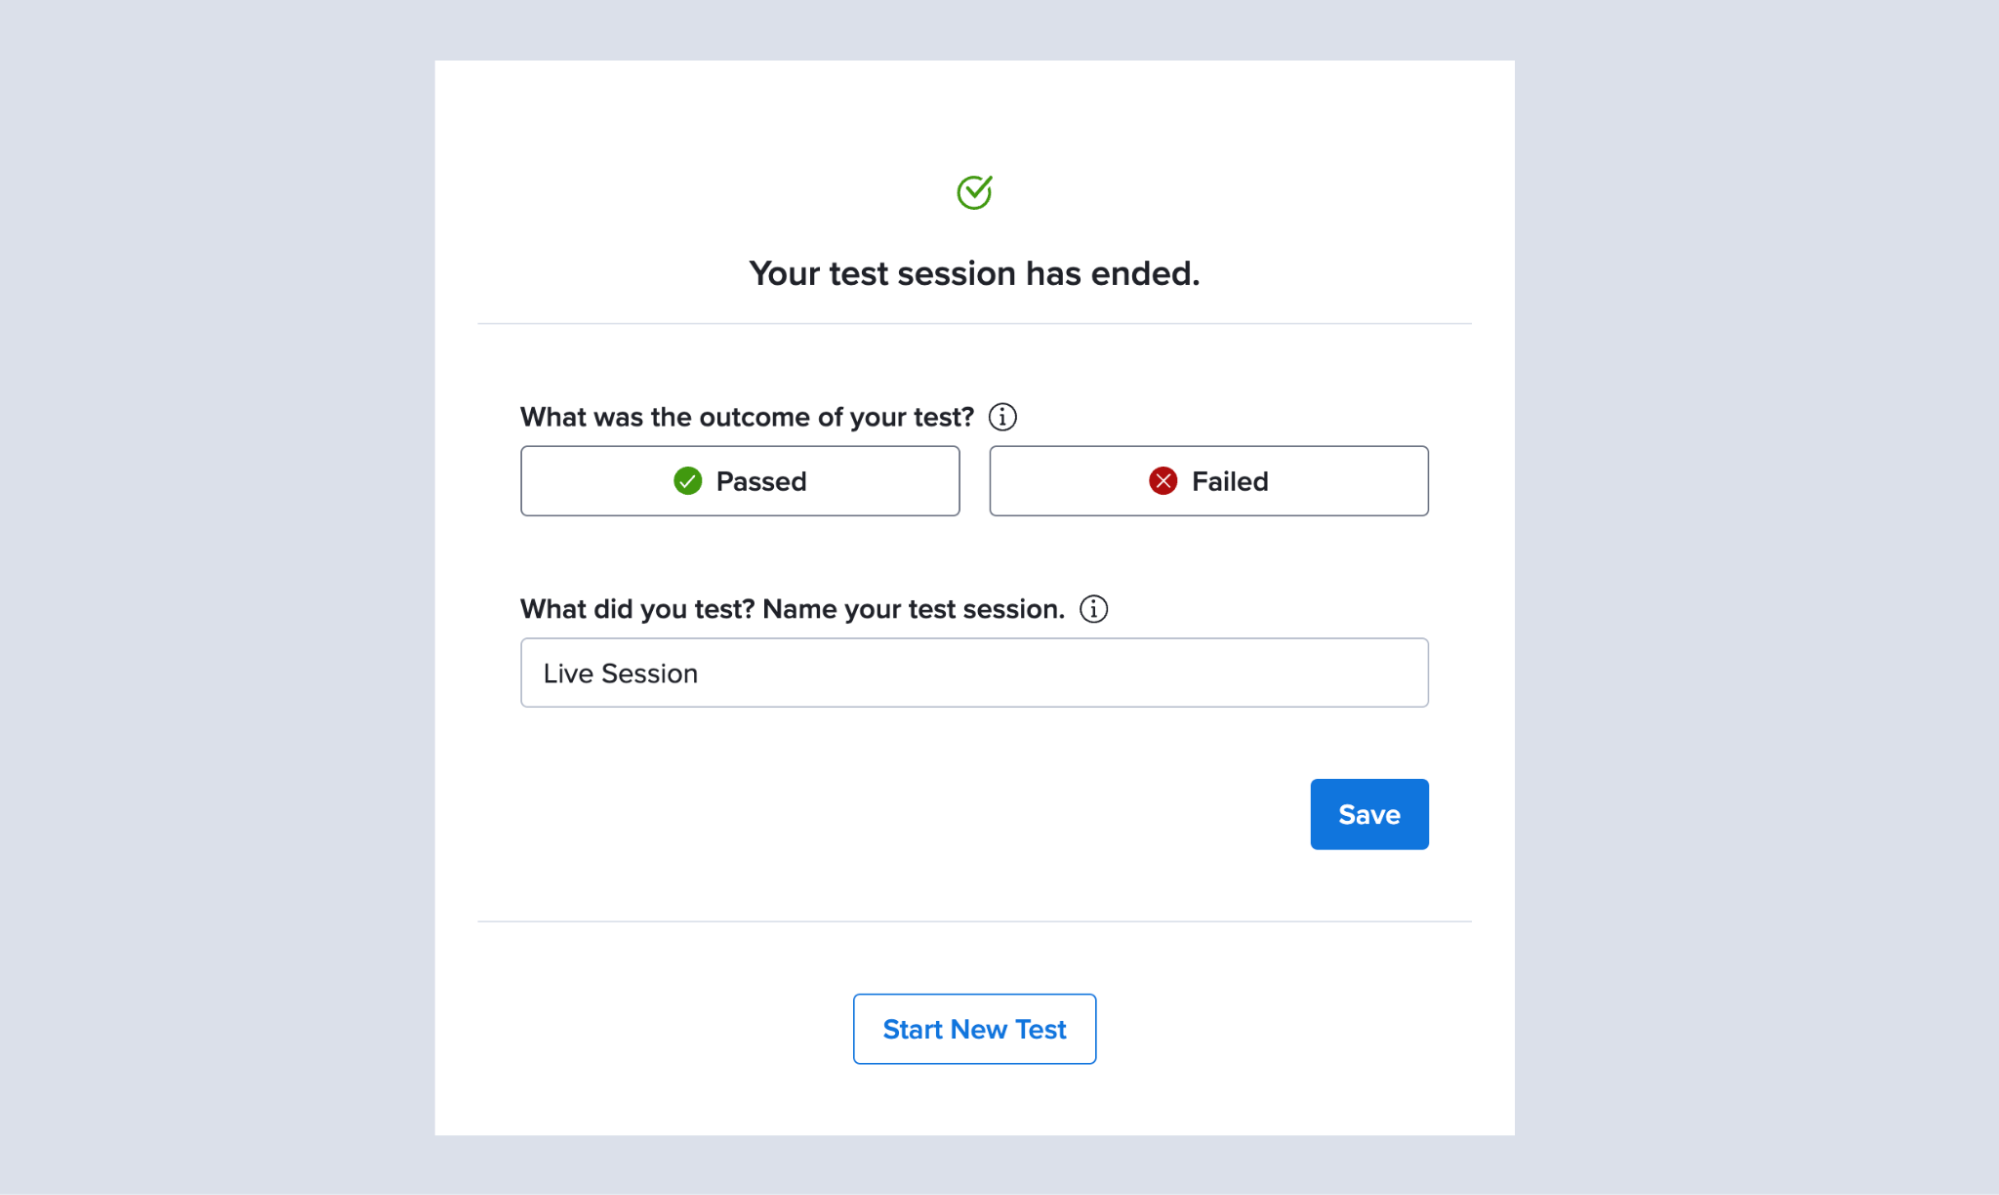
The updated test information is stored in Test Results for future reference.
Method II: From Test Results
Use this method to add a test name and outcome immediately after ending a live testing session.
Step 1: From the left navigation menu, click Live, then select Test Results.
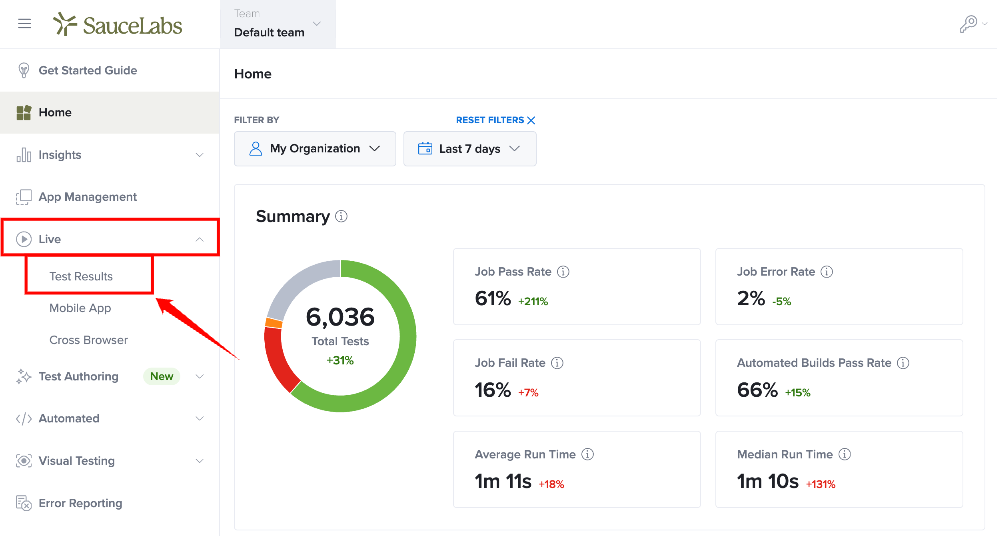
Step 2: Locate and open the testing session you want to update.
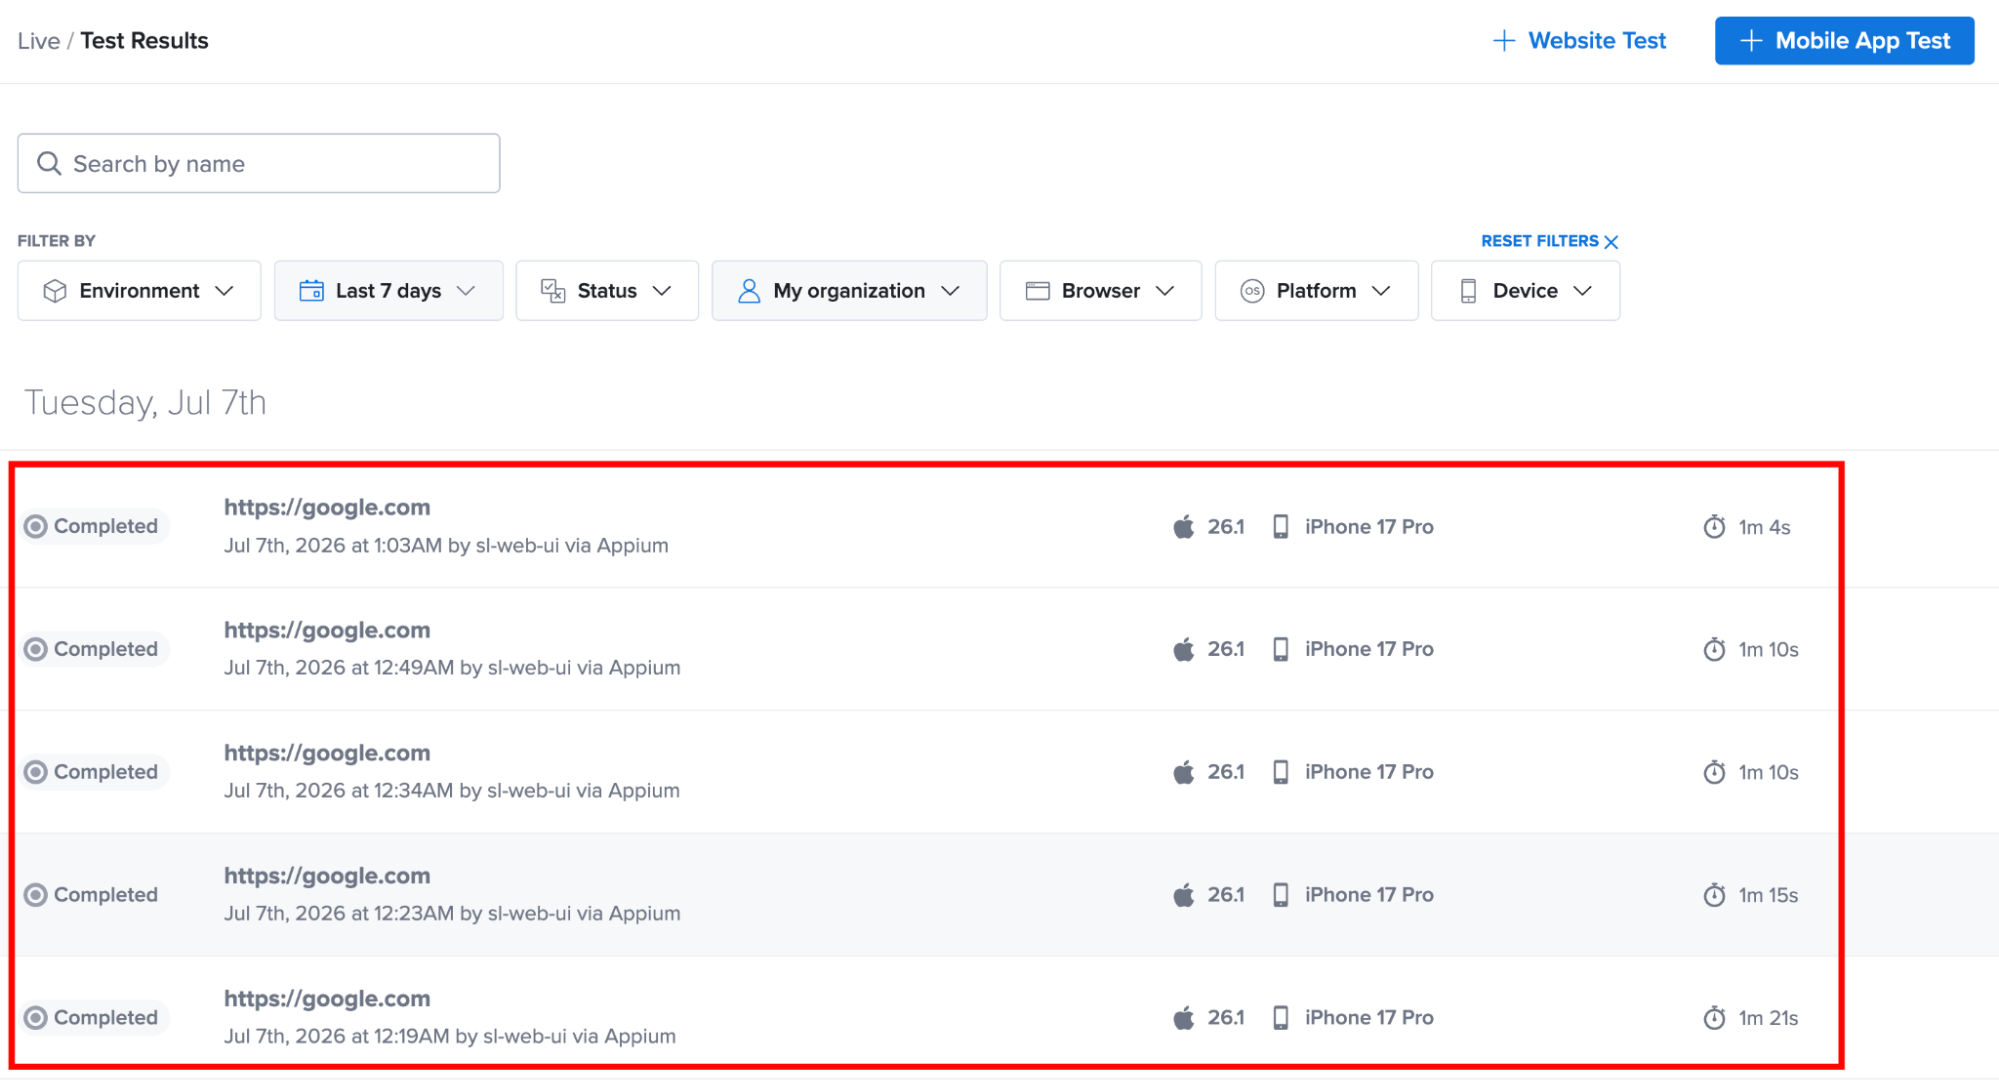
Step 3: On the Test Details page, click the Edit (✏️) icon next to the test name.
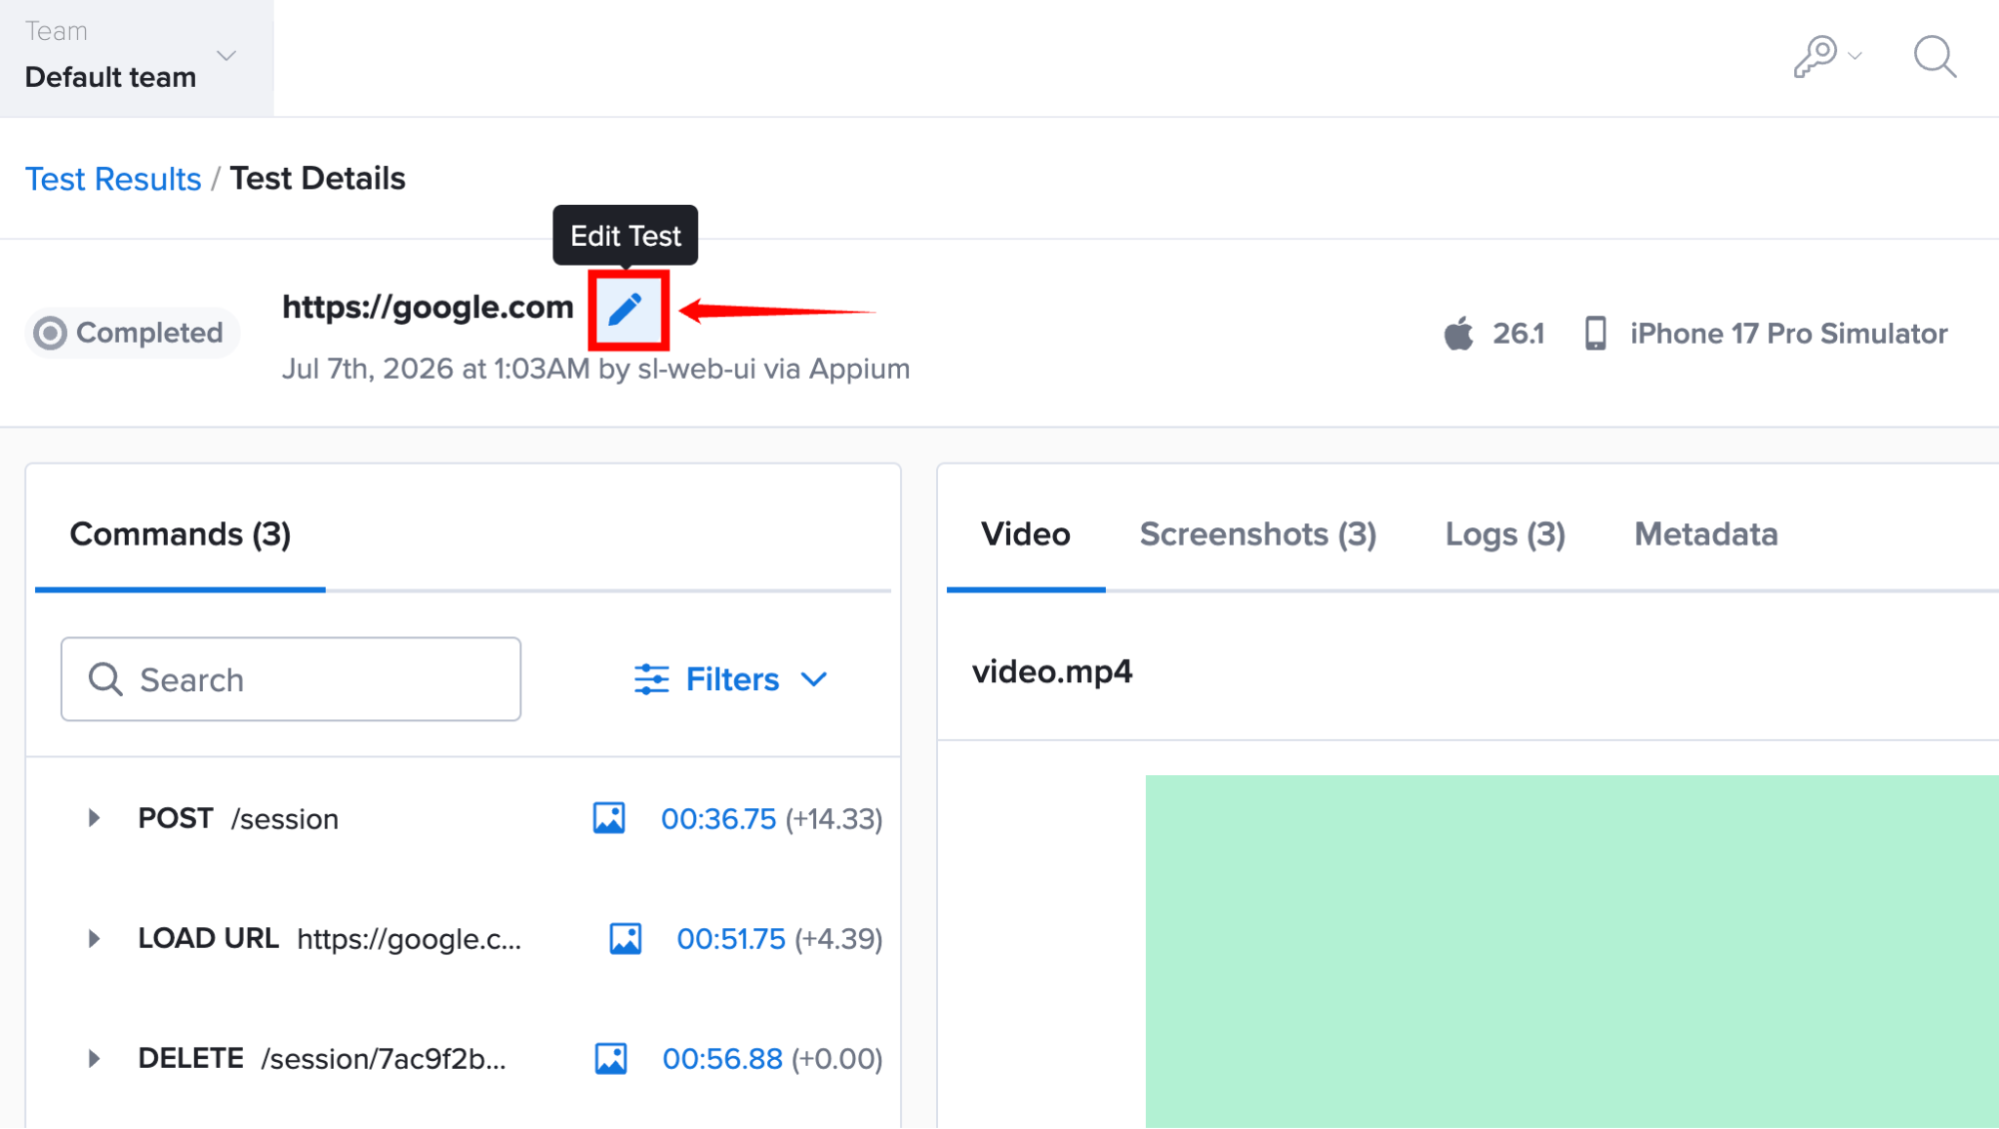
Step 4: Enter the new test name, then save your changes.
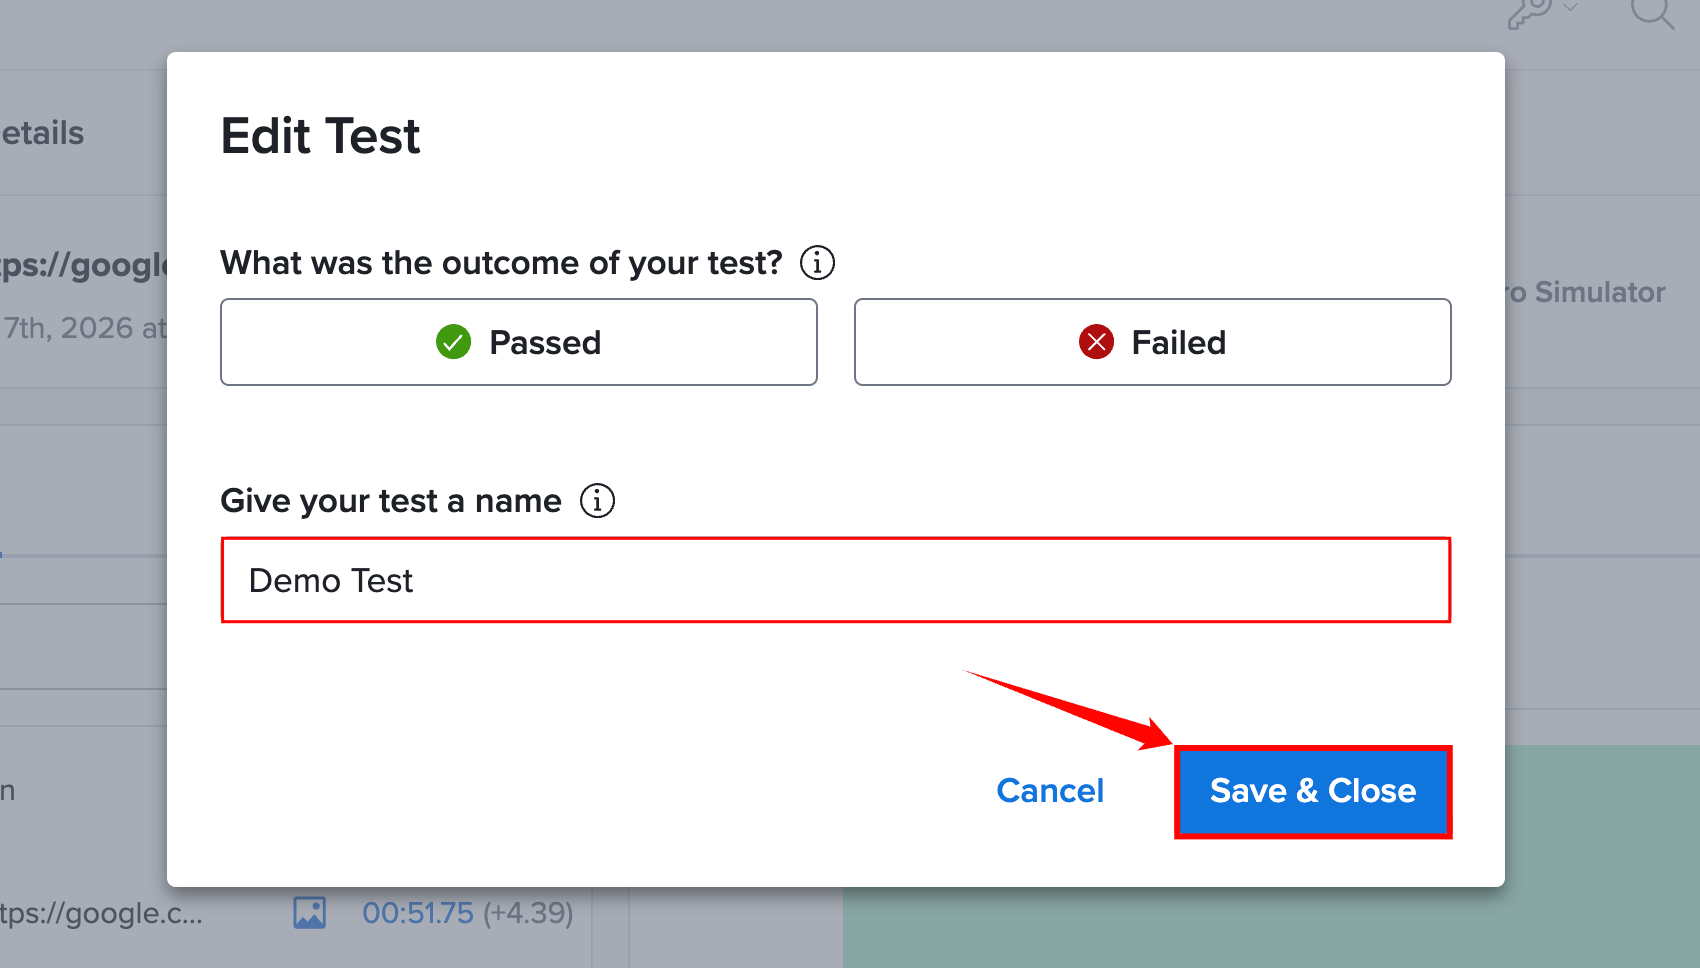
The process for updating the test name is the same for both Cross Browser Testing and Mobile App Testing.
Running Tests in Parallel
You can run multiple live test sessions at the same time, with the number of tests limited by the concurrency allowance associated with your account. To run tests in parallel, open a new browser tab and follow the steps to set up the new session. You can switch back and forth between the sessions by clicking on the browser tabs.
Time Limits and Timeouts for Cross-Browser Testing
For VDC and EmuSIM, the global limitations for the live session duration are:
-
Cross-browser tests for free users have an 11-minute limit from the session start.
-
Cross-browser tests for paid users are limited to three hours.
-
Cross-browser tests for all accounts will timeout after 90 seconds if the session is not active (that is, it has no active channels).
If there is no activity, a user is automatically logged out after 30 min.
Troubleshooting Live Cross Browser Tests
Below are resolutions to common errors that you may experience in live cross browser testing.
Seeing a Security Error Message (Error #2048)
This error is displayed when the ports used by manual testing relies are being blocked by a firewall on your end. This may also be caused by running apps such as Avast antivirus software.
Below are the servers and ports used by manual testing. If you plan to launch manual tests on locally installed browsers, we recommend checking with your network administrator to confirm that you can make secure websocket connections to: api.us-west-1.saucelabs.com:443 (for US-West-1 DC) or api.eu-central-1.saucelabs.com:443 (for EU-Central-1 DC).
Your Job is Not Loading
When a job is not loading, one of the following errors is likely to appear:
- Error message: "Uh oh! Some error occurred while connecting to the browser"
- The job seems to start, but you see only a white text box in the middle of a black screen.
Both errors indicate that your browser is having trouble displaying the VNC stream from the remote machine. Below are some steps to troubleshoot:
Check the Video on Sauce
If the recorded video after the job shows a steady video stream, this indicates that the issue is in your computer or connection to Sauce Labs. However, if the Sauce Labs video shows the same issue, that indicates an issue in our service. In that case, send us the URL for the job page and a screenshot of the issue.
Confirm That Your Browser is Up to Date
If you're on an older version, this may cause incompatibilities. Update your browser and try again.
Check Your Firewall
Make sure that your machine allows full access for the interactive stream over the required ports (see the Sauce Connect Proxy FAQ).
Confirm That Your Internet Connection is Stable
We recommend running Sauce tests from a machine with a wired Ethernet connection, to ensure a steady connection. If the connection flickers, this error could be thrown.
Long Load Times or Timing Out
We've streamlined our service to provide the best possible load times. If you're experiencing slow live testing sessions, head to the Sauce Labs Systems Status page and follow us on Twitter (@SauceOps) for the latest updates on service issues and operations.
Links Opening in New Tabs Instead of New Windows
It's possible for the manual testing VNC client to have a modifier key "stuck" down, causing any clicked links to open in new tabs. This happens if the client loses focus while a key is held down (for example, when using Alt-Tab to switch app windows). In this case, VNC never receives the keyUp event.
To prevent this from happening: every time you focus back on the manual testing window, click in the middle of the page, then press and release all the modifier keys (that is, Alt, Control, Command, and Shift).