Storage Management
Backtrace instances have limits on how many monthly error submissions they can accept and how much storage space those submissions consume. If an instance reaches 100% storage quota, you won't be able to receive new submissions until more storage space is available — either through a reduction in consumption, or an increase in available space. You can purchase more storage space or monthly submission quota as required.
Admin users can control retention, compression, storage sampling, and submission rules. In addition, the delete-by-query capability allows users to take a manual action to remove objects from the system and free space.
- To see how much storage was purchased and what percentage is consumed, admin users can go to the Universe Settings > Subscriptions page.
- To see how much storage is being consumed by project, go to the Project settings > Overview page > under Storage usage > see attachments.
Our sales team can assist in the purchase of additional storage as needed, and our support team can disable storage enforcement in critical cases.
Storage Notifications
Admin users will receive notifications (in-app and via email) when their instance is consuming 75% or more of the allotted storage quota.
When a storage notification is received:
- Review the retention policies to confirm that they are set to appropriate levels.
- Query fingerprints that consume a disproportionate amount of space and delete them as required.
- You can then use the results to inform additional configurations for Storage Sampling or Submission Actions to reduce storage usage for incoming duplicate errors.
- Review historical storage usage with the Explore view and add additional storage as required.
Retention Policies
Retention policies control how long error data is retained. By default, instances are set to compress and remove old objects after a set period of time to keep the amount of storage used at a reasonable amount, and admin users can tune these.
Admin users can configure retention policies in the Project settings > under Project > Storage retention. For more information on retention policies, see Data Retention.
We recommend the following retention policies:
- Set a rule to compress all dumps (removes ability to reprocess). This will compress items by at least 50% if not more.
- Consider how long you may need to get missing symbols or other actions that require reprocessing. For production instances, we recommend setting it to 45 days to start, though you can shorten this to 7-14 days once you get to production and high volumes.
note
Customers on the free tier may have limits on how much control they have over compression and retention.
- Consider how long you may need to get missing symbols or other actions that require reprocessing. For production instances, we recommend setting it to 45 days to start, though you can shorten this to 7-14 days once you get to production and high volumes.
- Set a rule to delete all dumps and Debug view data. This will free storage quota by removing minidump objects and attachments after the specified number of days.
- Consider how far back you require Debug view data. Paid customers may default to 90 days, and we can suggest reducing this to a lower number if needed (30 days is reasonable if you are fixing issues on a monthly basis).
note
Objects that are deleted will still retain all metadata, so there is history of the error occurring, with all indexed data available.
- Consider how far back you require Debug view data. Paid customers may default to 90 days, and we can suggest reducing this to a lower number if needed (30 days is reasonable if you are fixing issues on a monthly basis).
Query Fingerprints
You can query fingerprints that consume a disproportionate amount of storage to decide if it makes sense to run delete functions to remove objects that are duplicates.
To query fingerprints:
- Go to the Explore view.
- From the Group by filter, select
fingerprint. - Select Add aggregation, add the
object.sizeattribute and thesumoperator. - Click the column header to sort in decreasing order.
- Set the Time frame filter for which you want to delete the fingerprints.

You can add additional filters or aggregations for application.version (or the attribute you use for the version of your game or app) to see if there are impacts on a particular version that require deletion.
Delete Group
If you have a group of errors that have been identified as not useful or relevant, you can delete the group to manage storage. This action is available only for admins and fingerprint groups with fewer than 100k errors.
To delete a group:
- Go to the Explore view.
- From the Group - fingerprint column, select the Group options.
- Select Delete Group.
- From the Delete selected group dialog, select one of the following:
- Delete all physical objects: Allows you to retain metadata for aggregates and searching, but all the details of the errors will no longer be available for debugging purposes.
- Delete physical objects and metadata: Removes all data from your Backtrace instance.
- To confirm the action, enter DELETE, then select Delete forever.
Video: Delete Errors by Query
The following video shows how to query fingerprints and delete a group of errors.
Storage Sampling
Storage sampling controls how the objects attached to errors are sampled out before being stored.
For high volume customers, storage sampling is an effective way to conserve storage space by limiting the number of dump objects (used in the Debug view) that are persisted to long-term storage upon ingestion. Default rate limit rules are configured to keep a certain number of dump objects per fingerprint. You can also add an aggregation for application.version to ensure that sampling is not overly broad.
You can configure storage sampling in the Project settings > under Project > Storage sampling. For more information, see Storage Sampling.
Submission Actions
Consider configuring submission actions that perform automation actions to allow more granular control over the errors being submitted, such as reject submission and drop object. These submission actions are very flexible, and can have a % probability set on them so you can configure how often the rule should execute.
You can configure submission actions in the Project settings > under Error processing > Submission actions. For more information, see Submission Actions.
Historical Usage
Once you have confirmed your configurations for retention, compression, and sampling, you can perform a historical review of required storage quota based on average object size and volume over the retention period to identify the required storage quota to meet your needs.
To review historical storage usage:
- Go to the Explore view.
- From the Group by filter, select
NONE. - Select Add aggregation, add the
object.sizeattribute and thesumoperator. - Set the Time frame filter to a period for full error retention.
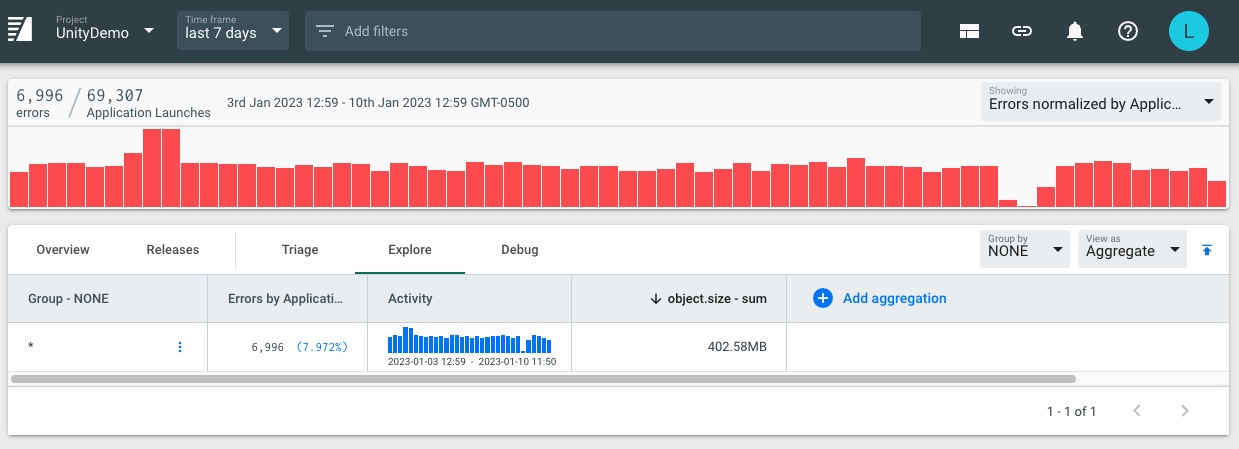
Since we have set retention/compression rules, this gives us an estimate for how much storage is required for the current state. With compressions/retention rules enabled, we should keep this usage consistent if traffic also remains consistent. With that said, we recommend a 25% buffer in storage needs, or a further reduction in object compression and retention rules.