Live Mobile App Testing
With Sauce Labs, you can test Android and iOS/iPadOS applications on real and virtual devices. Upload an application to App Storage, configure app and device settings, select a target device, and launch a live testing session. Live sessions include tools for application inspection, debugging, device interaction, and session management.
If you do not have an application available, you can use one of the Sauce Labs demo applications to familiarize yourself with the live testing workflow:
Prerequisites
Before starting a live mobile app testing session, ensure the following requirements are met:
-
You must have a valid Sauce Labs account. (Log in or sign up for a free trial license)
-
Upload your application to App Storage. The uploaded application will be available for selection when launching a live test.
Upload an Application
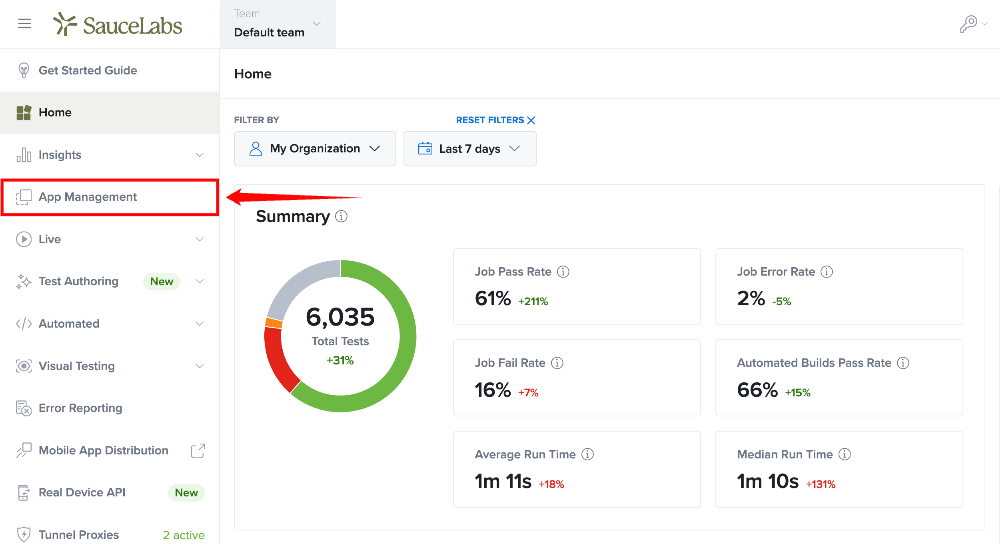
Step 1: Inside your Sauce Labs account, click on the App Management from the left hand navigation menu.
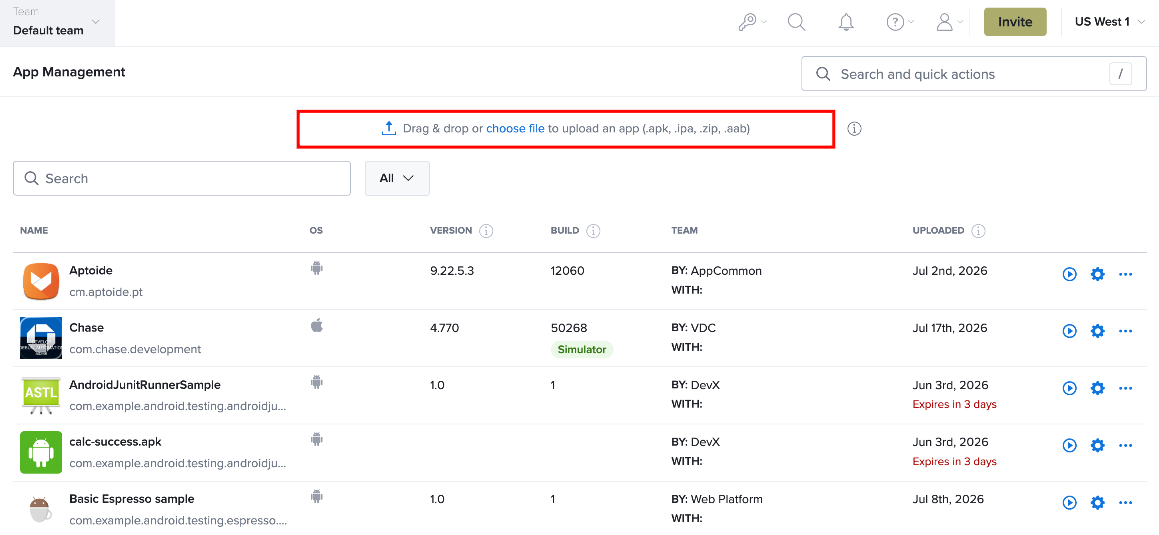
Step 2: In the App Management page, drag and drop your application into the upload area, or click choose file to upload it from your local computer storage.
For more information about supported file types and application upload methods, see the Accepted File Types and Uploading Apps documentation.
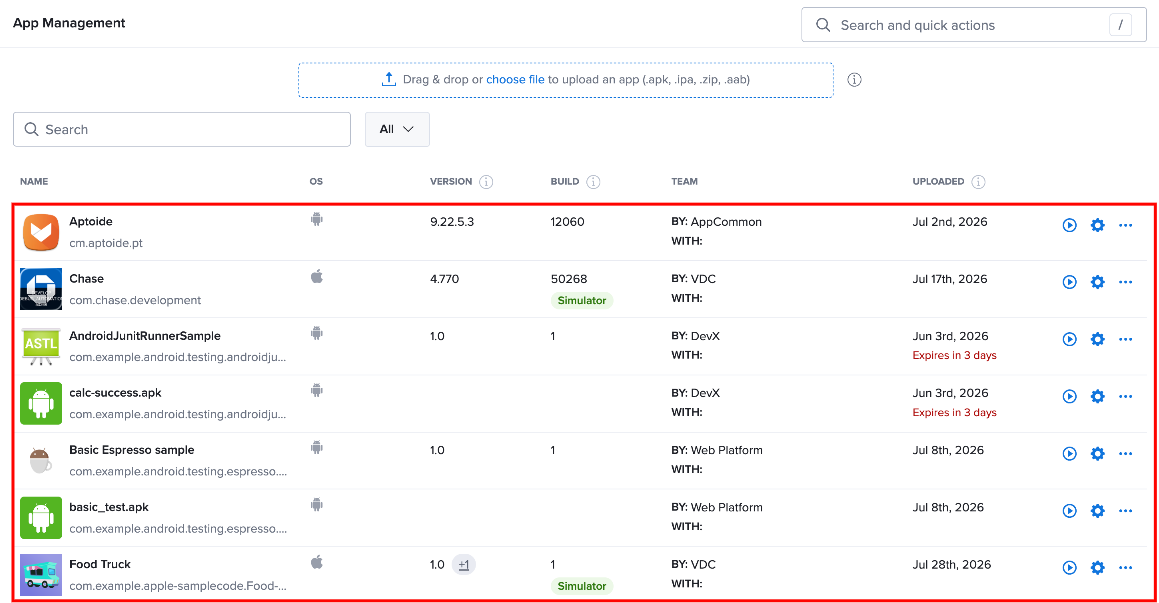
Step 3: After the upload is complete, the application is listed in the App Management, where you can view application details, uploaded versions, and available actions.
App and Device Settings
Configure the default application and device settings used for live mobile testing. These settings define the application's testing behavior and the device configuration applied when starting a manual test session.
The configured settings are used as the default for all manual live testing sessions. Automated tests use the settings defined with in the test script instead of these default configurations.
The Real Device Settings are only applicable for real device testing. Any changes you make to the app and device settings will affect all uploaded versions of the app.
Only organization and team admins have permission to modify these settings. If an organization admin wants to grant a member permission to modify these settings, they can promote the member to Team Admin. For further assistance, reach out to your Customer Success Manager or Sauce Labs Support.
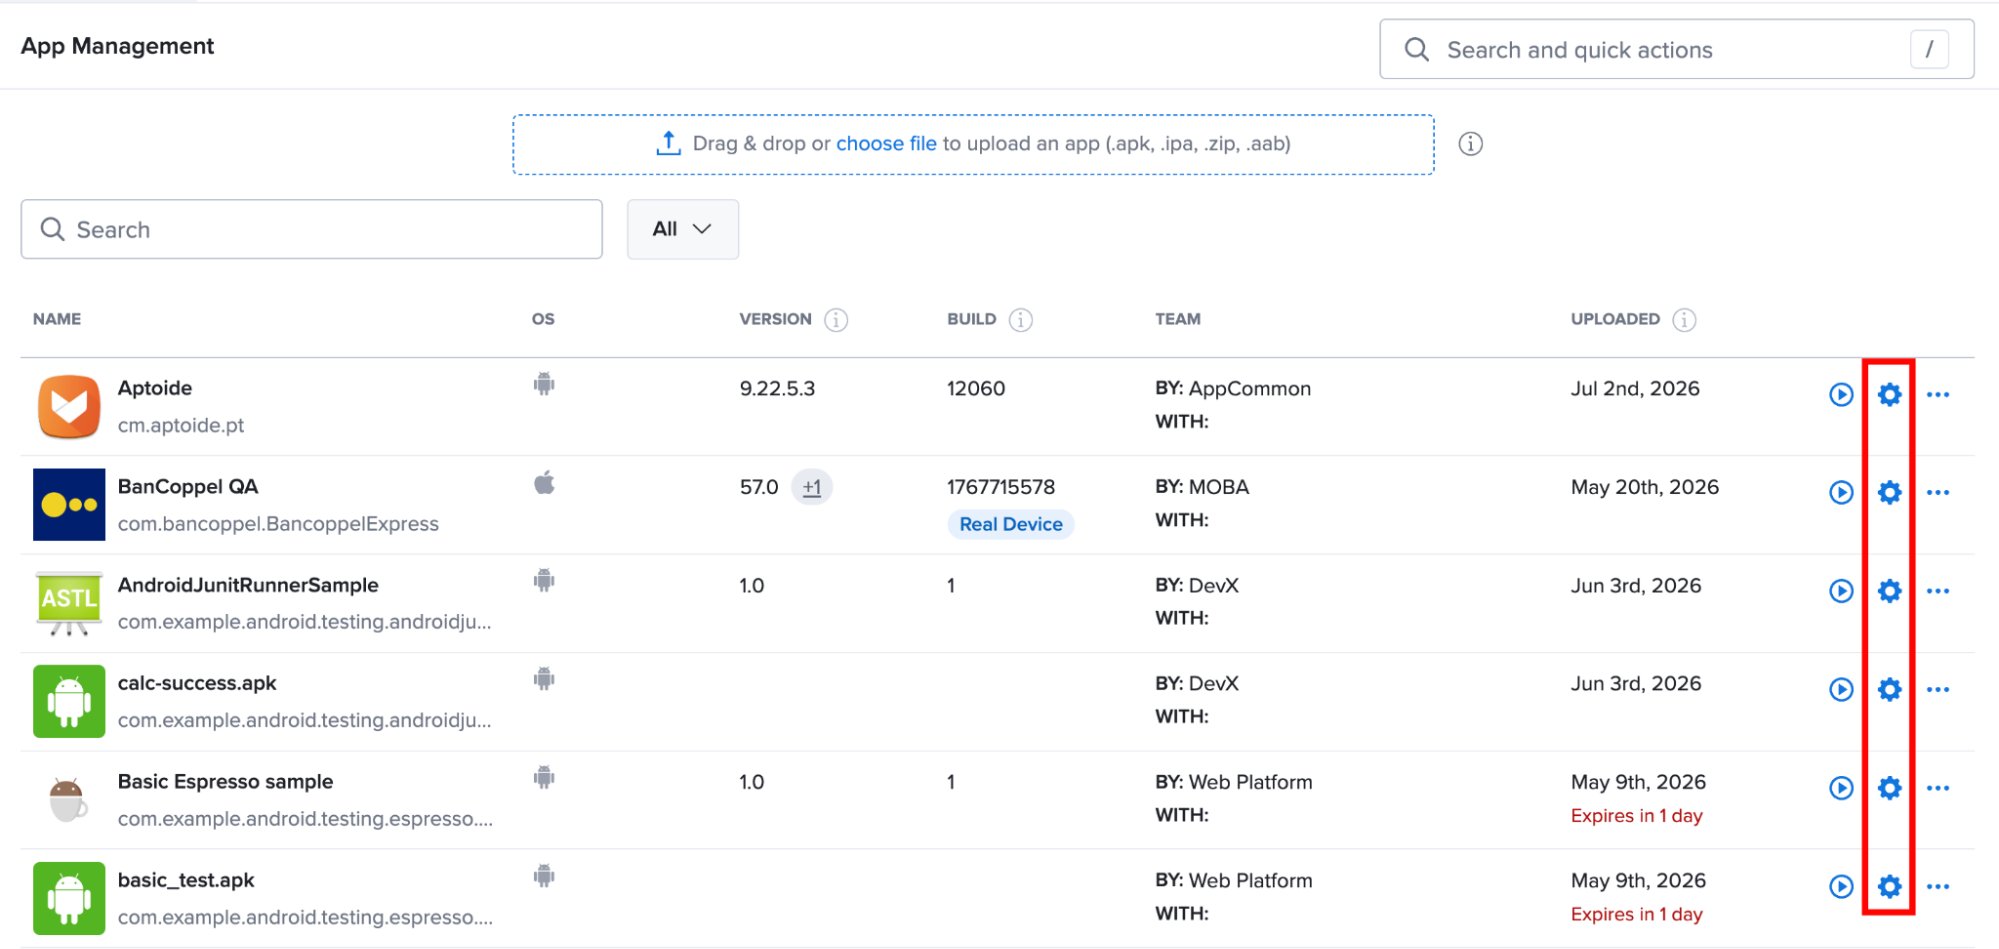
Step 1: In the App Management page, locate the uploaded application and click the Settings (⚙️) icon next to the application of your interest.
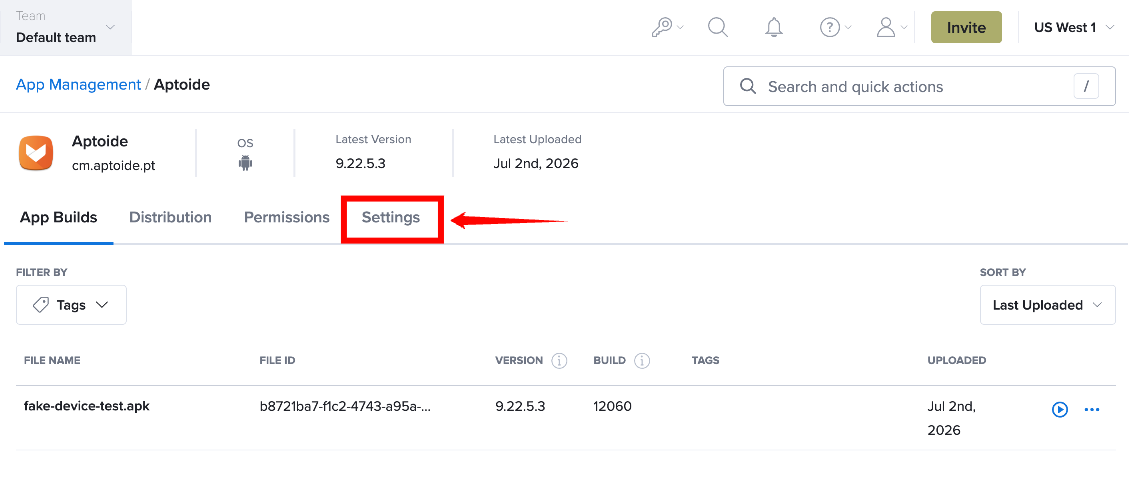
Step 2: On the application details page, select the Settings tab to view and configure the available application and device settings.
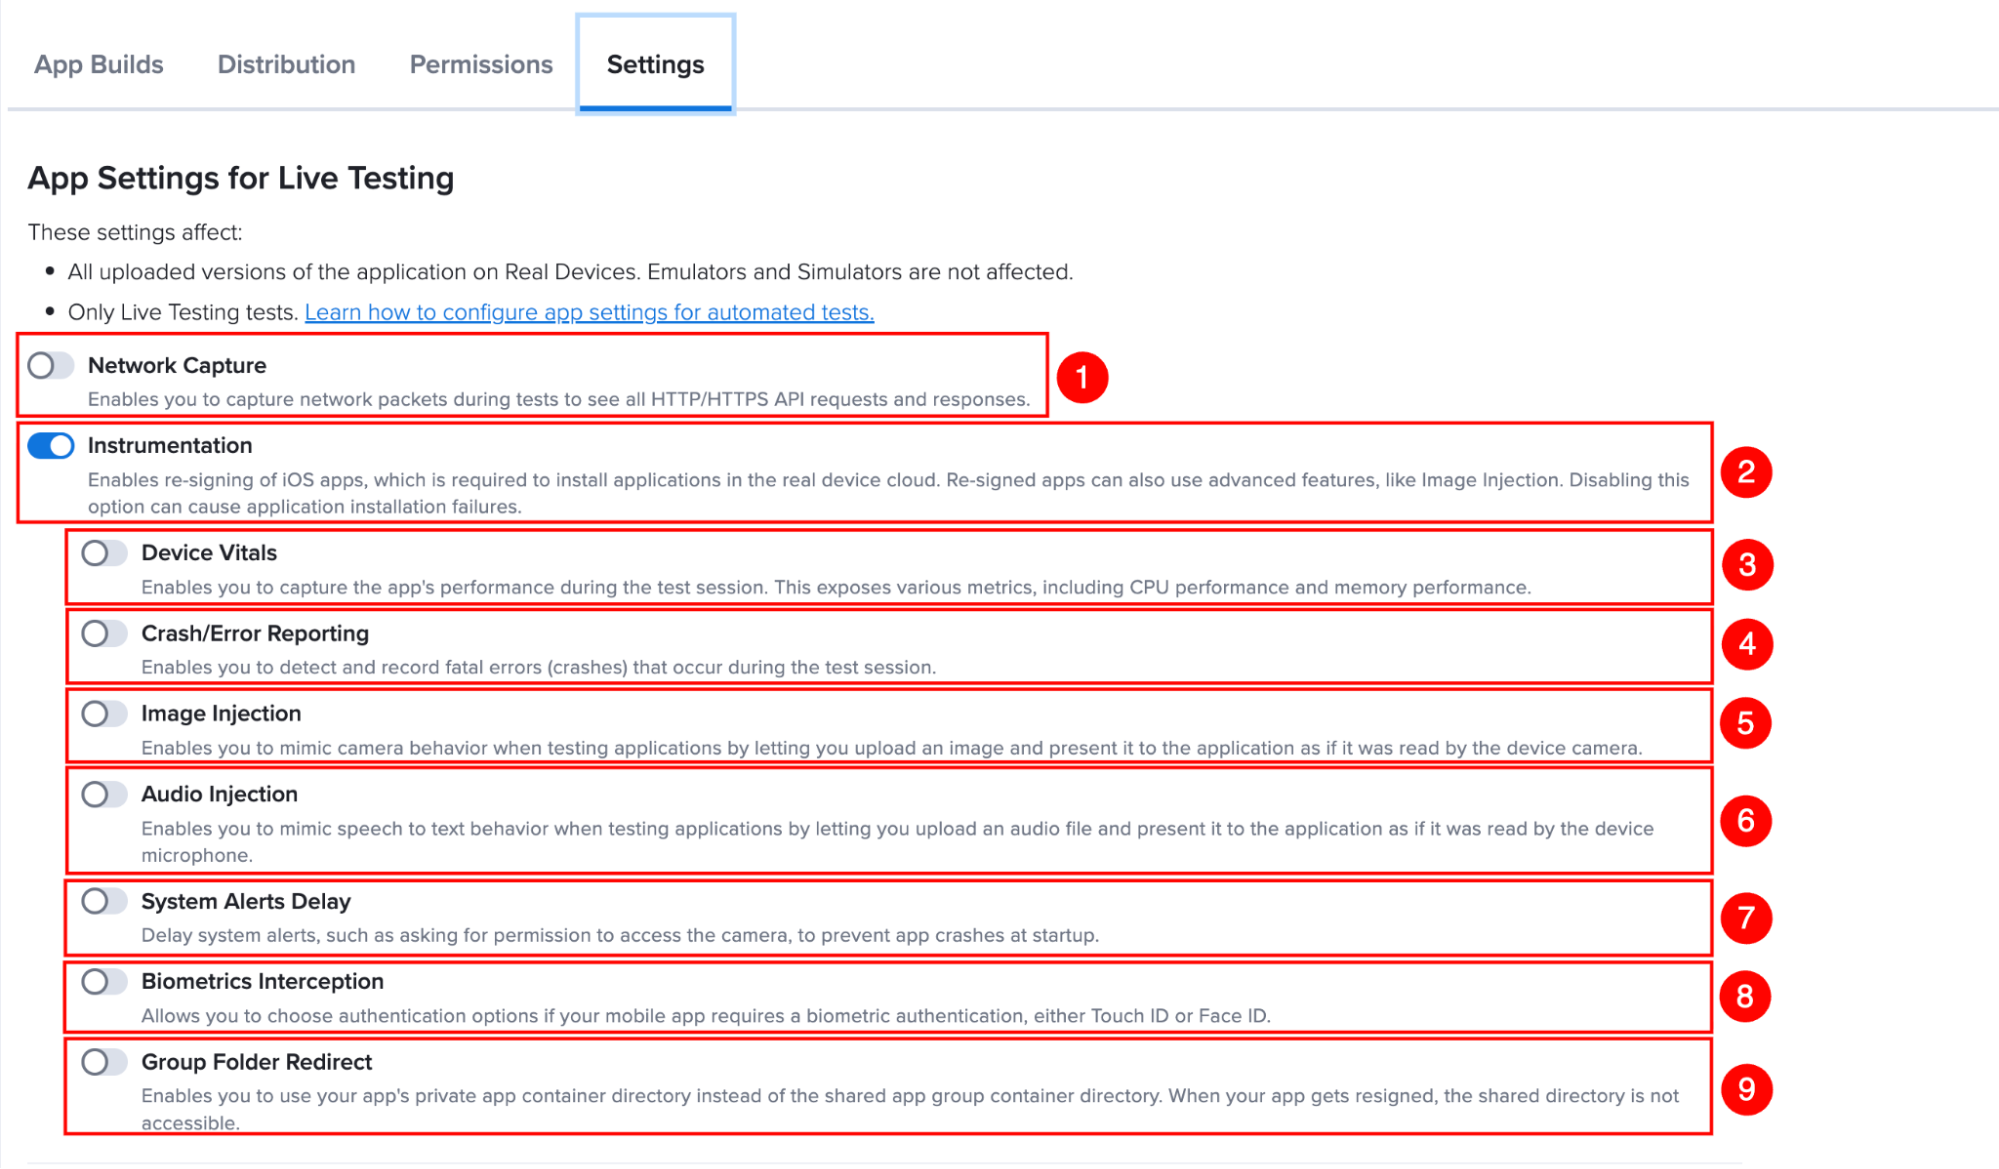
App Settings
The App Settings lets you configure default application behaviors for live testing sessions. These settings control features such as application instrumentation, network monitoring, performance metrics, crash reporting, and testing utilities.
| Ref. | Settings | Description |
|---|---|---|
| 1 | Instrumentation | Enable/disable app instrumentation. Enabling allows you to use advanced features when testing your app in the real device cloud, like Image Injection and Bypass Screenshot Restriction. |
| 2 | Network Capture | Enable/disable Network Capture. Enabling allows you to capture network packets during tests to see all HTTP/HTTPs API requests and responses. For Android a minor modification in the manifest is necessary to make your app trust our proxy certificate. We'll do this for you automatically on the fly, right before we install the app to the target device. |
| 3 | Device Vitals | Enable/disable Device Vitals. Enabling allows you to capture the app's performance during the test session. This exposes various metrics, including CPU performance, memory performance, and UI responsiveness (Android only). |
| 4 | Crash/Error Reporting | Enables/disables Crash/Error Reporting. Enabling allows you to detect and record fatal errors (crashes) that occur during the test session. |
| 5 | Image Injection | Enable/disable Image Injection. Image Injection allows you to mimic camera behavior when testing apps by letting you upload an image and present it to the app as if it were read by the device camera. |
| 6 | Audio Injection | Enable/disable Audio Injection. Enabling allows you to simulate microphone input by uploading an audio file and presenting it to the application as if it were captured through the device's microphone. |
| 7 | System Alerts Display iOS Only | Enable/disable a system alerts delay. Enabling delays alerts, such as asking for permission to access the camera, to prevent app crashes at startup. |
| 8 | Biometrics Interception | Enable/disable Biometrics Interception. Enabling allows you to choose authentication options if your mobile app requires biometric authentication, such as fingerprint or face recognition on Android, and Face ID or Touch ID on iOS. This setting is disabled by default for iOS apps. |
| 9 | Group Folder Redirect iOS Only | Enable/disable a group directory redirect. Enabling allows you to use your app's private app container directory instead of the shared app group container directory. When your app gets resigned, the shared directory is not accessible. |
| 10 | Bypass Screenshot Restriction Android Only | Enable/disable Bypass Screenshot Restriction. If you're testing Android mobile apps on Sauce Labs and see a black screen in your live testing session, you might need to enable the Bypass Screenshot Restriction. This allows Sauce Labs to work around a setting on those apps that prevents screenshots or videos from being taken. However, there are other details to keep in mind. To effectively test apps that have this setting, see Bypass Screenshot Restriction. |
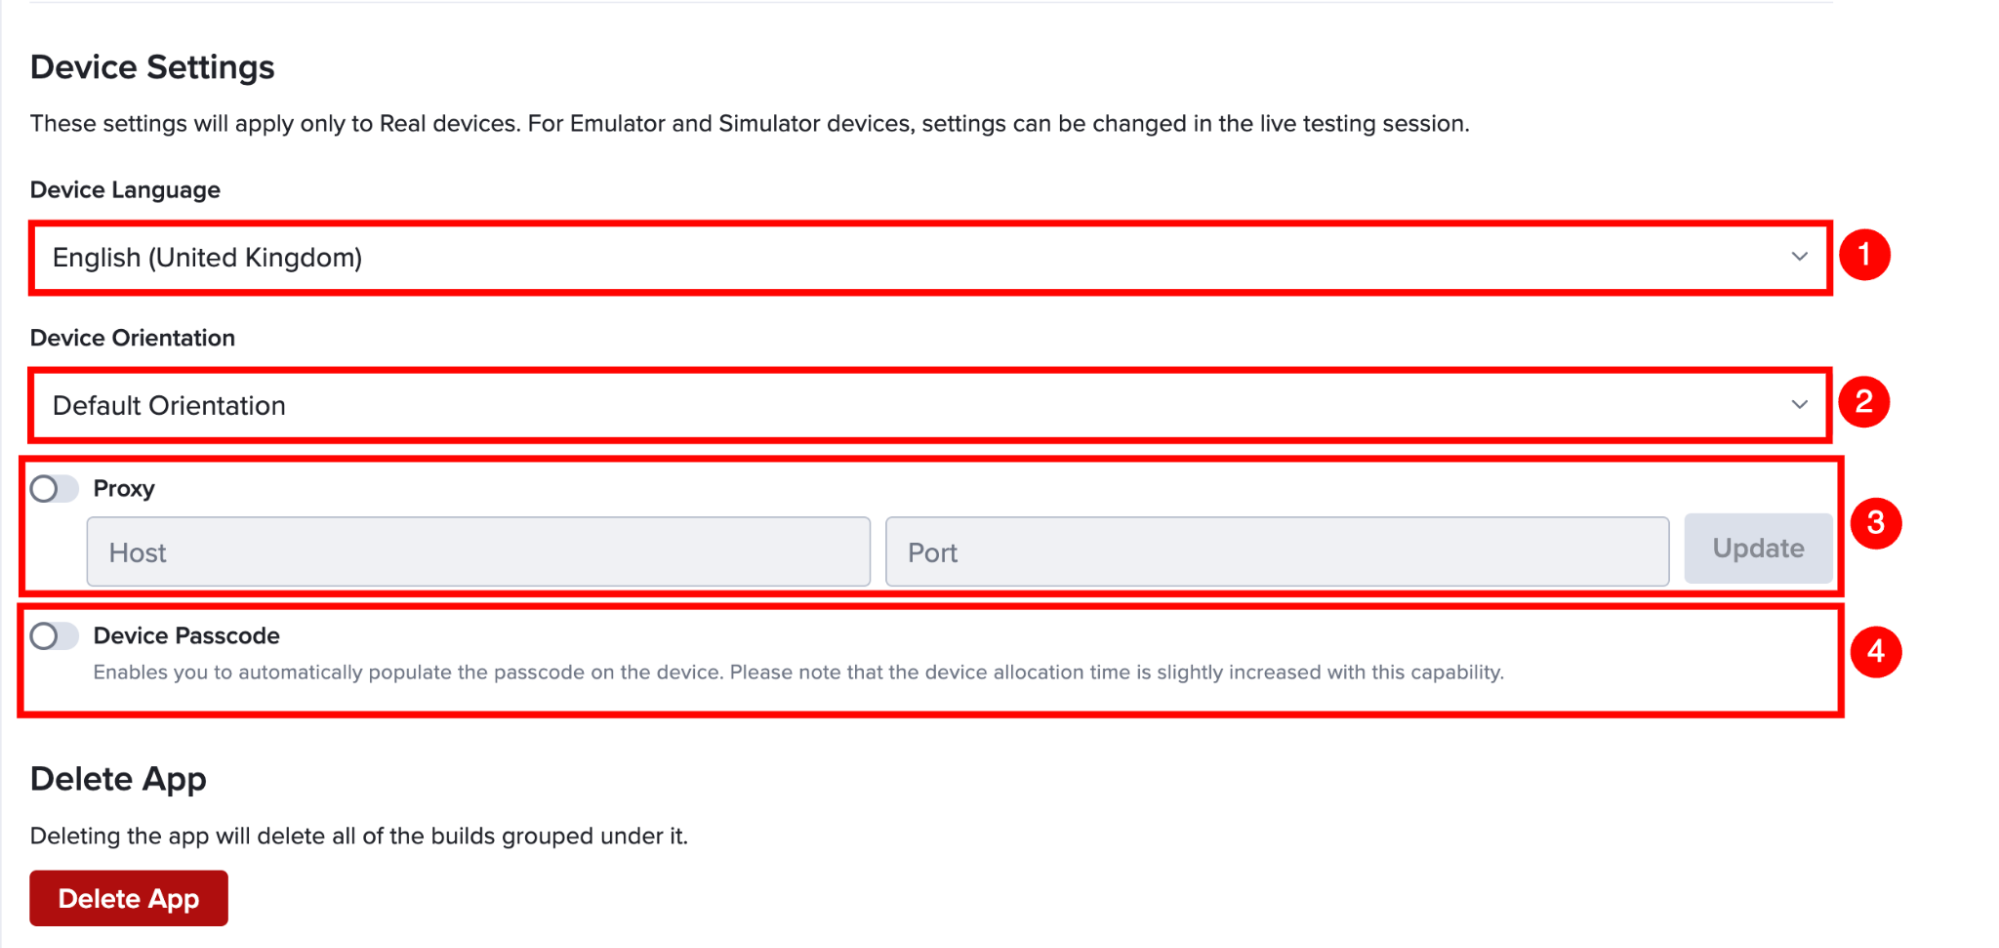
Real Device Settings
The Device Settings section defines the default configuration applied to real devices when a live testing session starts. These settings allow you to customize the device environment without manually configuring the device during each testing session.
| Ref. | Setting | Description |
|---|---|---|
| 1 | Device Language | Use the dropdown list to select the device language. The language selector will tell your application that the device's locale and region are set to the selected parameter. You won't need to manually change the OS's language during a session inside iOS/Android settings. For more information about the locale setting, see the documentation for iOS and Android. |
| 2 | Device Orientation | Use the dropdown list to set the device orientation (Landscape or Portrait). |
| 3 | Proxy | Enable/disable the use of a proxy. Enter the Hostname and Port and then click Update. |
| 4 | Device Passcode | Enable/disable the device passcode for your apps. If your app requires a device passcode/screenlock to launch, you can enable this setting to run your tests on a passcode-protected device. On Android we are setting 000000, on iOS 089675 as passcode. This feature is available during Live Testing sessions, see it below in the Live Testing interface section. |
Select an Application
You can start a live testing session from the App Management page or the Live > Mobile Apps page. Depending on where you start the session, you can test either the latest uploaded build or a specific application version.
Method I: From App Management
Use this method to start a test using the latest uploaded version of an application.
Step 1: From the App Management page, locate the application of your interest, and click the Start Test icon next to it.
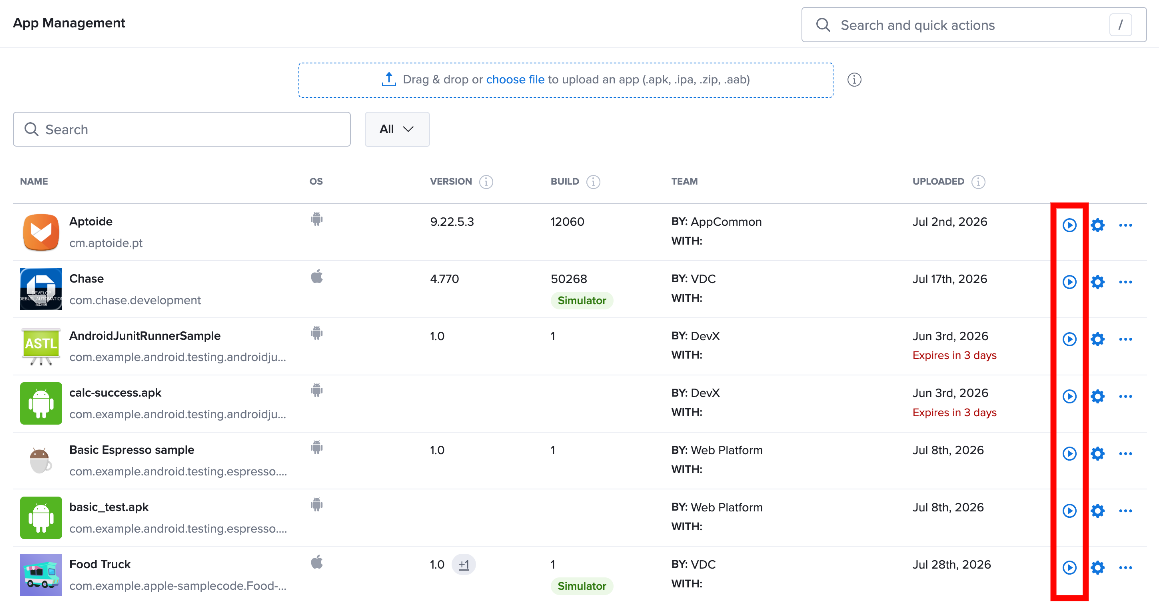
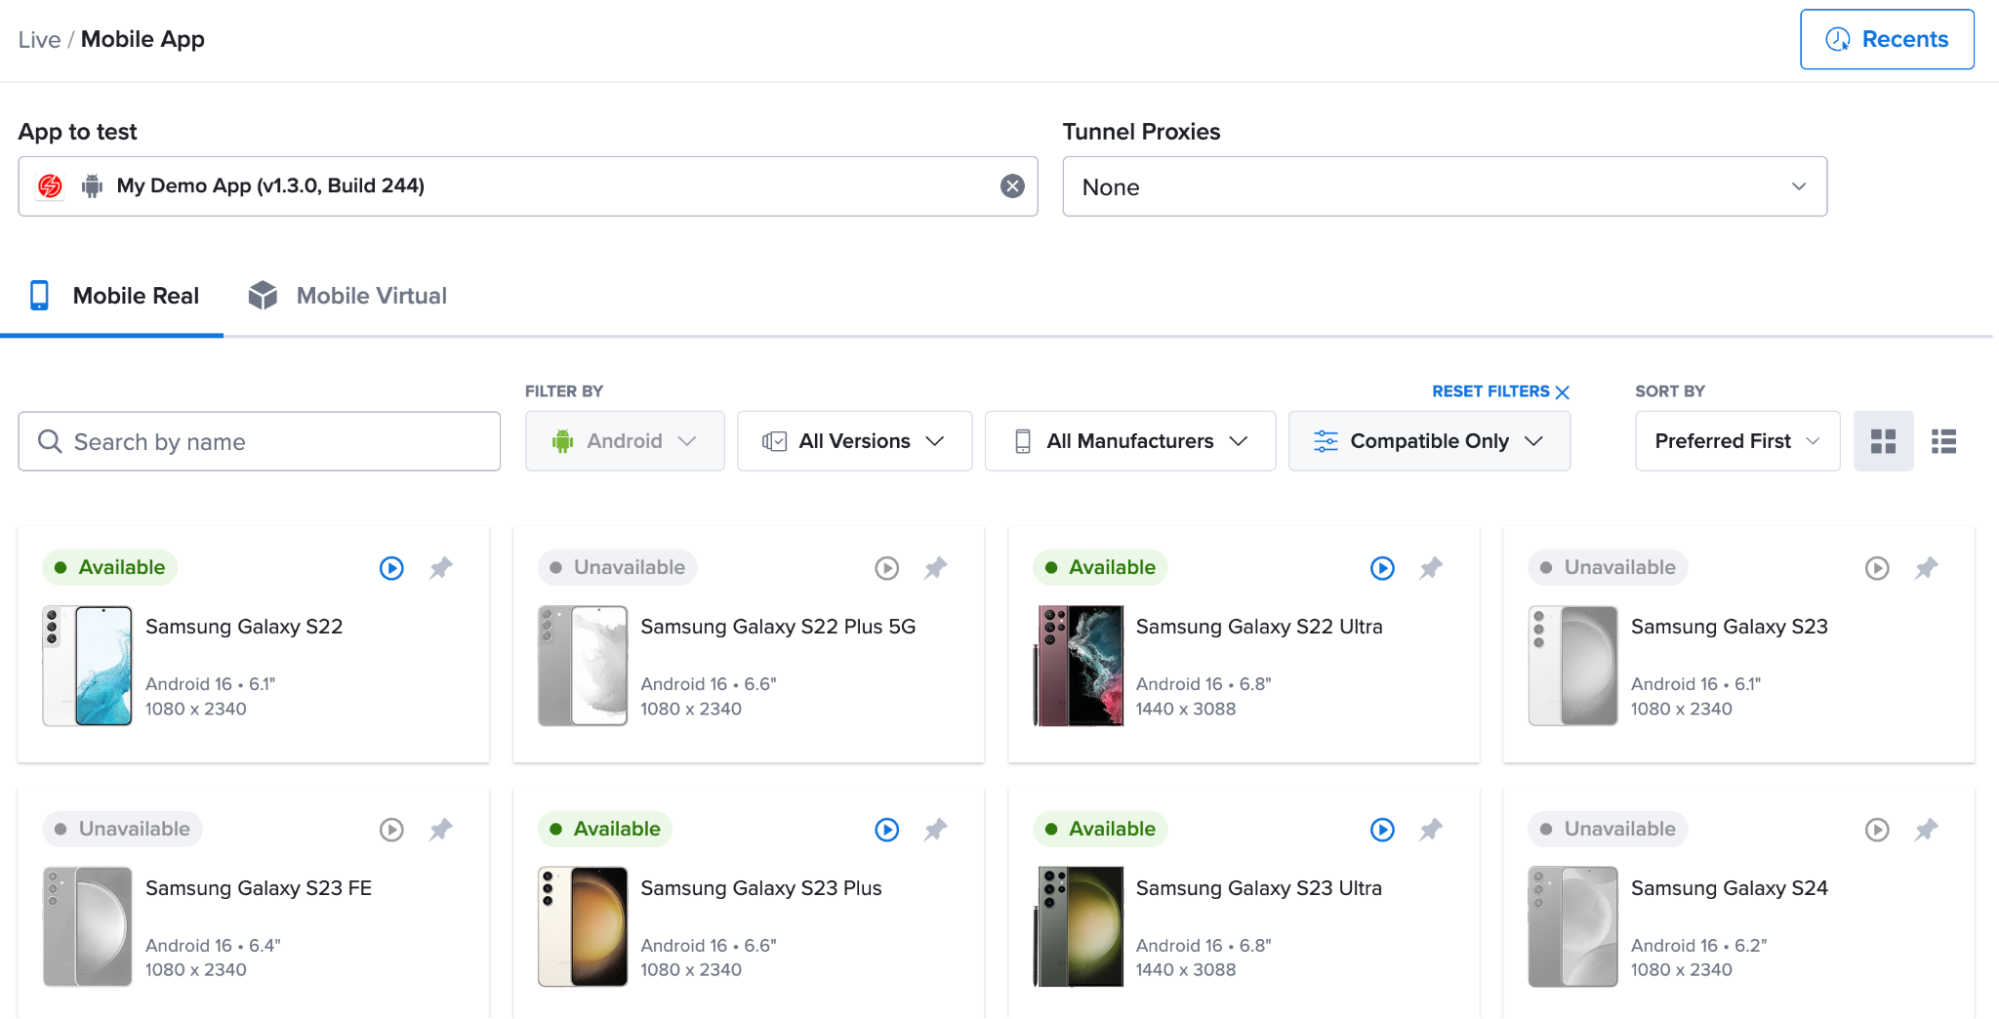
The latest uploaded build is selected automatically, and the Device Selection page opens.
Method II: From App Management - App Builds
Use this method to launch a test with a specific application build.
Step 1: In App Management, open the application details page, select the App Builds tab, and locate the build you want to test.
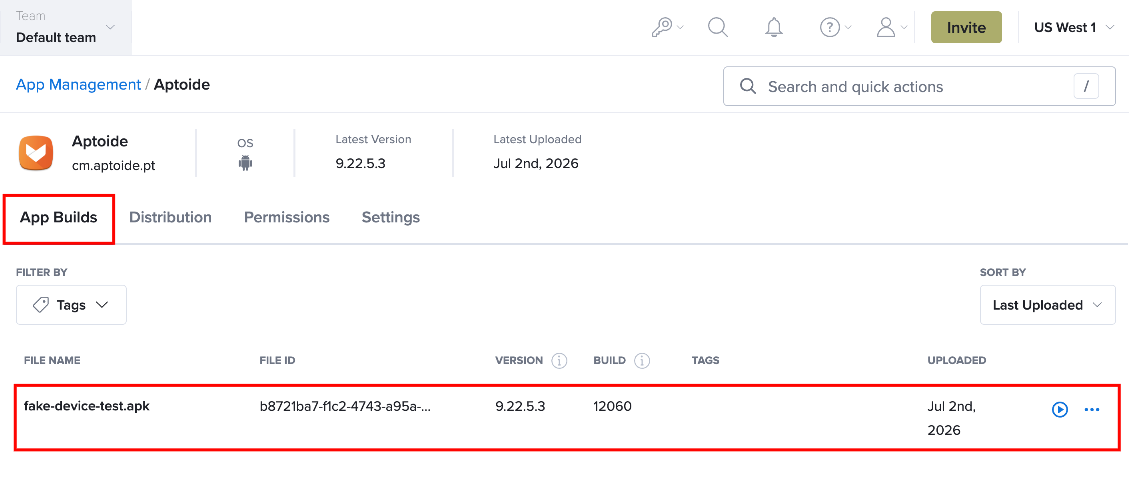
Step 2: Click the Start Test icon for the selected build. The Device Selection page opens.
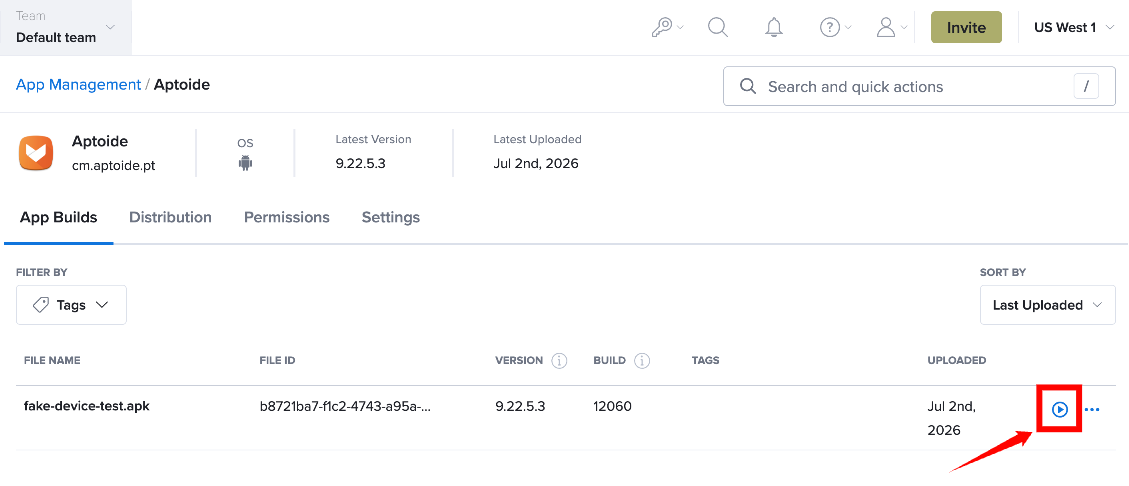
Use this method to start a test with a specific application build instead of the latest uploaded build.
Method III: From Live - Mobile Apps
Use this method to start a live testing session by selecting an application build from the Live Mobile Apps page.
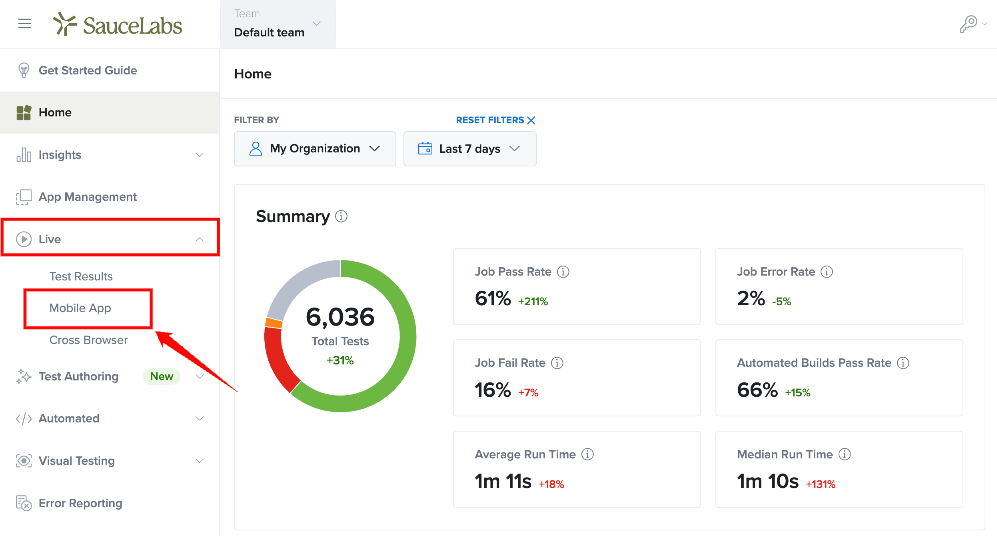
Step 1: From the left navigation menu, click Live, then select Mobile App.
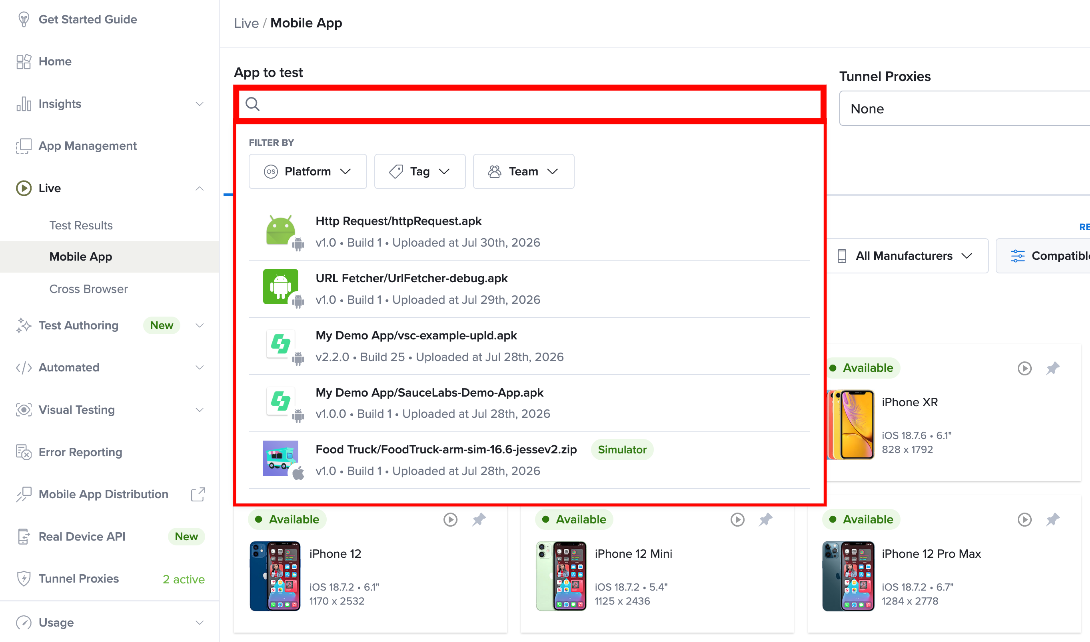
Step 2: In the App to test section, search for the application using the search box, or browse the list of available application builds.
You can also use the Platform, Tag, and Team filters to narrow the results.
Select a Device
After selecting an application, choose the device on which you want to run the live testing session.
| Device Type | Description |
|---|---|
| Real Device | Runs the application on a physical Android or iOS device hosted by Sauce Labs. Use this option to validate application behavior on actual hardware. |
| Virtual Device | Runs the application on an Android Emulator or iOS Simulator. Use this option for functional testing without requiring physical devices. |
If you are testing an iOS application, only the device type (Real Device or Virtual Device) supported by the application is displayed.
Select From Real Devices
Launch a live testing session on a physical Android or iOS device hosted by Sauce Labs.
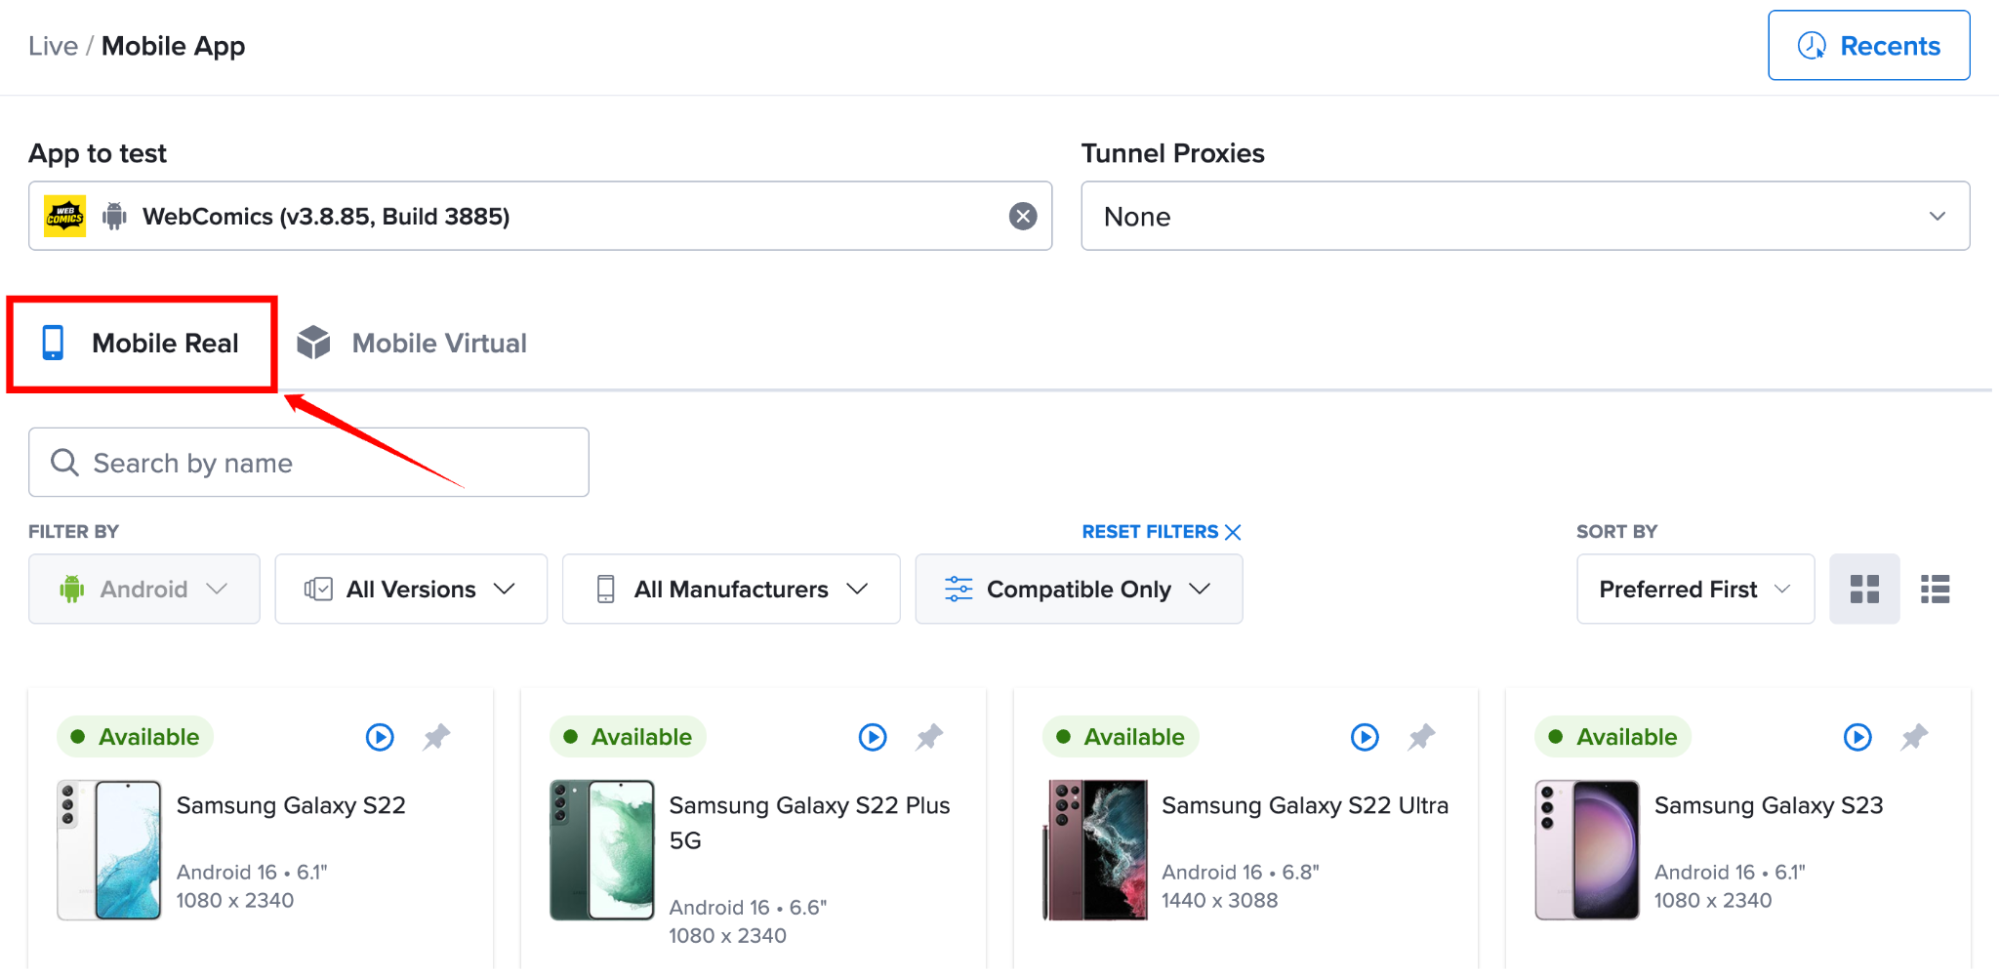
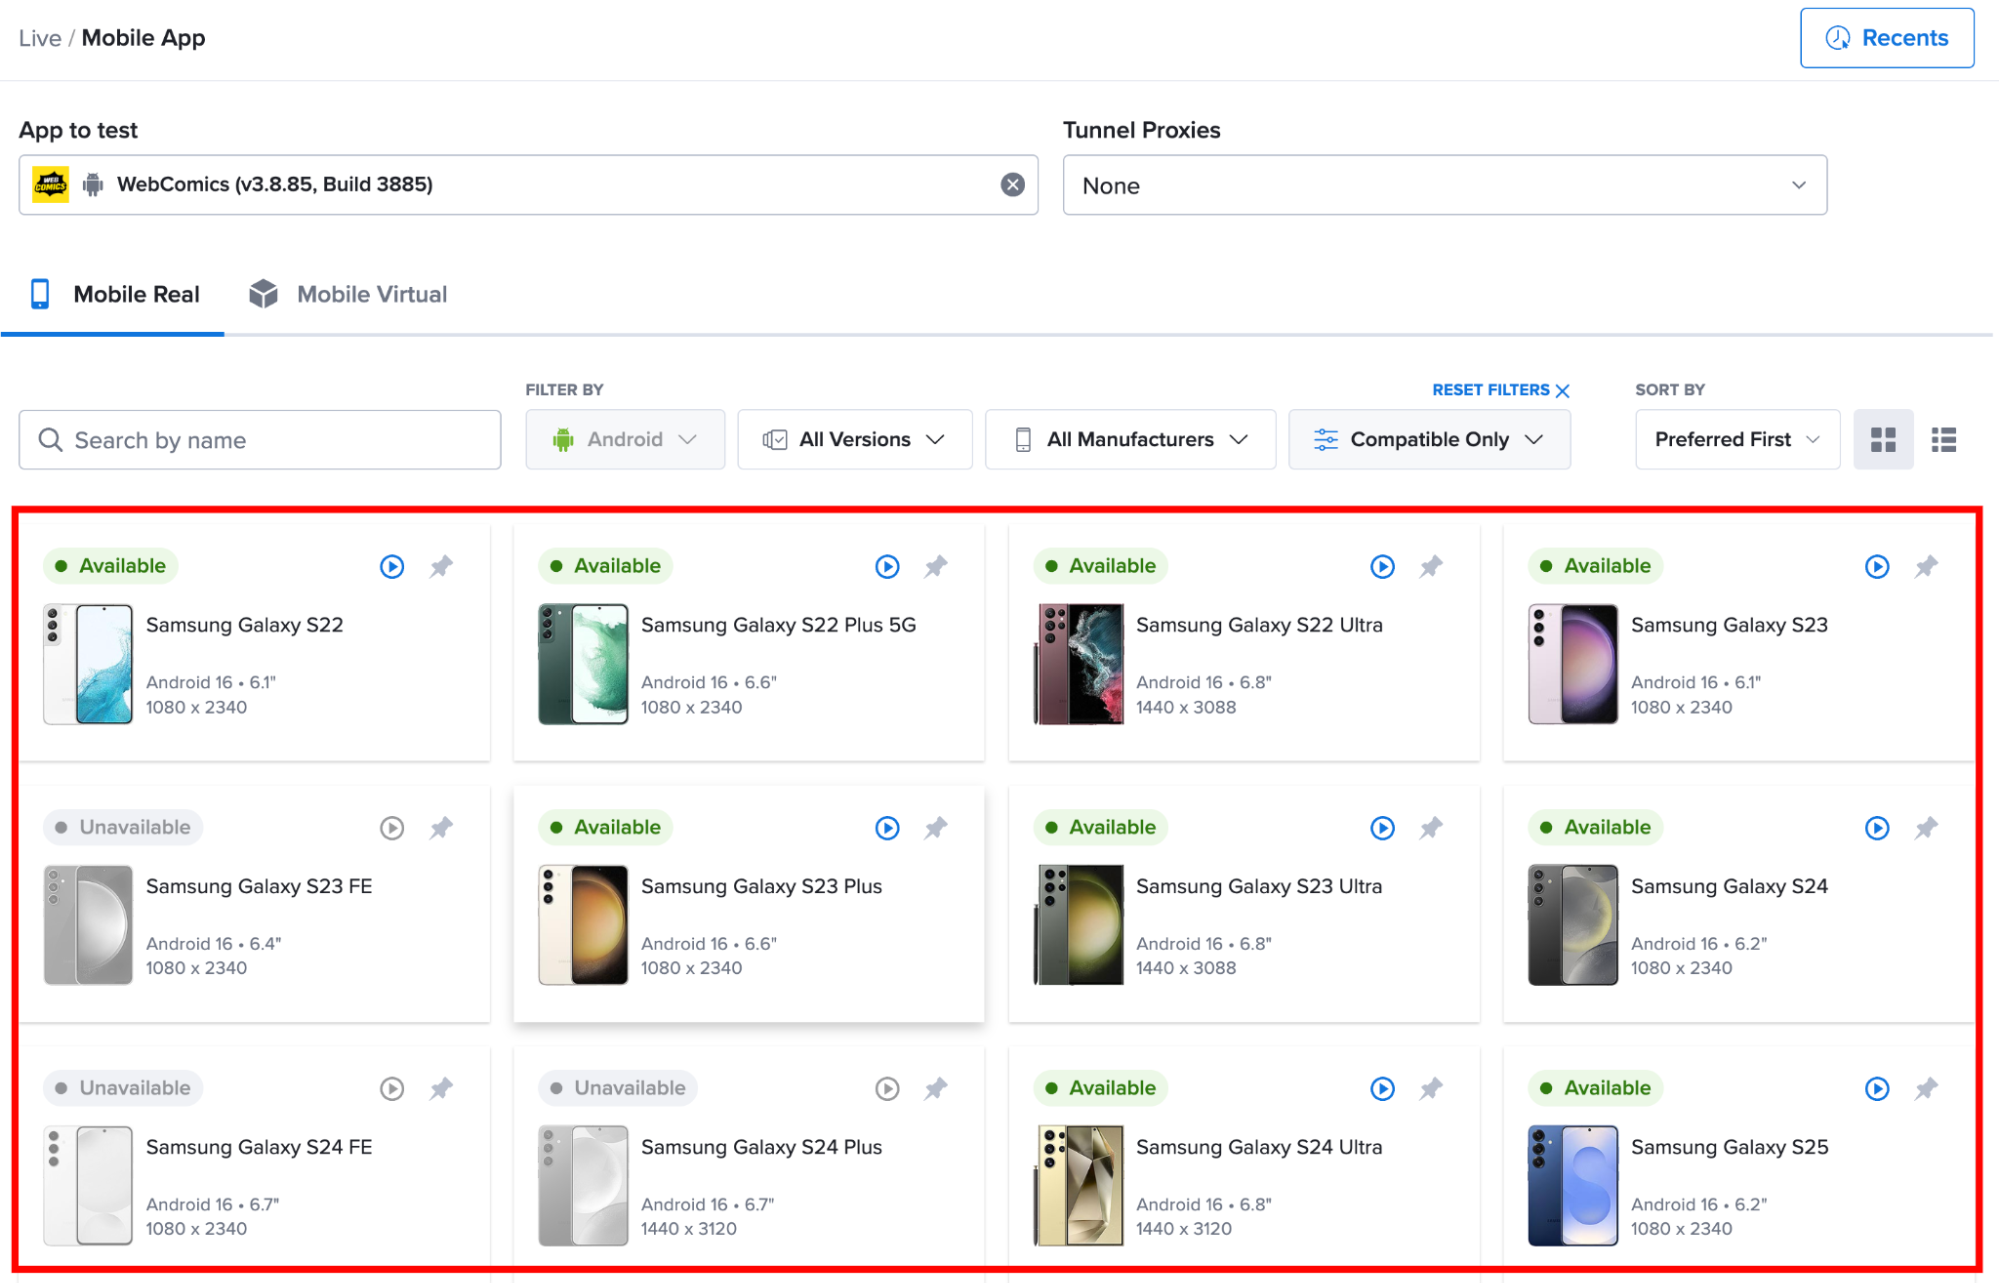
Step 1: On the Device Selection page, select the Mobile Real tab to view the list of available physical devices.
Step 2: (Optional) Use the Search box or the available filters to locate a device by manufacturer, operating system, platform, or compatibility.
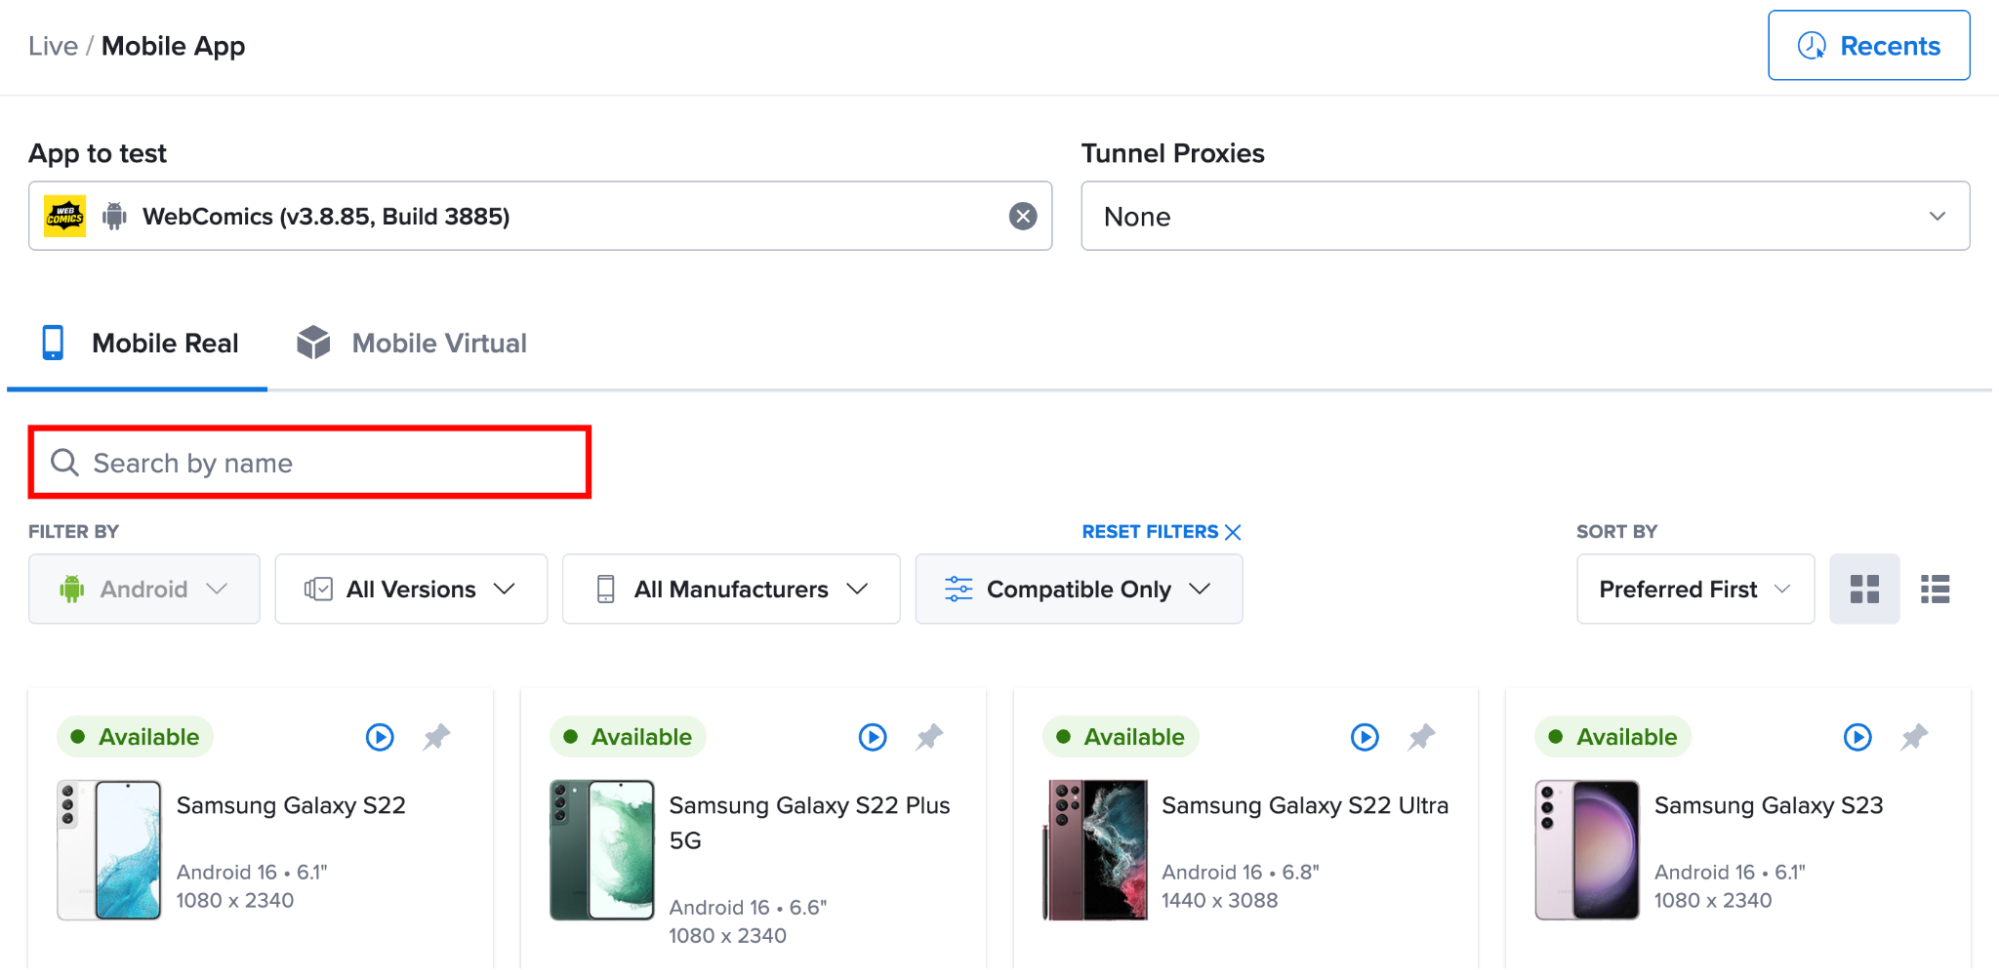
Step 3: Browse the list of available devices and review the device details, such as the device model, operating system version, screen resolution, and availability.
After you find the device you want to use, click on the device card to select it.
Select From Virtual Devices
Use this method to launch a live testing session on an Android Emulator or iOS Simulator.
Step 1: On the Device Selection page, select the Mobile Virtual tab.
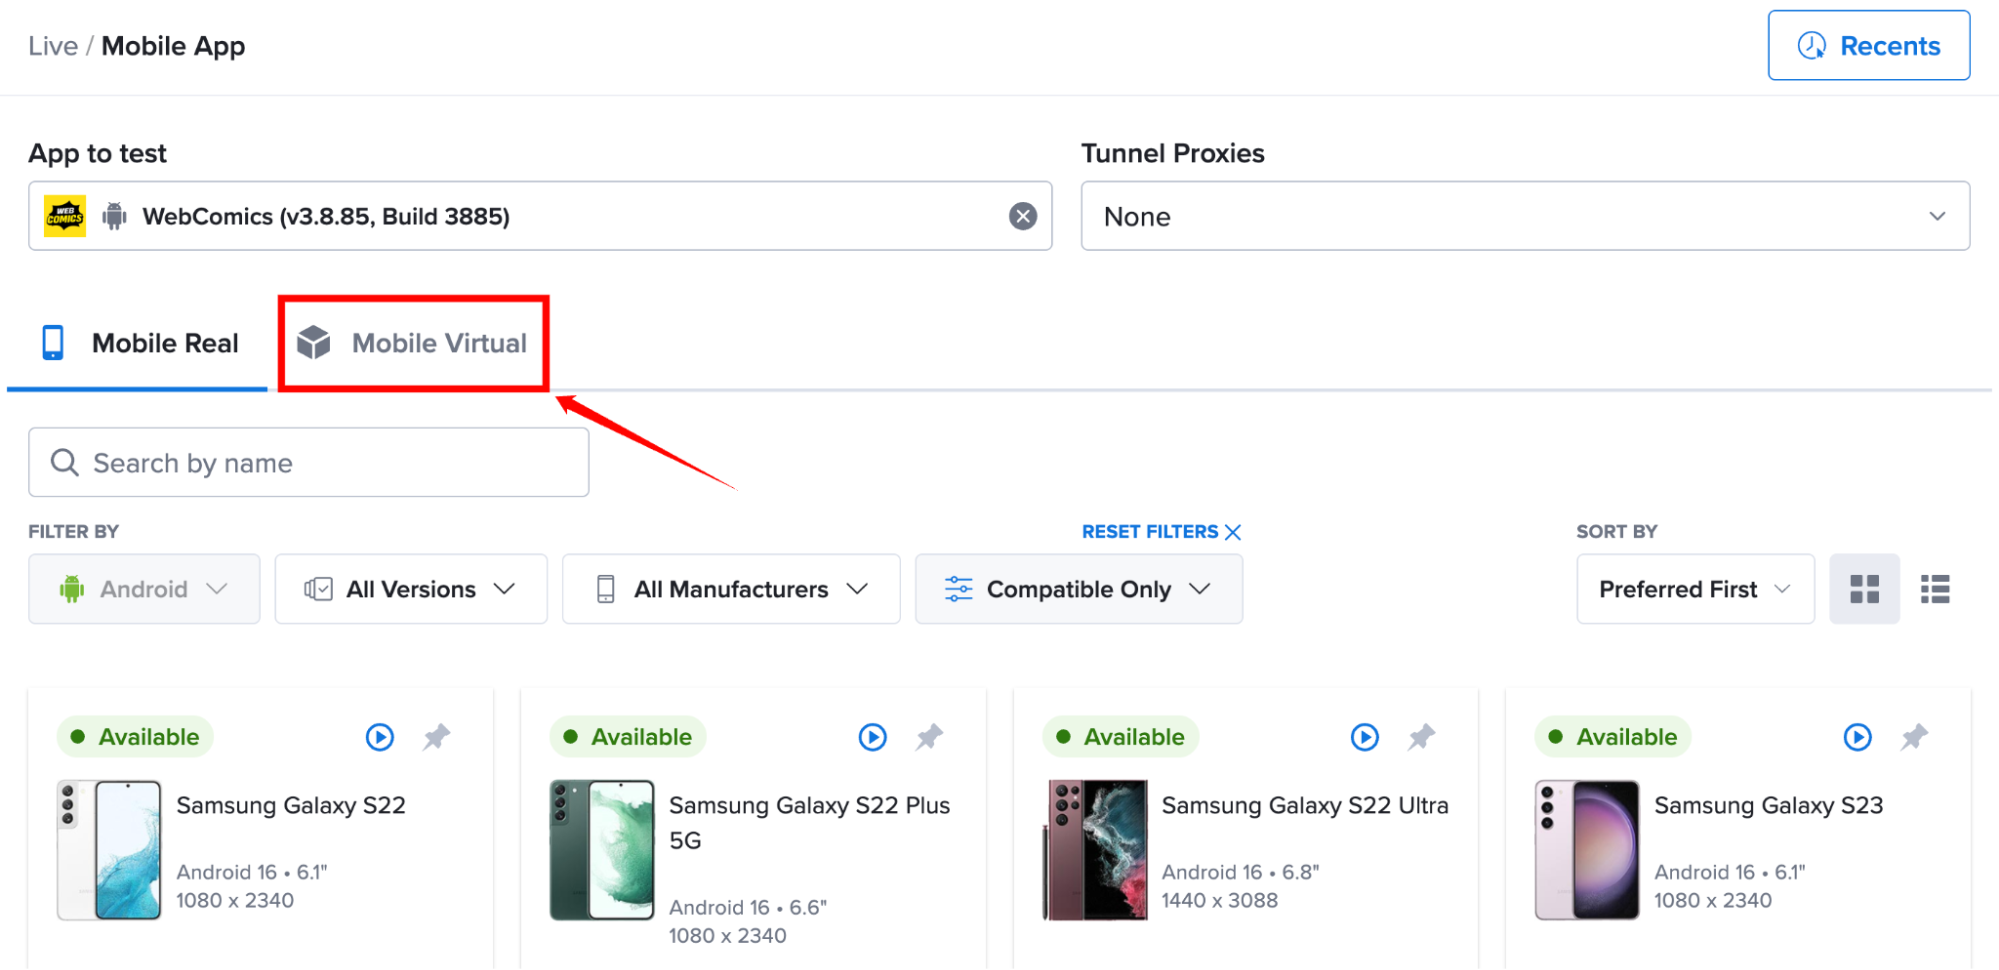
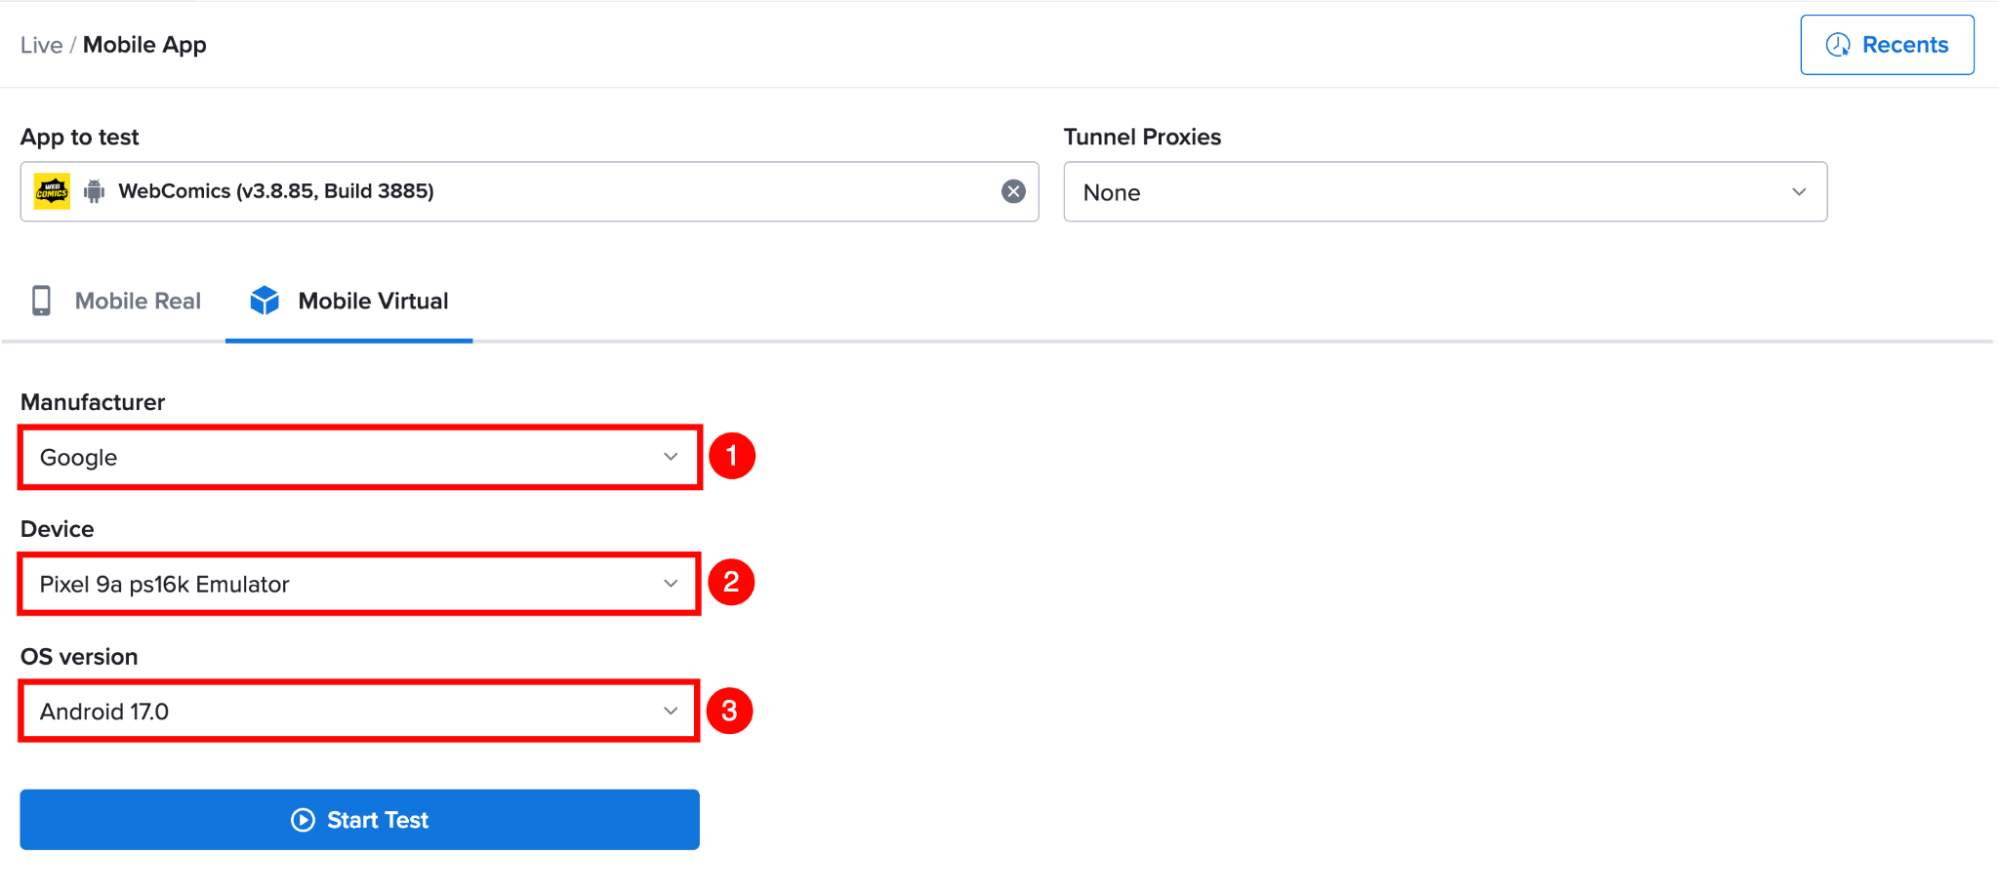
Step 2: Use the available dropdown lists to select the required platform, operating system version, and virtual device model.
| Field | Description |
|---|---|
| Manufacturer | Select the device manufacturer for the virtual device (for example, Google or Samsung). |
| Device | Select the virtual device model you want to use for testing. |
| OS Version | Select the operating system version for the virtual device. |
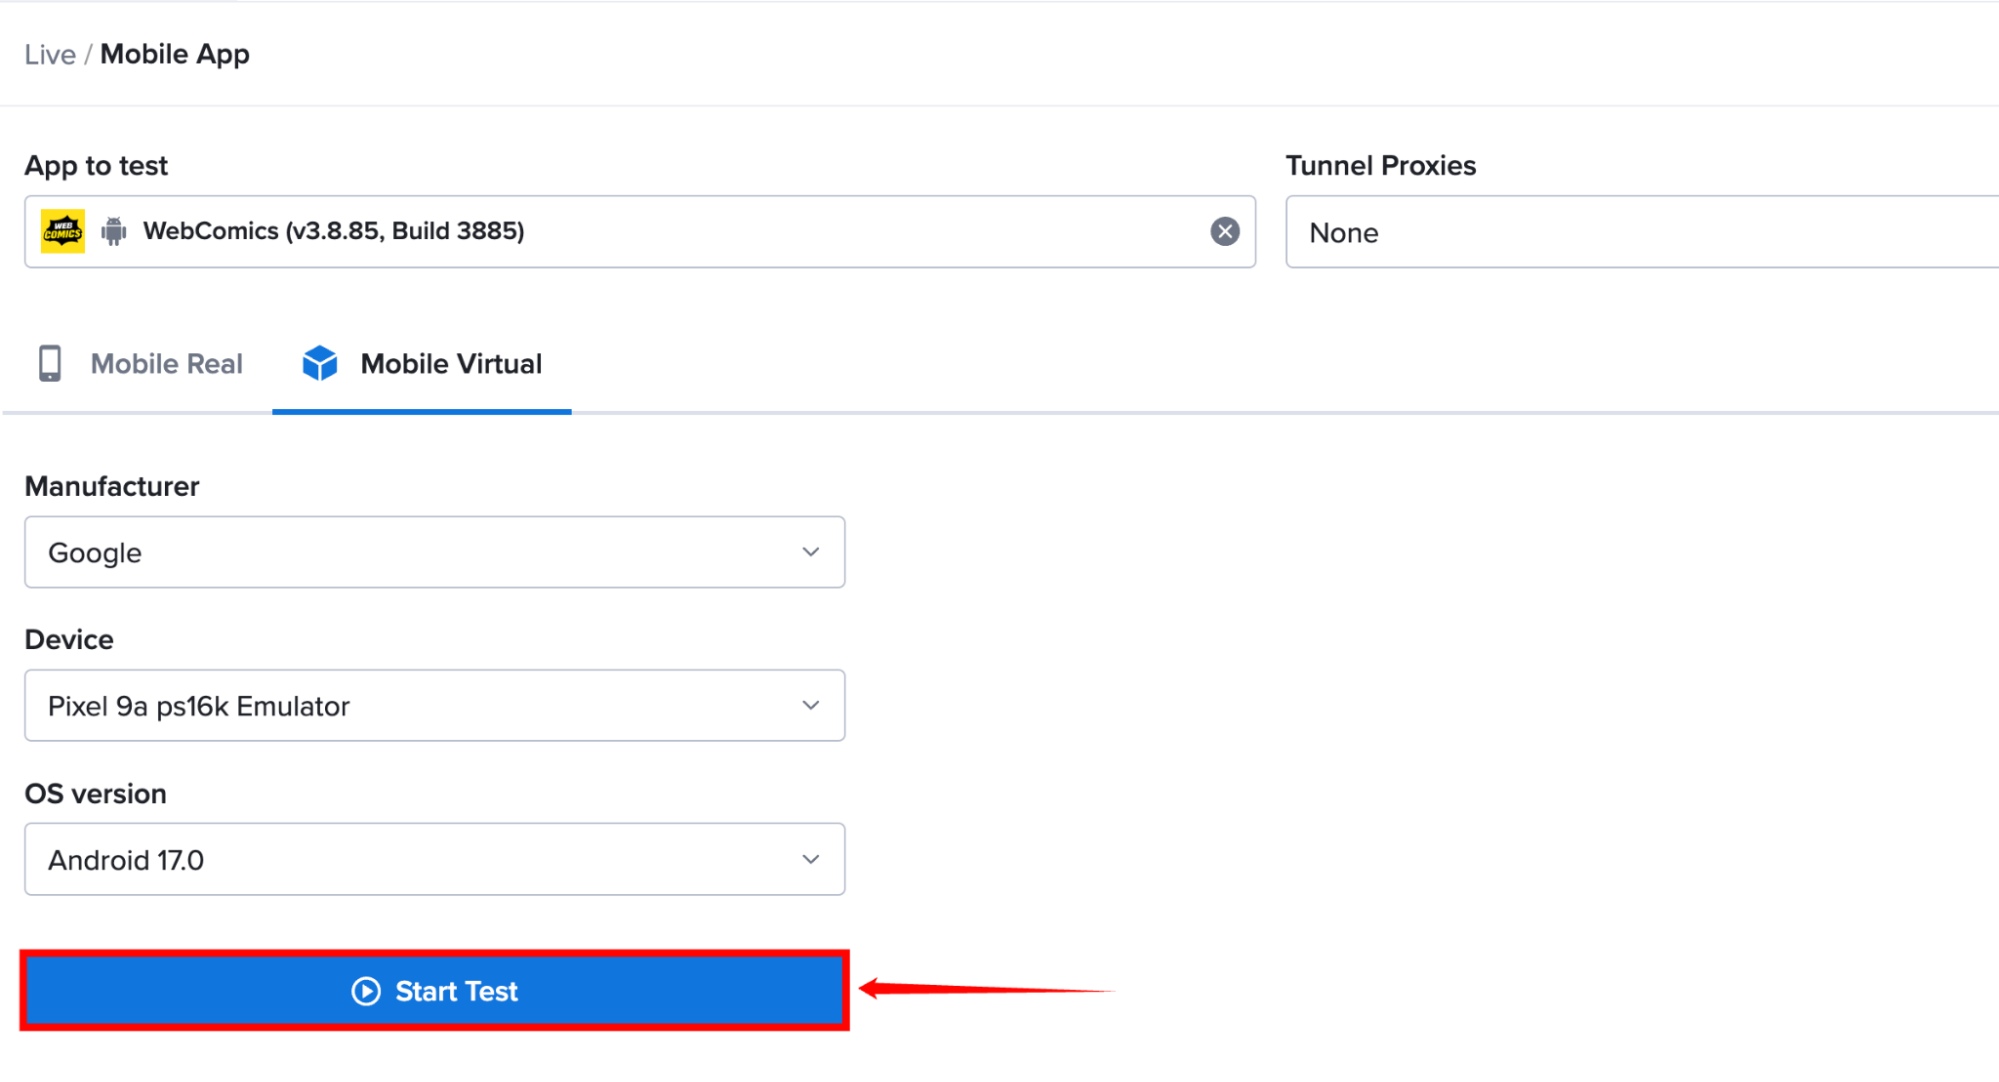
Step 3: Click Start Test to launch the selected virtual device. After the device is ready, the live testing session starts automatically.
Public vs. Private Devices
Sauce Labs provides two types of devices for live mobile testing: Public Devices and Private Devices.
| Device Type | Description |
|---|---|
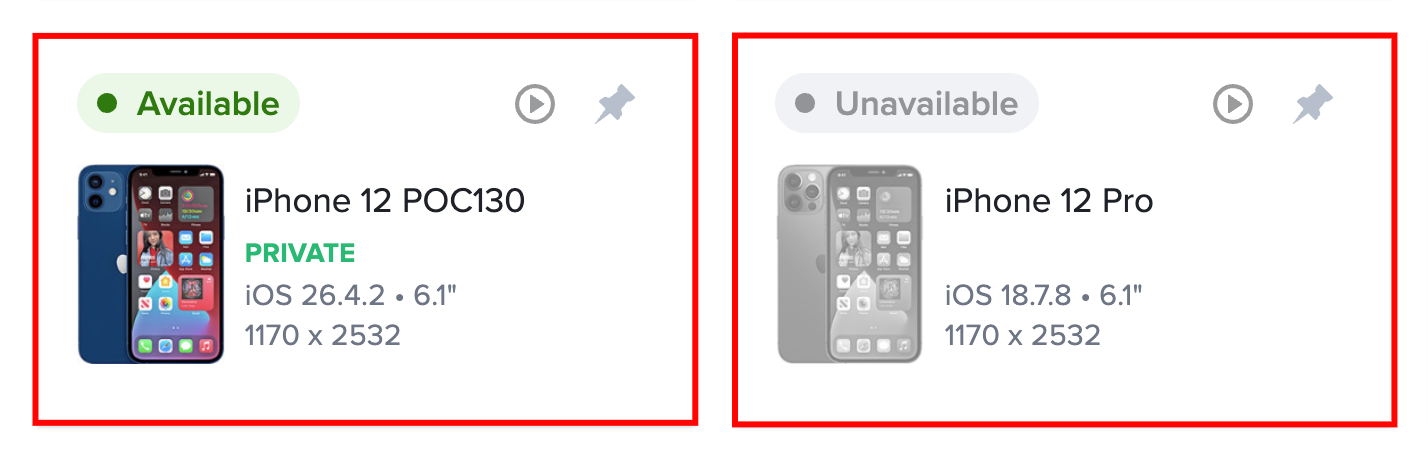
| Public Devices | Public devices are shared across Sauce Labs users and are available based on current device availability. If a device is already in use, it is marked as UNAVAILABLE in the device grid. |
| Private Devices | Private devices are dedicated to your organization and are available only with Enterprise plans. They are identified by the PRIVATE label in the device grid and are accessible only to authorized users with in your organization. |
To learn more about Enterprise plans or private device access, contact your Sauce Labs Sales Engineer or Customer Success Manager.
Pin a Device
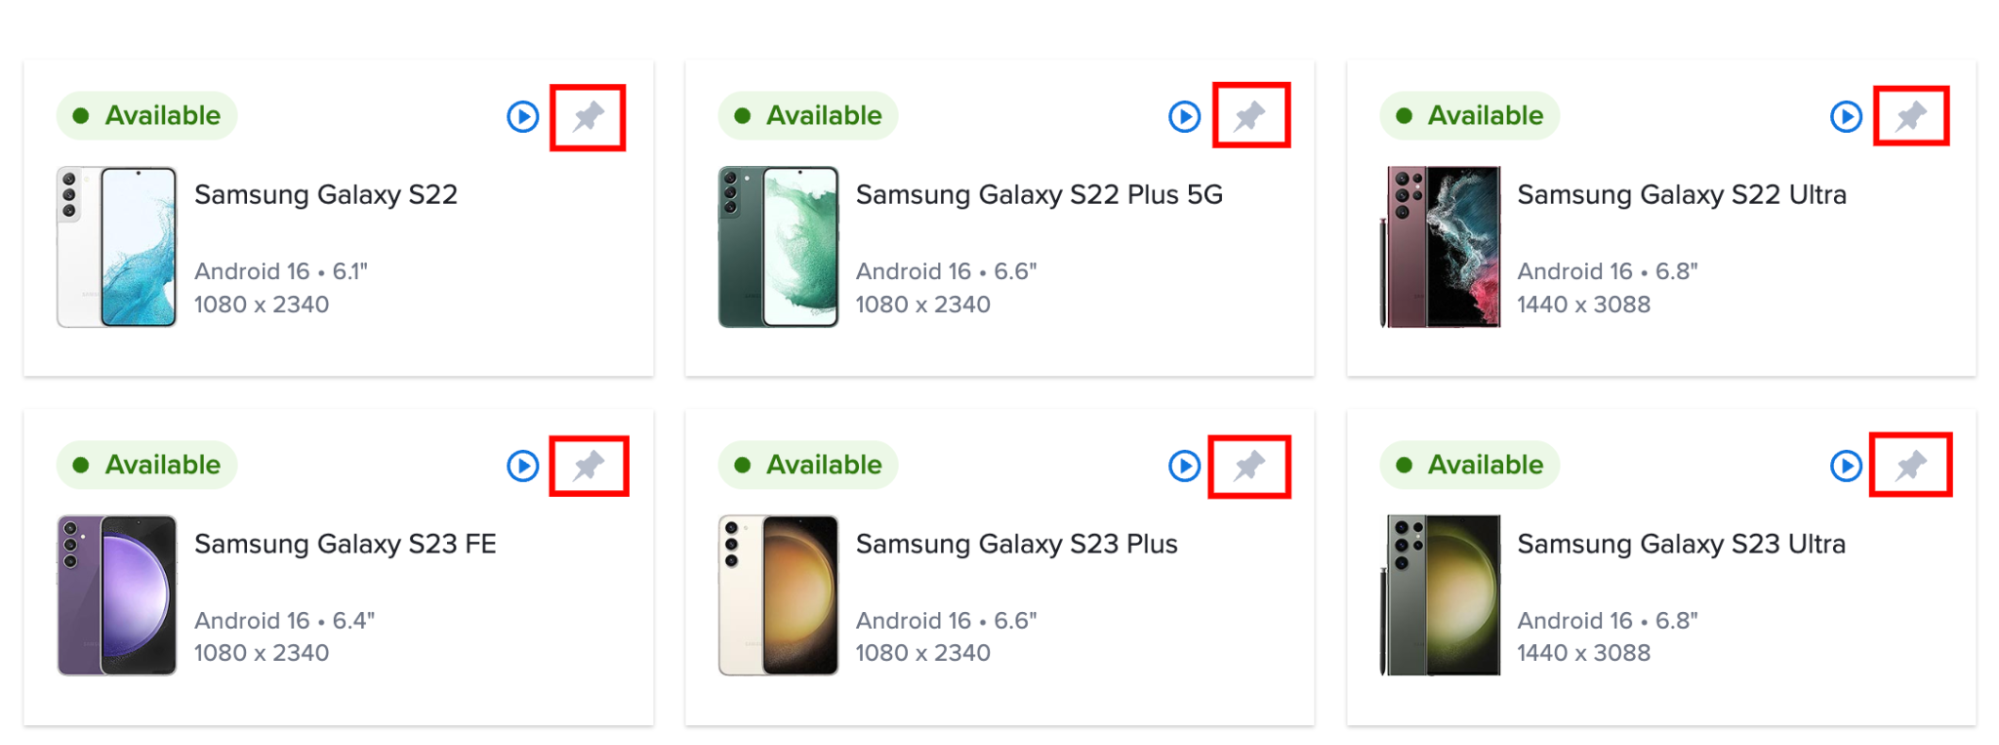
To quickly access a frequently used device, locate it in the device grid and click on the Pin (📌) icon on its device card. Pinned devices are displayed at the top of the device list by default.
View Recent Configurations
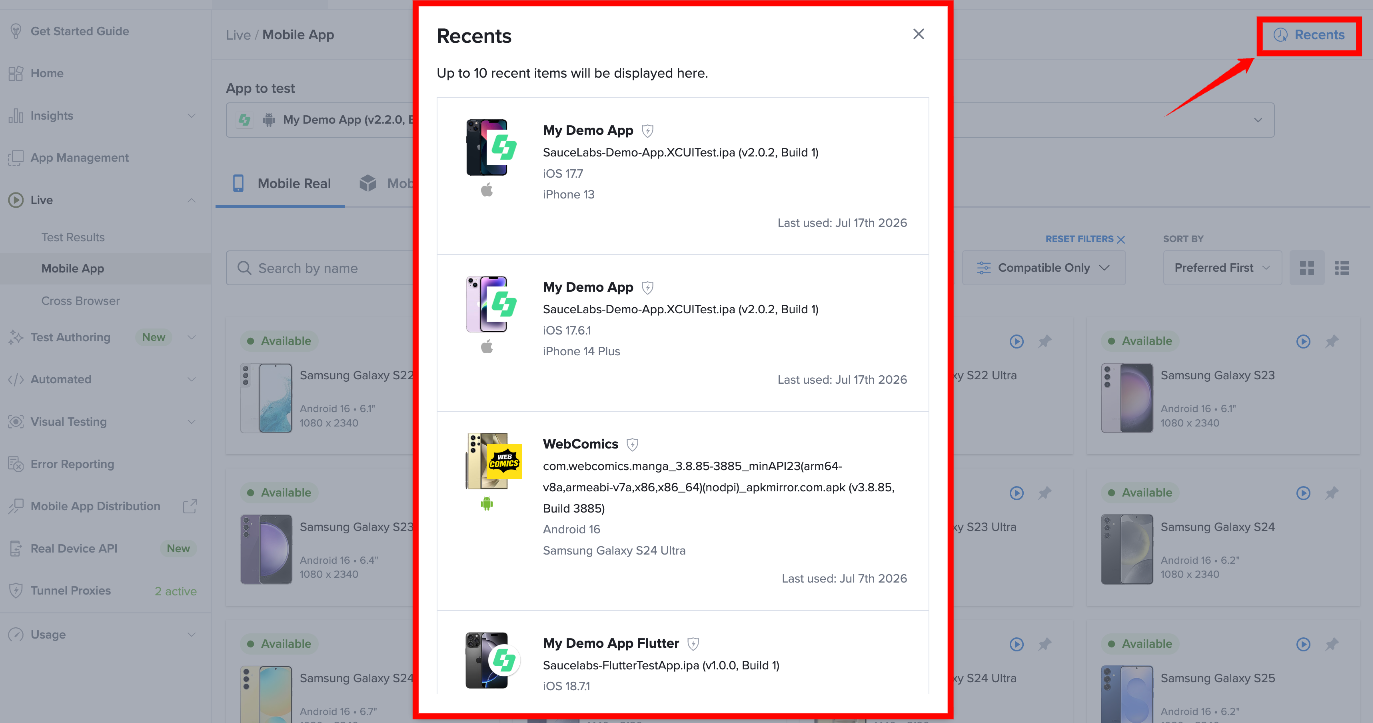
To view your recent configurations, click Recents on the Device Selection page. The Recents section displays your recently used application and device combinations, allowing you to quickly launch a new live testing session with a previously used configuration.
Launch a Test
After selecting an application and device, launch the live testing session to begin testing your application.
If you have issues starting live tests, check your IT infrastructure and make sure you are not blocking WebSockets.
Step 1: On the Device Selection page, locate the device you want to use.
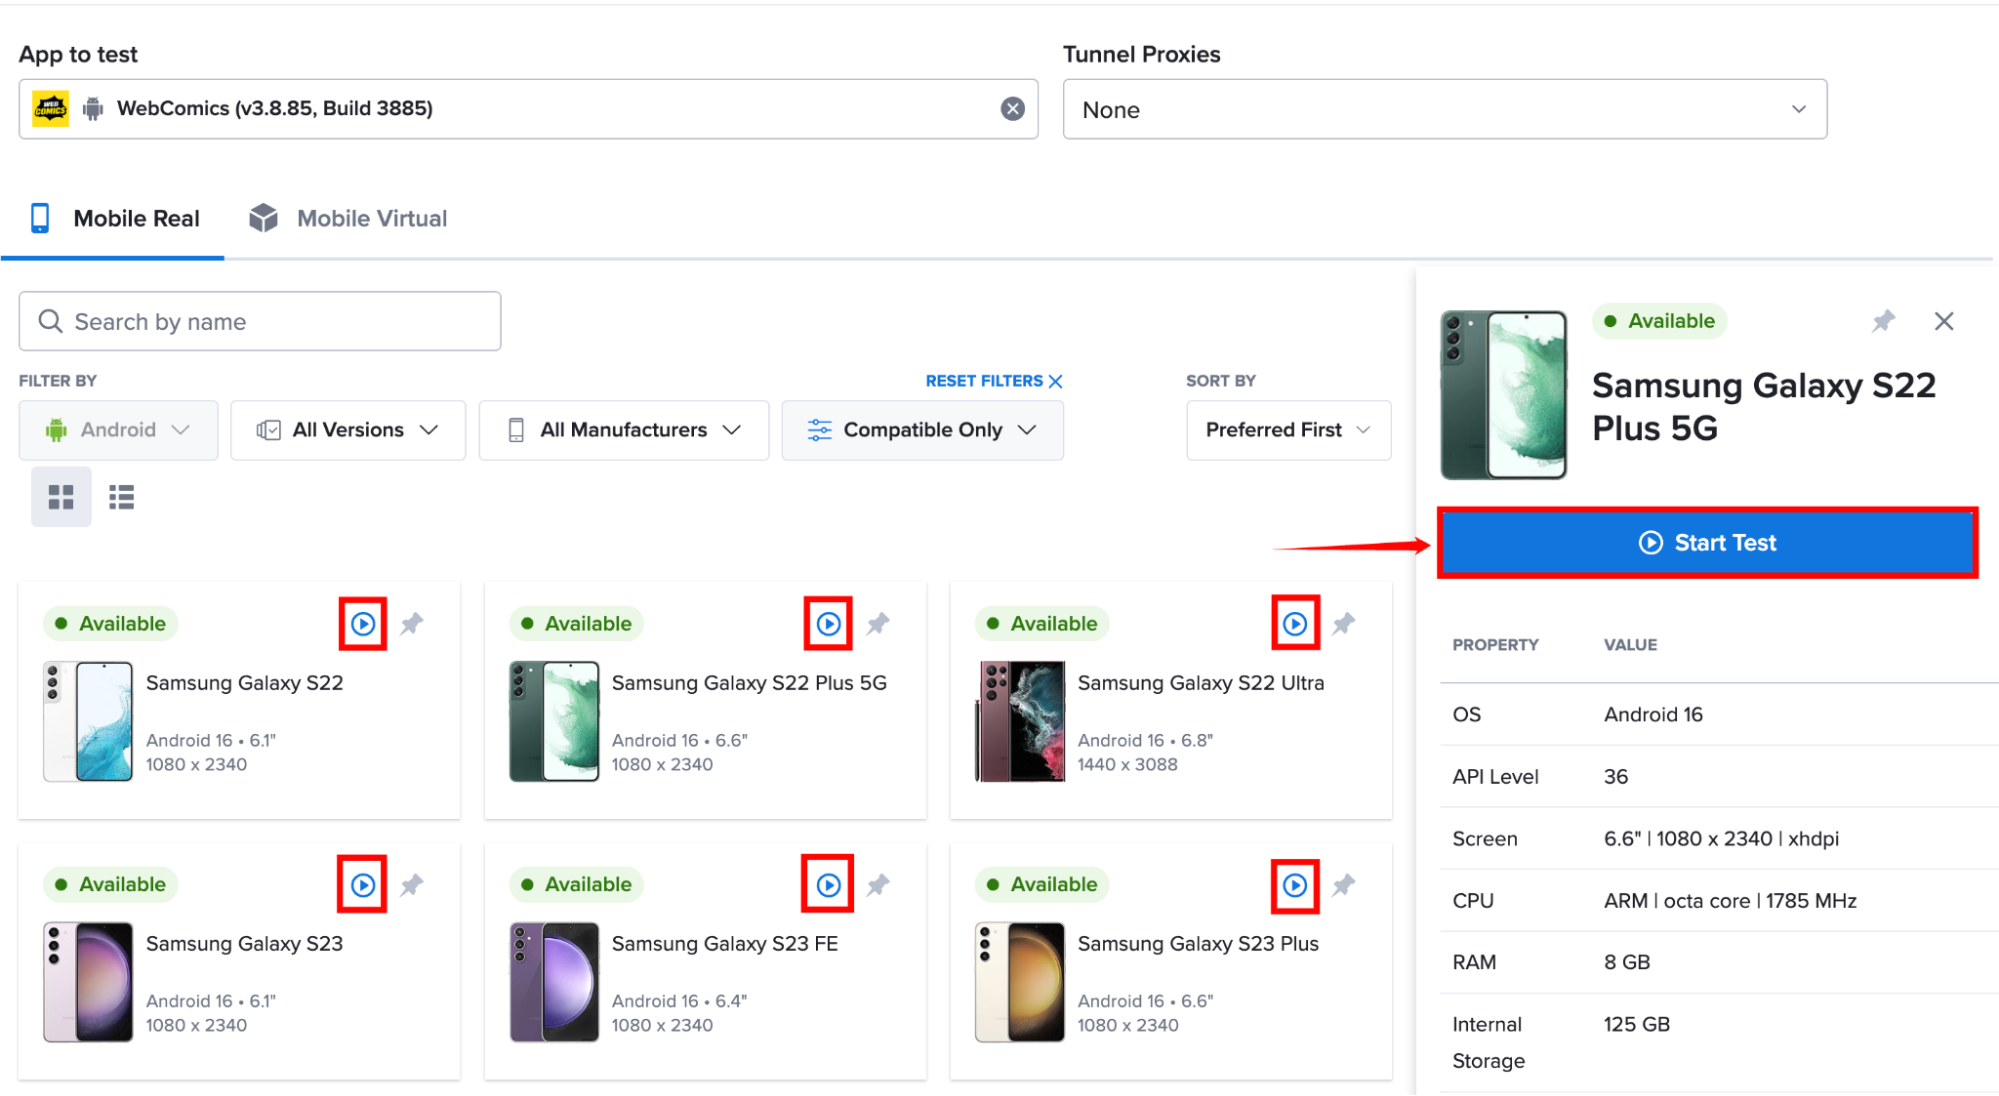
Step 2: Start the live testing session using one of the following methods:
- Hover over the device in the grid and then click Start Test.
- Click the device card to open the Device Details page, On the Details screen, click Start Test.
Step 3: A loading screen is displayed while the selected device is initialized. When the initialization is complete, the application automatically launches in the live testing window.
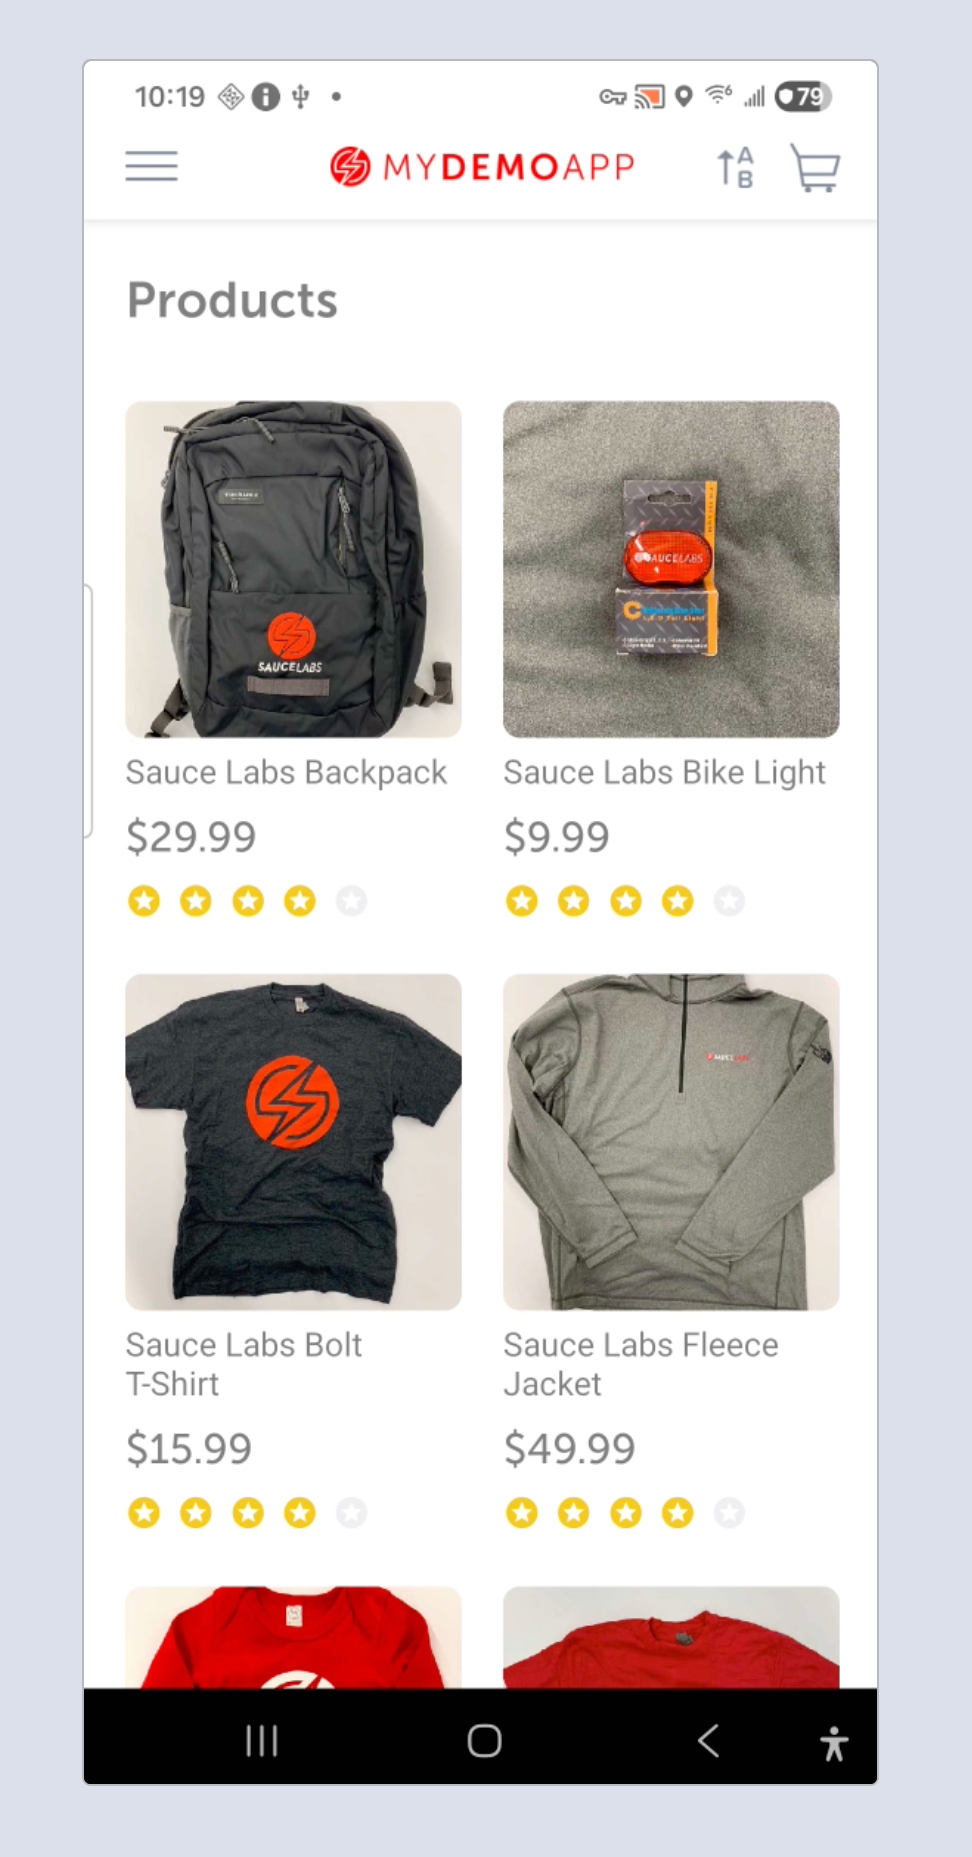
- Free user sessions are limited to 10 minutes from the time the session starts.
- Paid user sessions can run for up to 6 hours, provided the session remains active.
- Live testing sessions automatically end after 15 minutes of inactivity to release the allocated device.
Trust Enterprise Certificates (Private Devices)
Private Devices Only
If your application is signed with an enterprise certificate and Instrumentation is DISABLED in the App Settings, you must manually trust the certificate before the application can be launched on a private iOS device.
Applies to: Private Devices only
Step 1: If the application installation fails, close the application loading screen by clicking the X.

Step 2: On the device, open the Settings app, select General, and then tap VPN & Device Management.
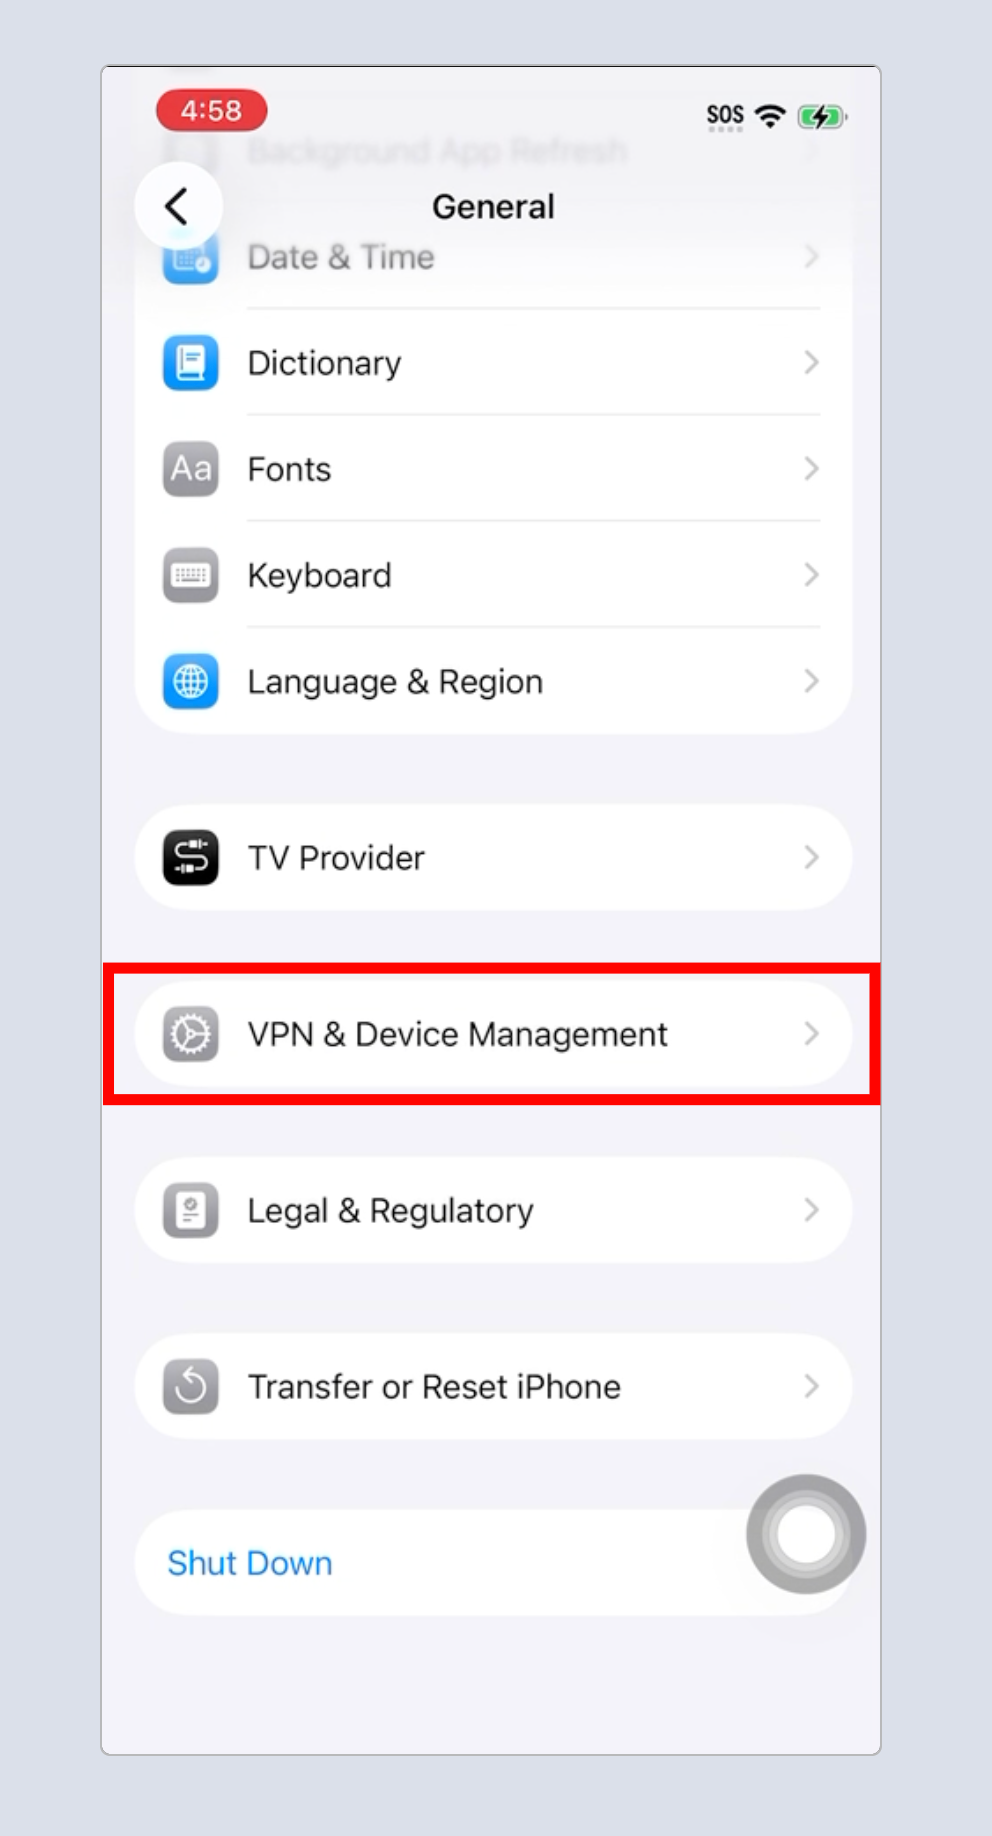
Step 3: Under VPN & Device Management, select the enterprise application you want to install.
Step 4: Tap Trust "<Application Name>", then tap Trust again to confirm.
Step 5: Return to the application and relaunch the live testing session.
Add a Test Name and Outcome
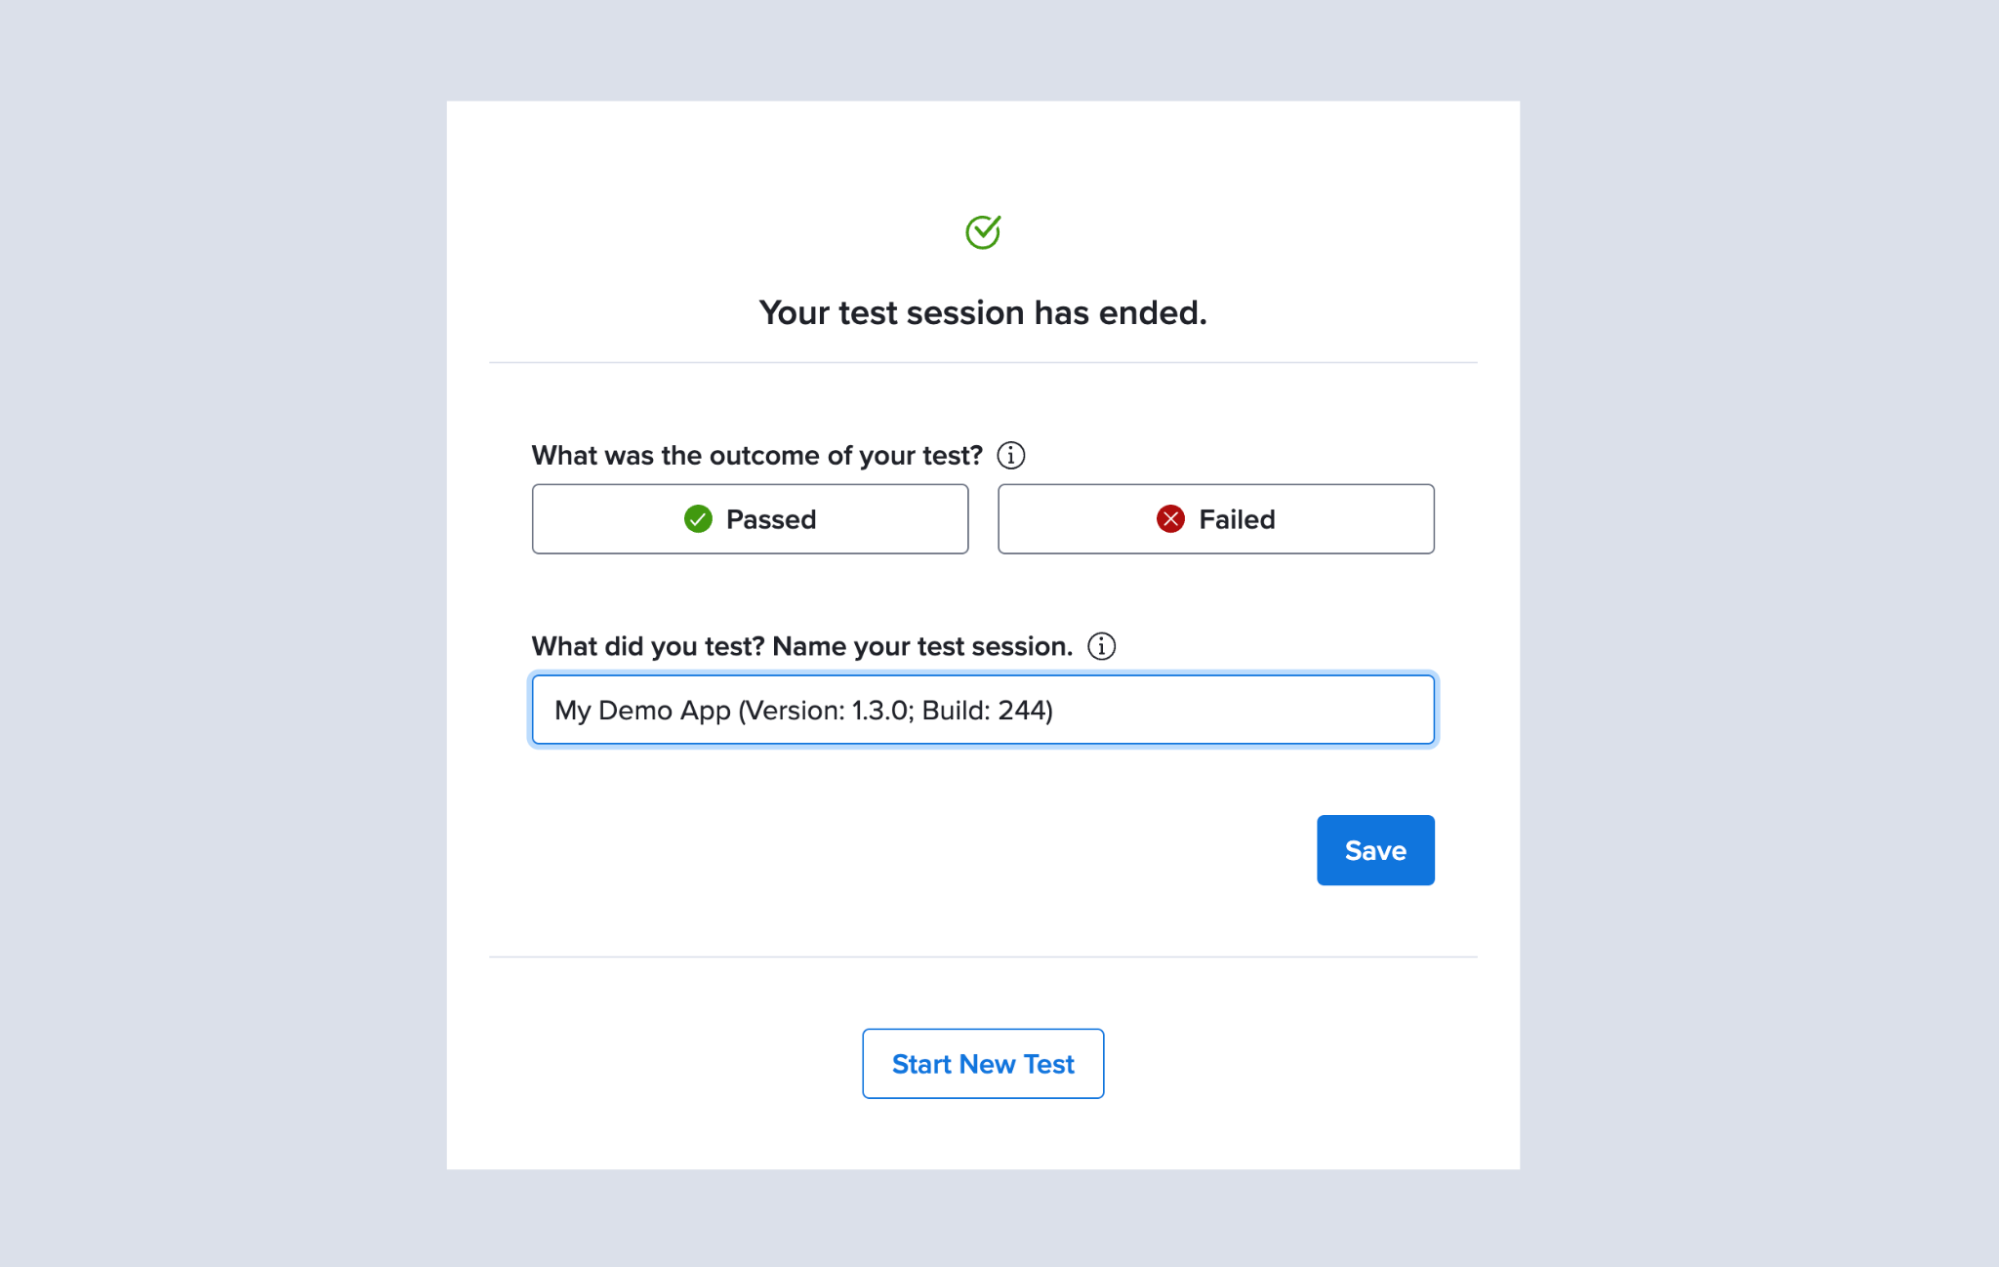
After completing a live testing session, you can assign a test name and record the test outcome (Passed or Failed). This information is displayed in Test Results and can be updated later if needed.
-
Add descriptive names to your tests to quickly identify your findings.
-
Keep track of tested steps by adding details to test names.
-
Rename your tests to reflect Jira tickets or other related tasks.
This feature has a constraint on the maximum allowable length of the test name, which is limited to 255 characters. The utilization of emojis is not supported in the test name.
You can perform this action using either of the following methods discussed below.
Method I: From the End Session Dialog
Use this method to add a test name and outcome immediately after ending a live testing session.
Step 1: Complete the live testing session, then click End in the live testing toolbar to open the End Session dialog.
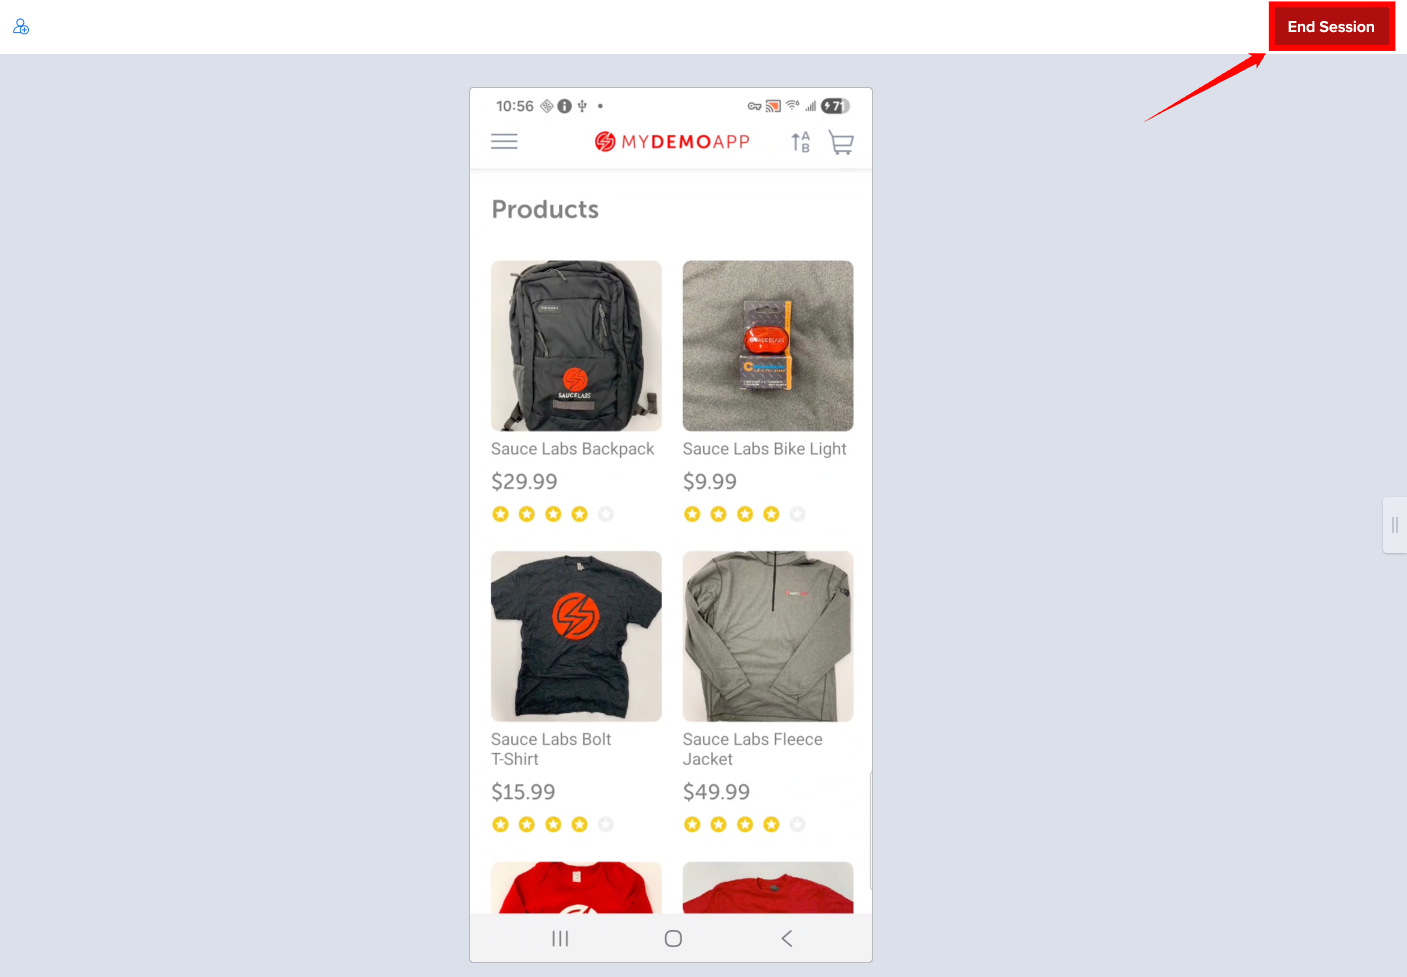
Step 2: In the End Session dialog, enter a name in the Test Name field, select the appropriate Test Outcome (Passed or Failed), and save the changes to complete the session.
Method II: From Test Results
Use this method to update the test name after the live testing session has ended.
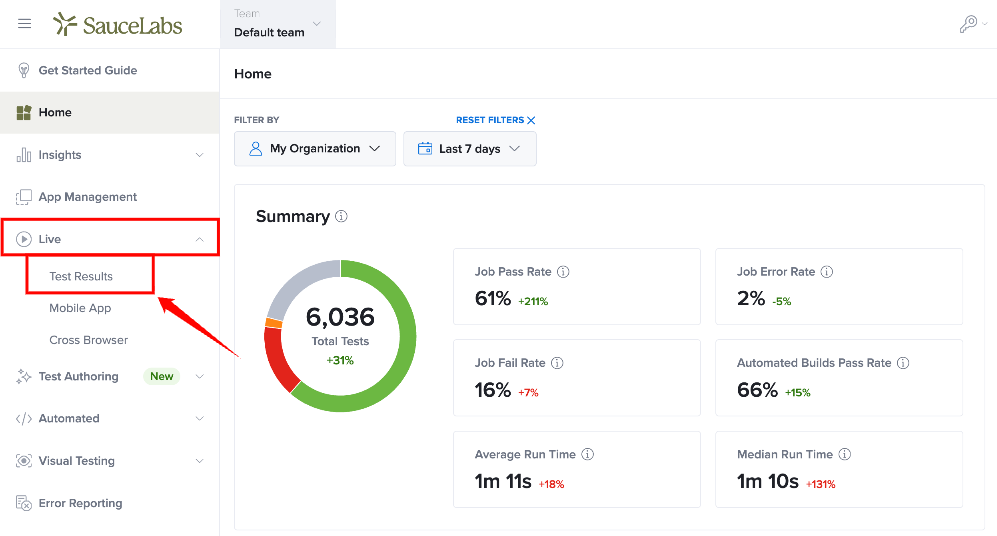
Step 1: From the left navigation menu, click on Live and then select Test Results.
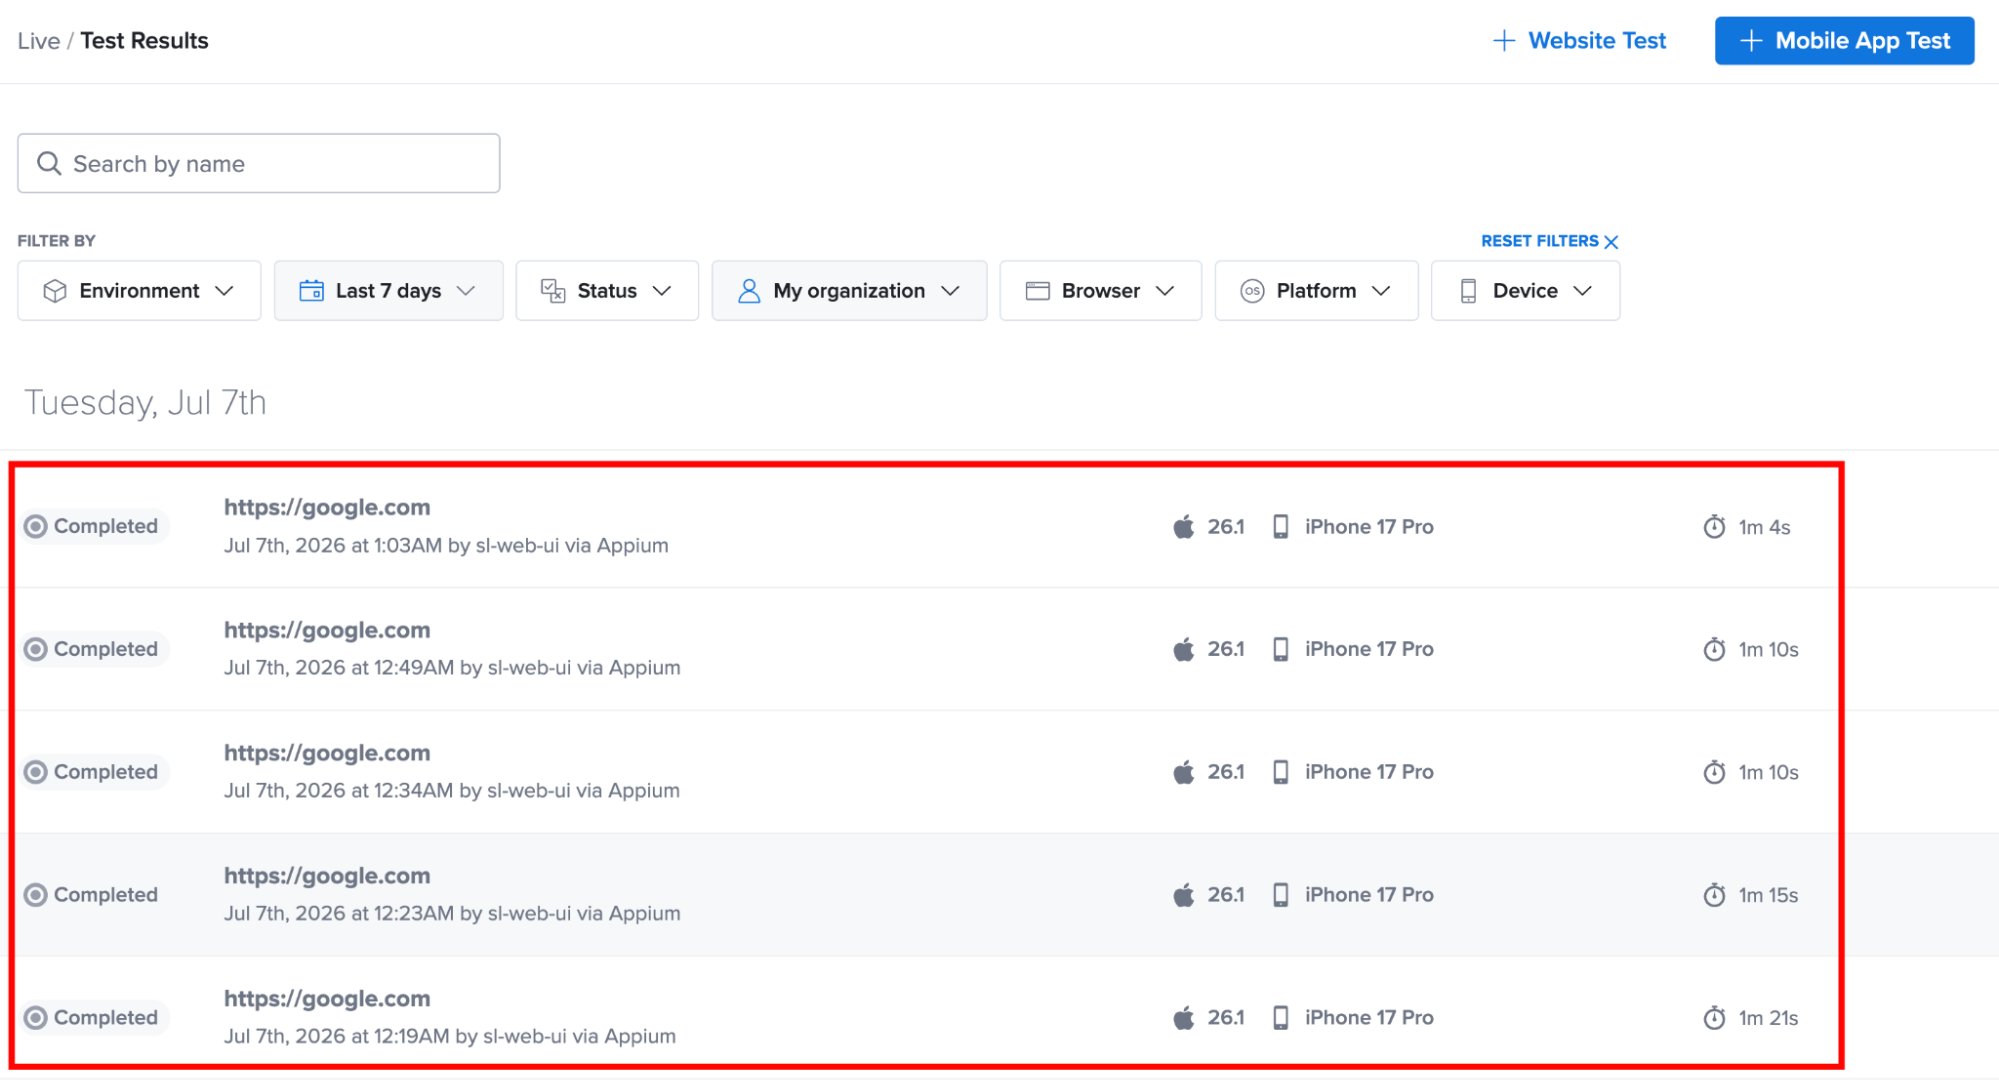
Step 2: In the Test Results page, locate and click on the test you want to update.
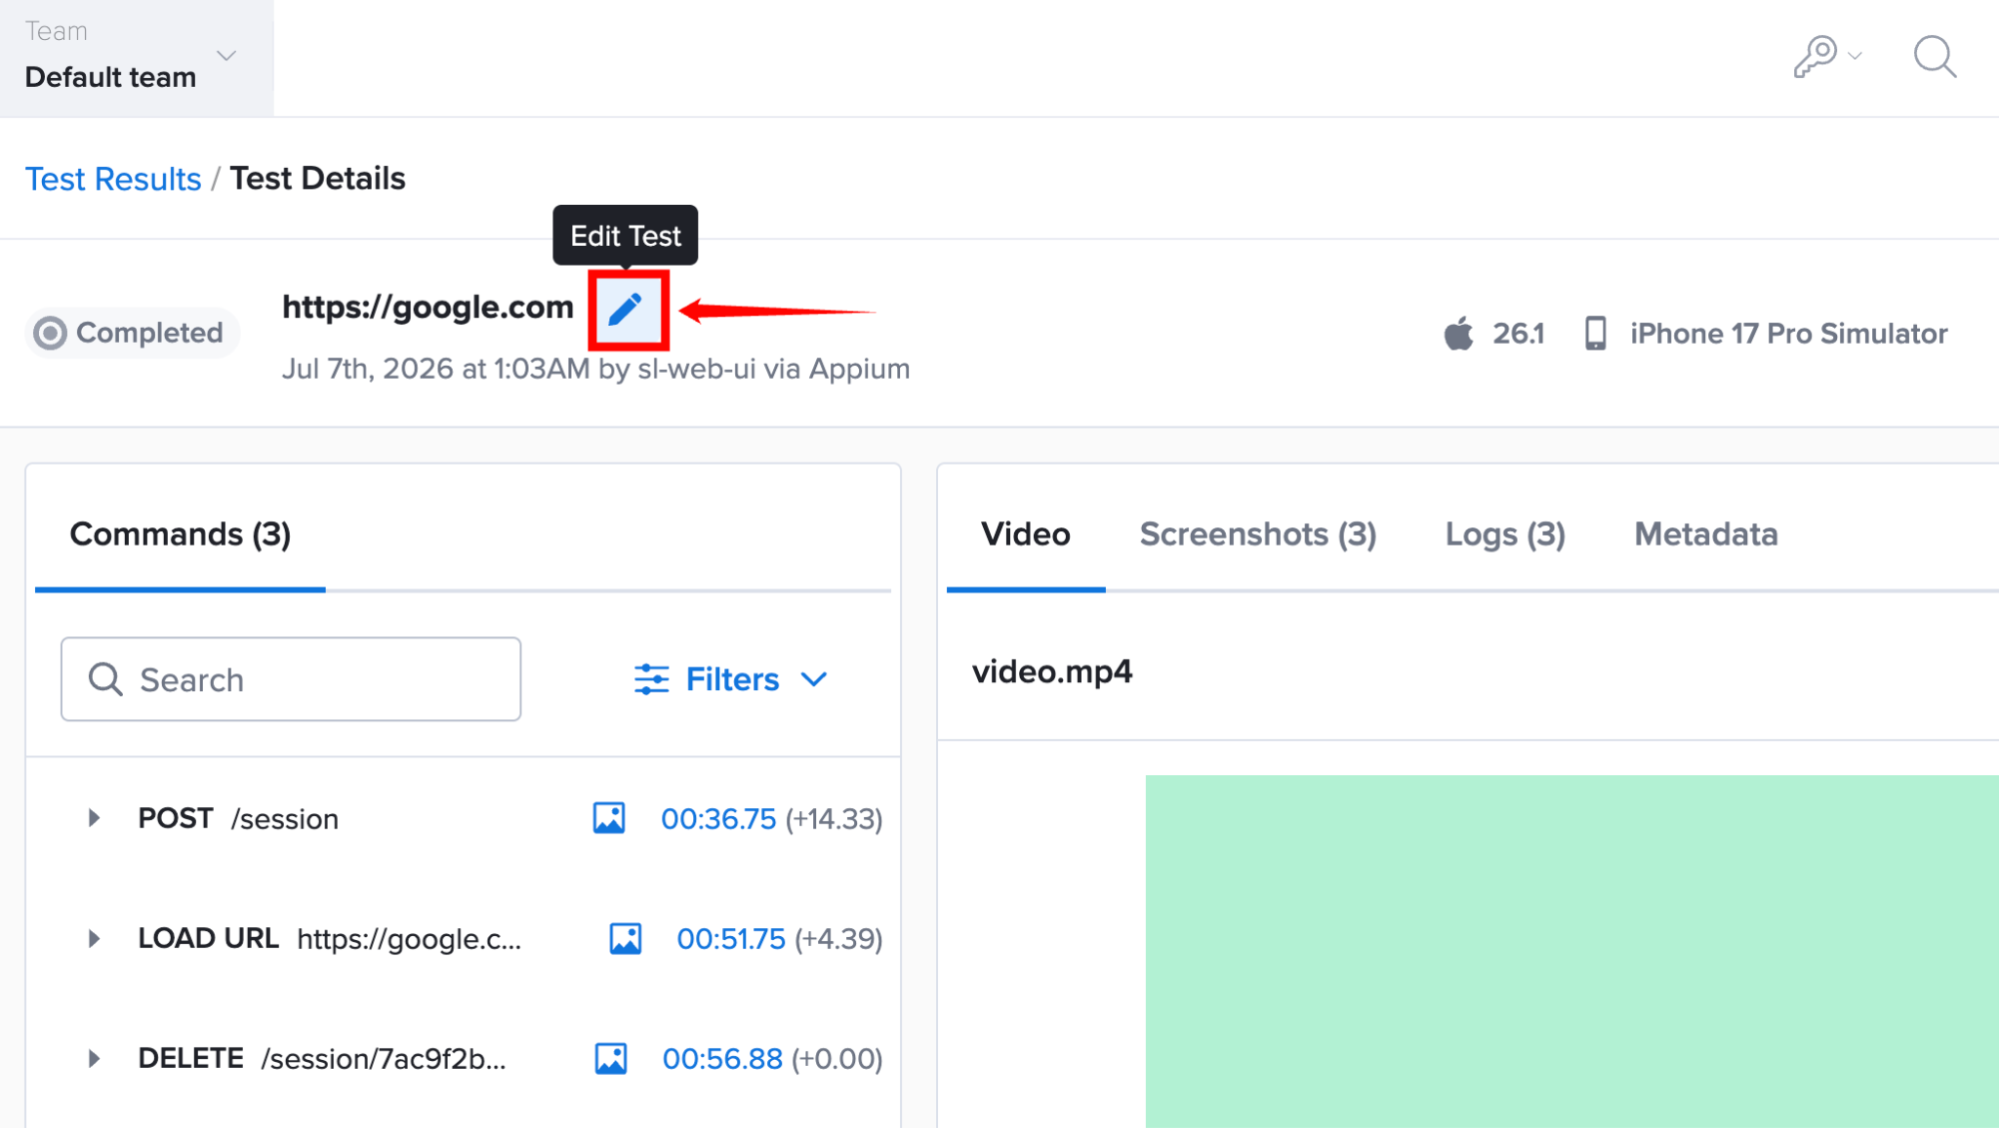
Step 3: On the Test Details page, click the Edit (✏️ ) icon next to the Test Name.
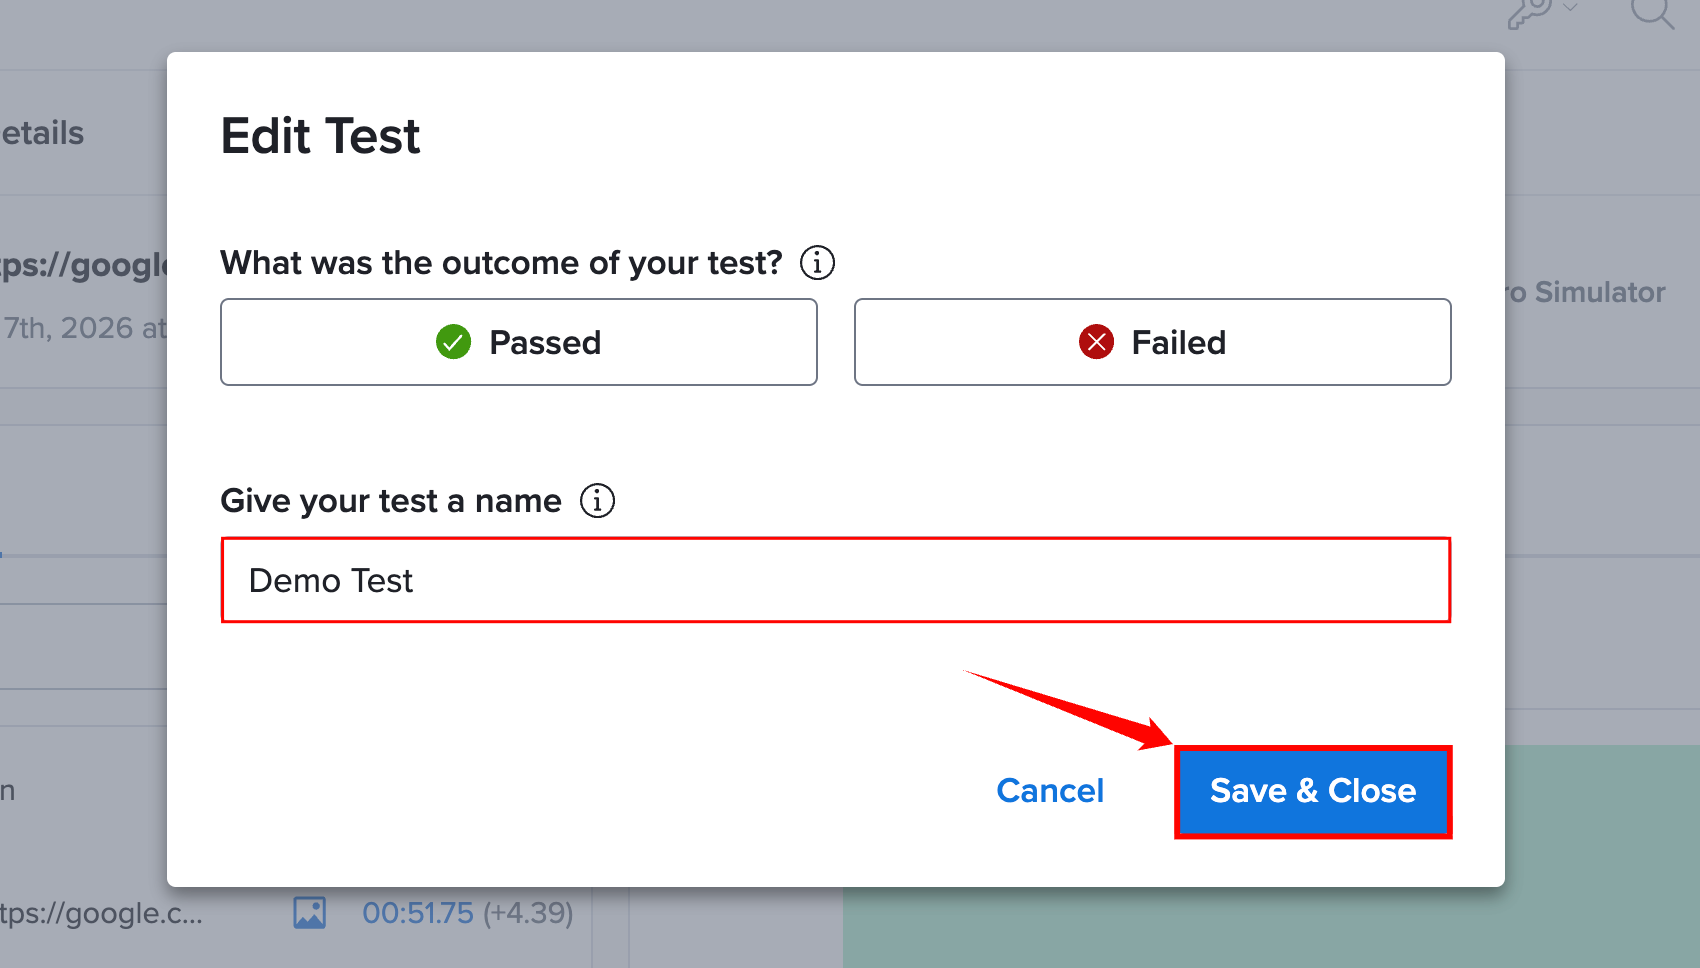
Step 4: Enter the new test name, then click Save & Close to save your changes.
This feature works the same way for both cross-browser testing and mobile app testing.
Live Test Interface
After a live testing session starts, the Live Test Interface provides access to the tools and controls required to interact with the device, monitor the testing session, capture diagnostics, and perform debugging tasks.
The toolbar includes options for device navigation, application management, session sharing, screenshots, developer tools, and additional testing features.
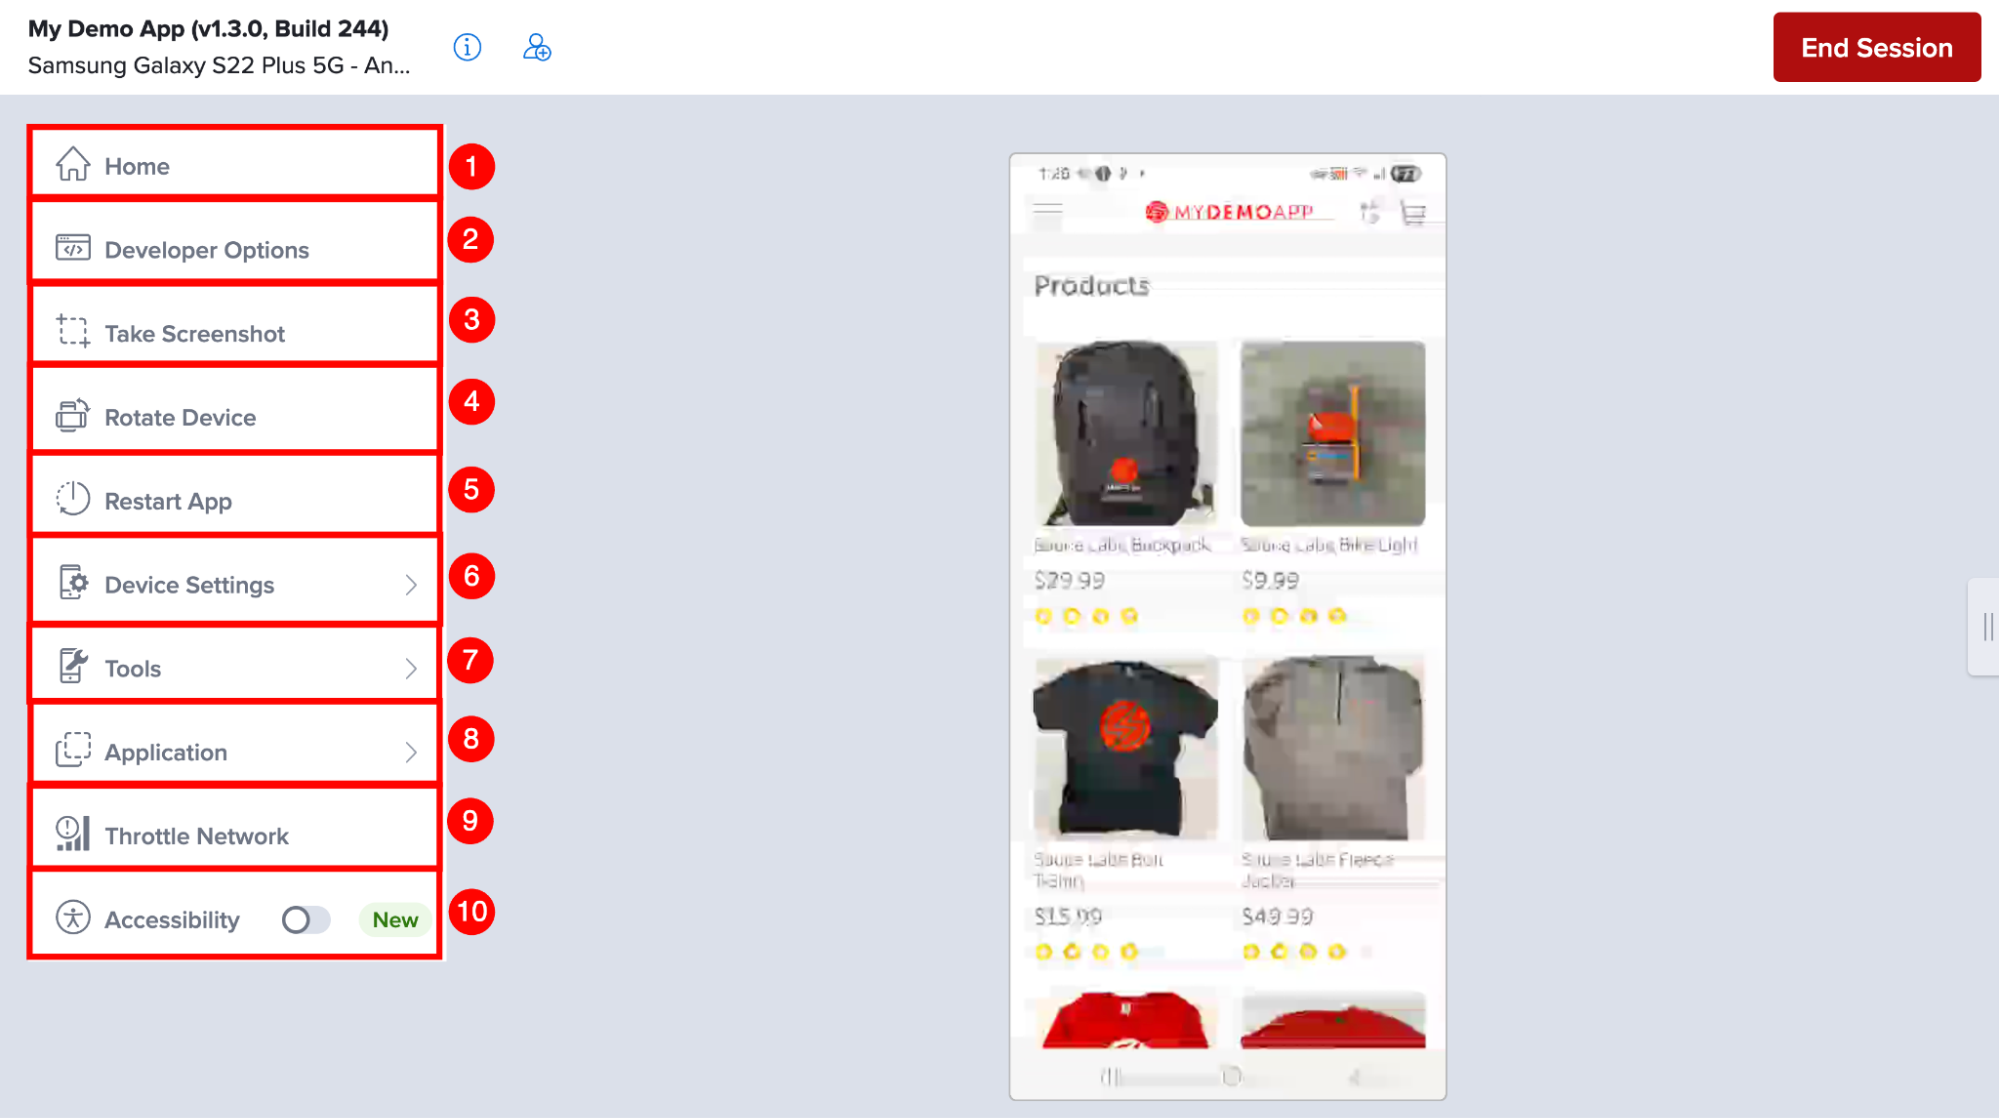
The following table describes the available controls in the Live Test Interface.
Basic Controls
These controls provide quick access to the most commonly used actions during a live testing session.
| Ref. | Control | Description | Learn More |
|---|---|---|---|
| 1 | Home | Returns the device to its home screen without ending the live testing session, allowing you to manually navigate and relaunch applications if needed. | — |
| 2 | Developer Options | Opens the developer tools panel, where you can access the Device Log and other debugging tools to monitor application behavior and troubleshoot issues. | Device Logs |
| 3 | Take Screenshot | Captures the current device screen and automatically downloads it as a PNG image for documentation, reporting, or issue tracking. | — |
| 4 | Rotate Device | Change the device orientation between portrait and landscape to verify that the application responds correctly to screen rotation. | — |
| 5 | Restart App | Closes and relaunches the application without ending the testing session, allowing you to quickly restart the application after making changes or reproducing an issue. | — |
| 6 | Device Settings | Configures device-specific settings, including audio, Wi-Fi, language, performance mode, animations, and passcode. Use these settings to simulate different device configurations during testing. | Device Settings |
| 7 | Tools | Provides additional testing utilities, such as location simulation, camera image injection, biometric authentication, and clipboard management, to help simulate real-world testing scenarios. | Tools |
| 8 | Application | Provides options for managing the application during the testing session, including switching between uploaded app versions, installing dependent applications, and configuring application-specific testing features. | Application |
| 9 | Throttle Network | Simulates different network conditions, such as slower or unstable connections, allowing you to evaluate application performance and behavior under varying network environments. | — |
| 10 | Accessibility | Enables accessibility features for the testing session, allowing you to verify how the application behaves when accessibility options are enabled on the device. | — |
Device Settings
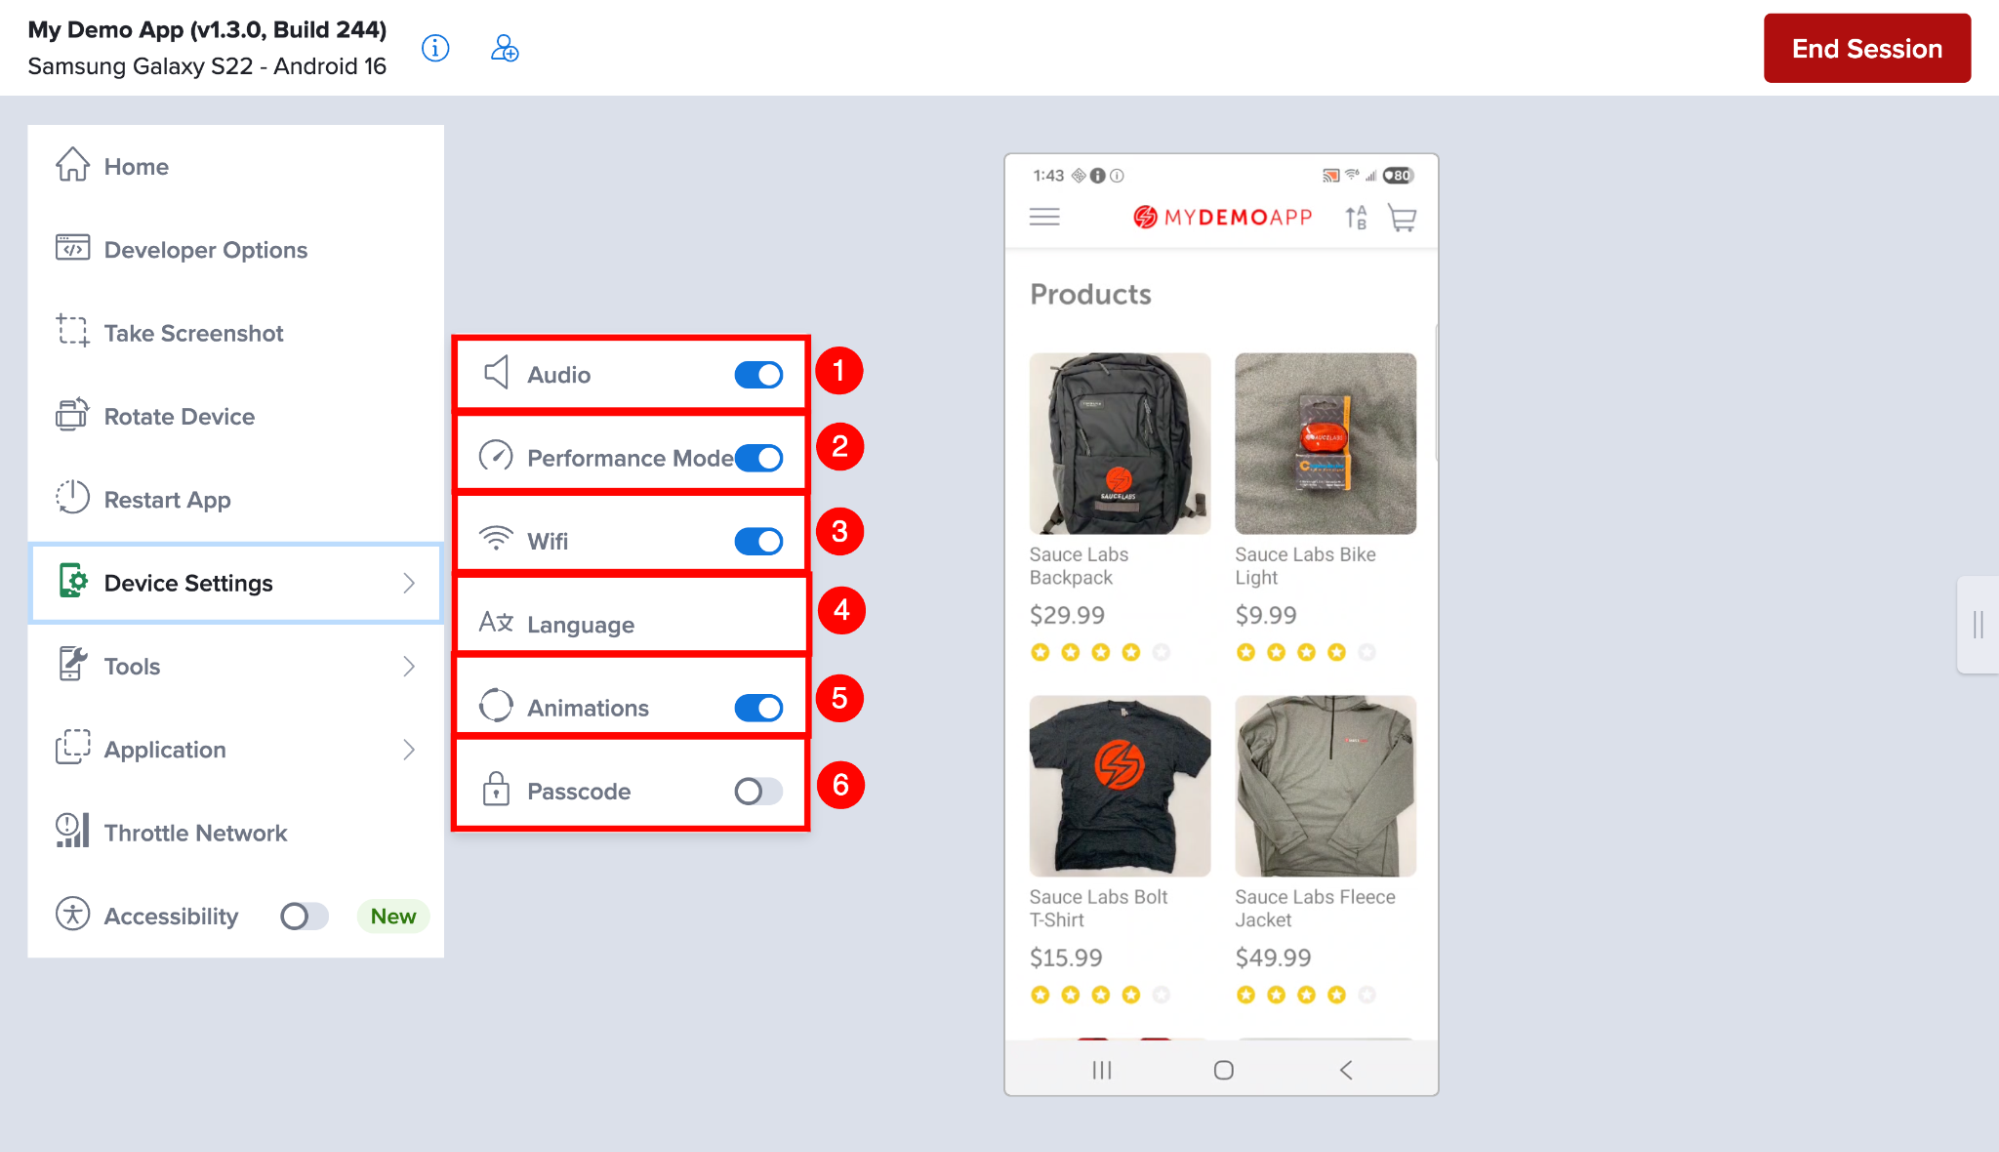
Use Device Settings to configure device behavior during the current live testing session. These settings help simulate different device conditions and testing scenarios.
| Ref. | Setting | Description |
|---|---|---|
| 1 | Audio | Enables or disables device audio during the testing session, allowing you to verify audio playback and sound-related functionality. |
| 2 | Performance mode On/Off | Enables you to increase frame rate per second, or switch back to lower frame rate video streaming, when your network connection or VPN is restrictive and you experience blurred screen. |
| 3 | Wi-Fi | Enables or disables the device's Wi-Fi connection to observe how the application behaves when network connectivity changes. |
| 4 | Language | Change the device language to verify application localization, translations, and region-specific content. |
| 5 | Animations | Enables or disables system animations to evaluate application behavior with reduced or disabled device animations. |
| 6 | Passcode | Enables a predefined device passcode for testing applications that require screen lock authentication before access. |
Tools
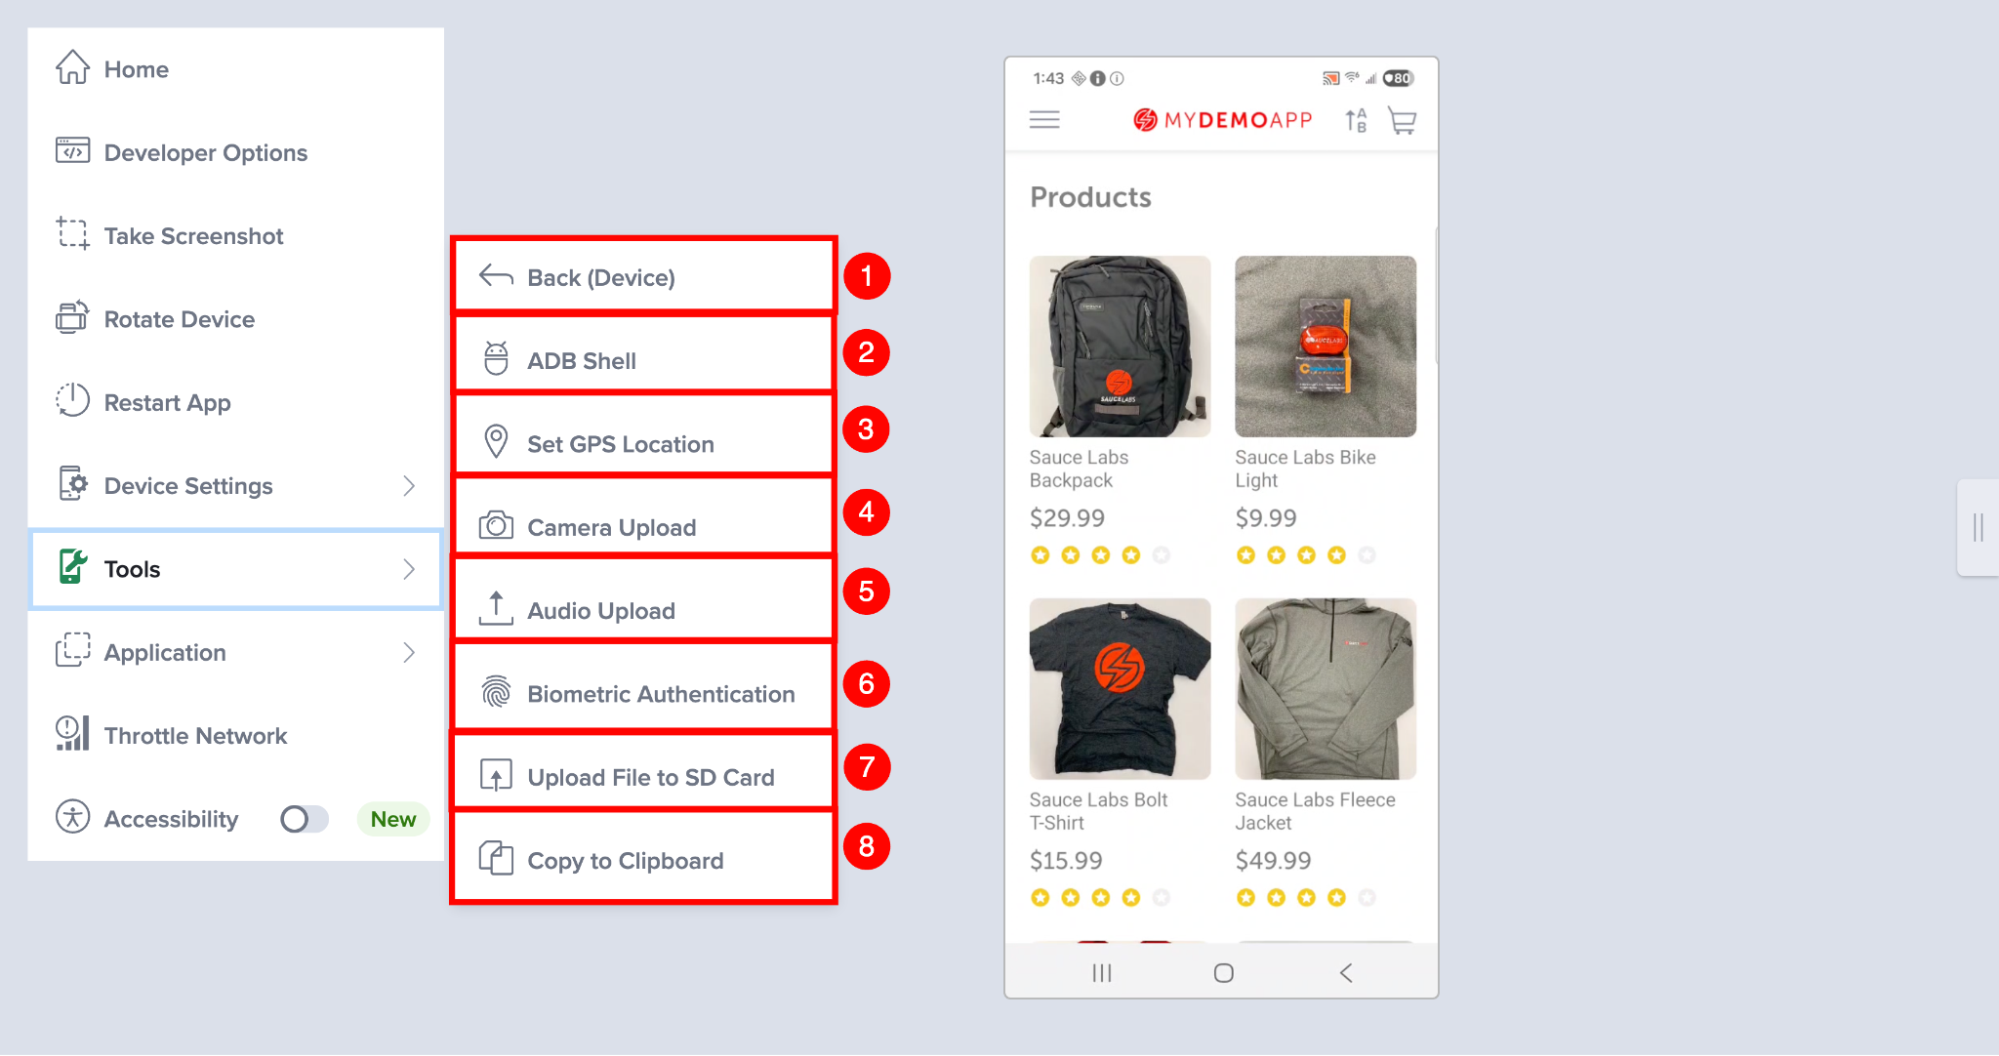
The Tools menu provides additional utilities that help simulate real-world scenarios, interact with the device, and perform advanced testing tasks during a live testing session.
| Ref. | Tool | Description |
|---|---|---|
| 1 | Back (Device) | Returns to the main live testing controls without making any changes. |
| 2 | ADB Shell | Opens an interactive Android Debug Bridge (ADB) shell, allowing you to run ADB commands directly on the connected Android device for debugging and troubleshooting. |
| 3 | Set GPS Location | Simulates a GPS location by entering coordinates or selecting a location on a map. Use this option to test location-based features and services. |
| 4 | Camera Upload | Uploads an image and presents it to the application as if it were captured by the device camera, allowing you to test camera-dependent workflows. |
| 5 | Audio Upload | Uploads an audio file and plays it through the device as microphone input, enabling testing of voice commands, speech recognition, and other audio-related features. |
| 6 | Biometric Authentication | Simulates biometric authentication, such as Face ID, Touch ID, or Fingerprint Authentication, to test secure login and authentication flows. |
| 7 | Upload File to SD Card | Uploads a file to the device's SD card or external storage, allowing the application to access the file during testing. |
| 8 | Copy to Clipboard | Copies text to the device clipboard so it can be pasted into the application during testing. |
Application
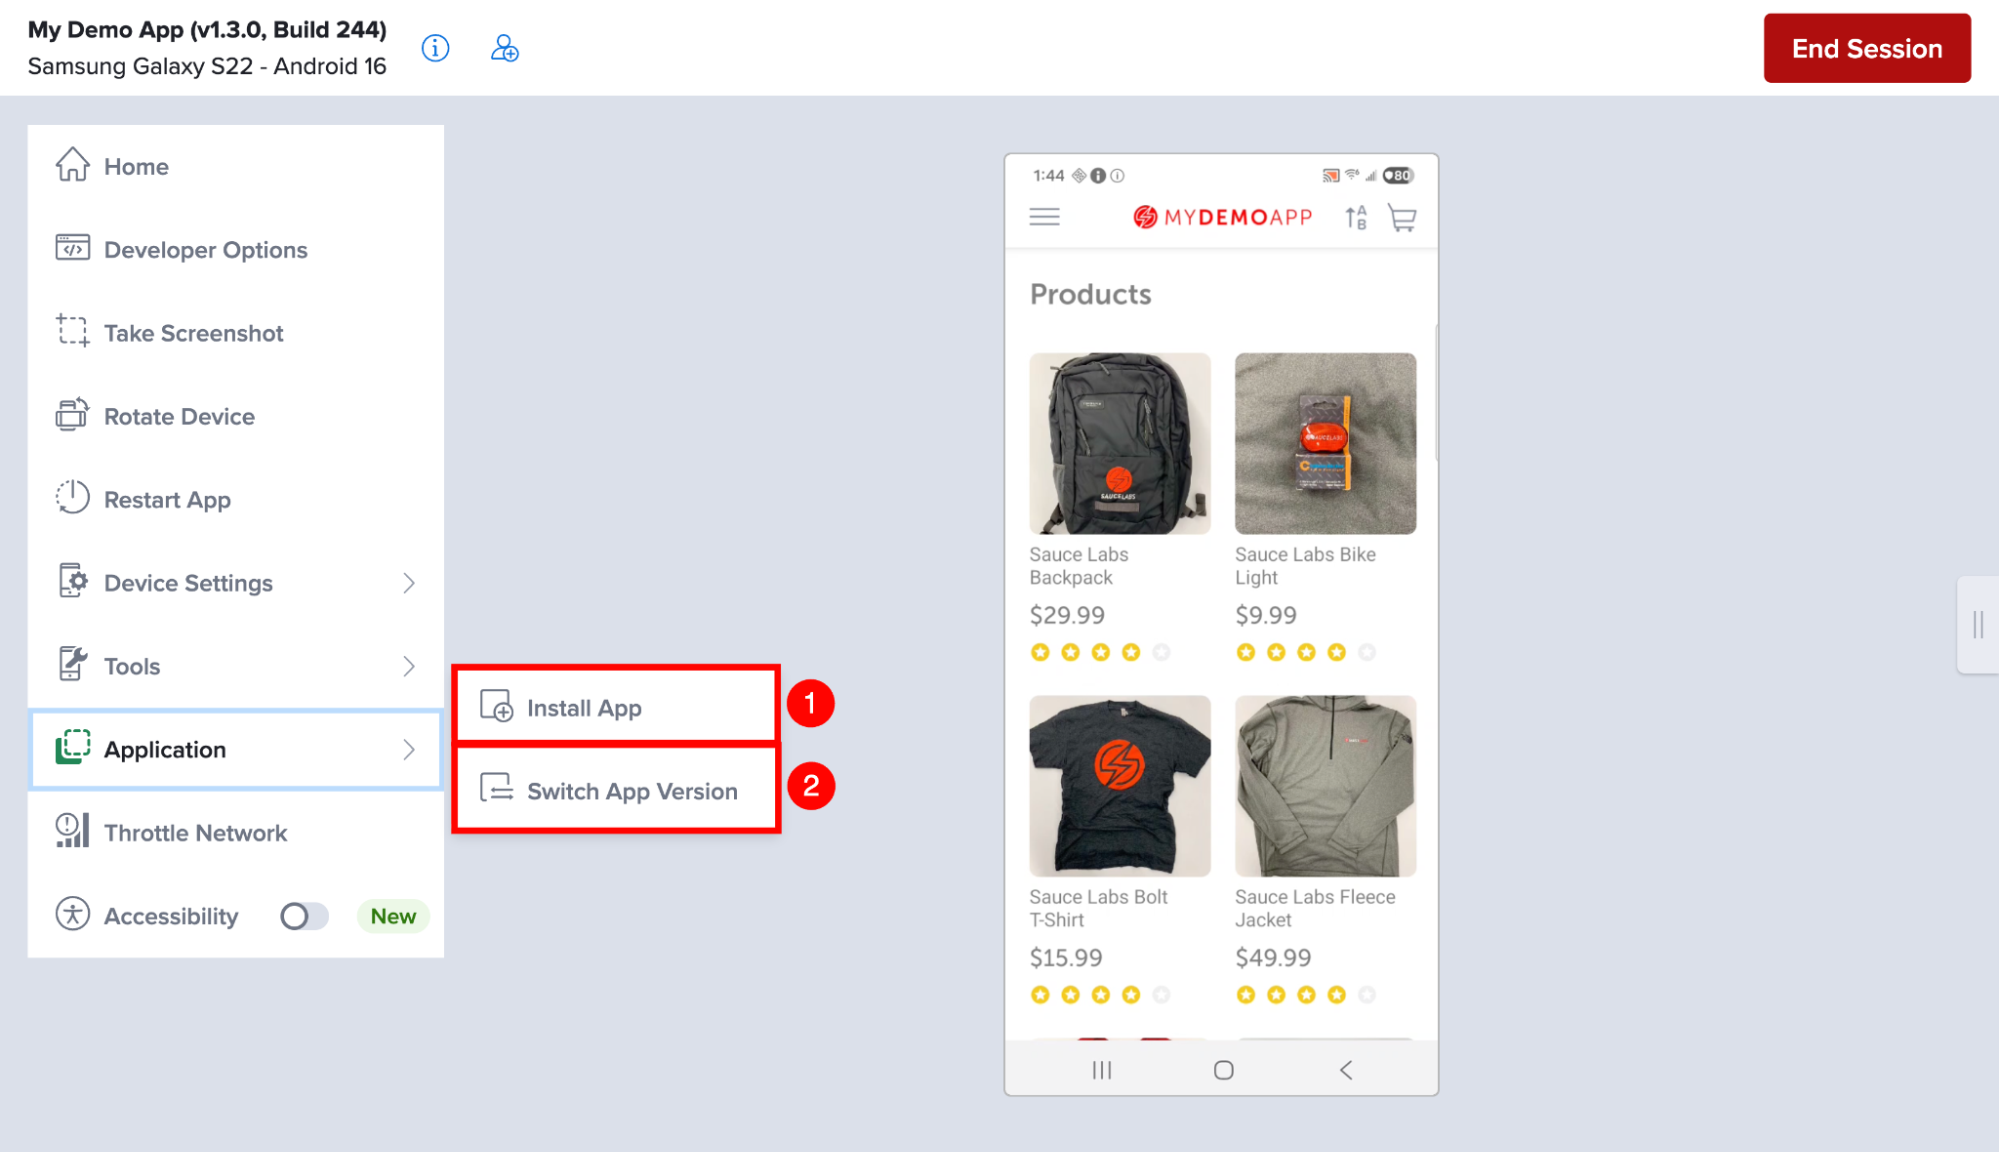
The Application menu provides options for managing the application while the live testing session is in progress.
| Ref. | Option | Description |
|---|---|---|
| 1 | Install App | Installs an additional application on the current device during the live testing session. Use this option when your application depends on another app, such as an authentication app, payment app, or companion application, to complete testing scenarios. |
| 2 | Switch App Version | Switches to another uploaded version of the current application without leaving the live testing session. This option helps compare application behavior across different versions or validate fixes in a newer build. |
Device Log
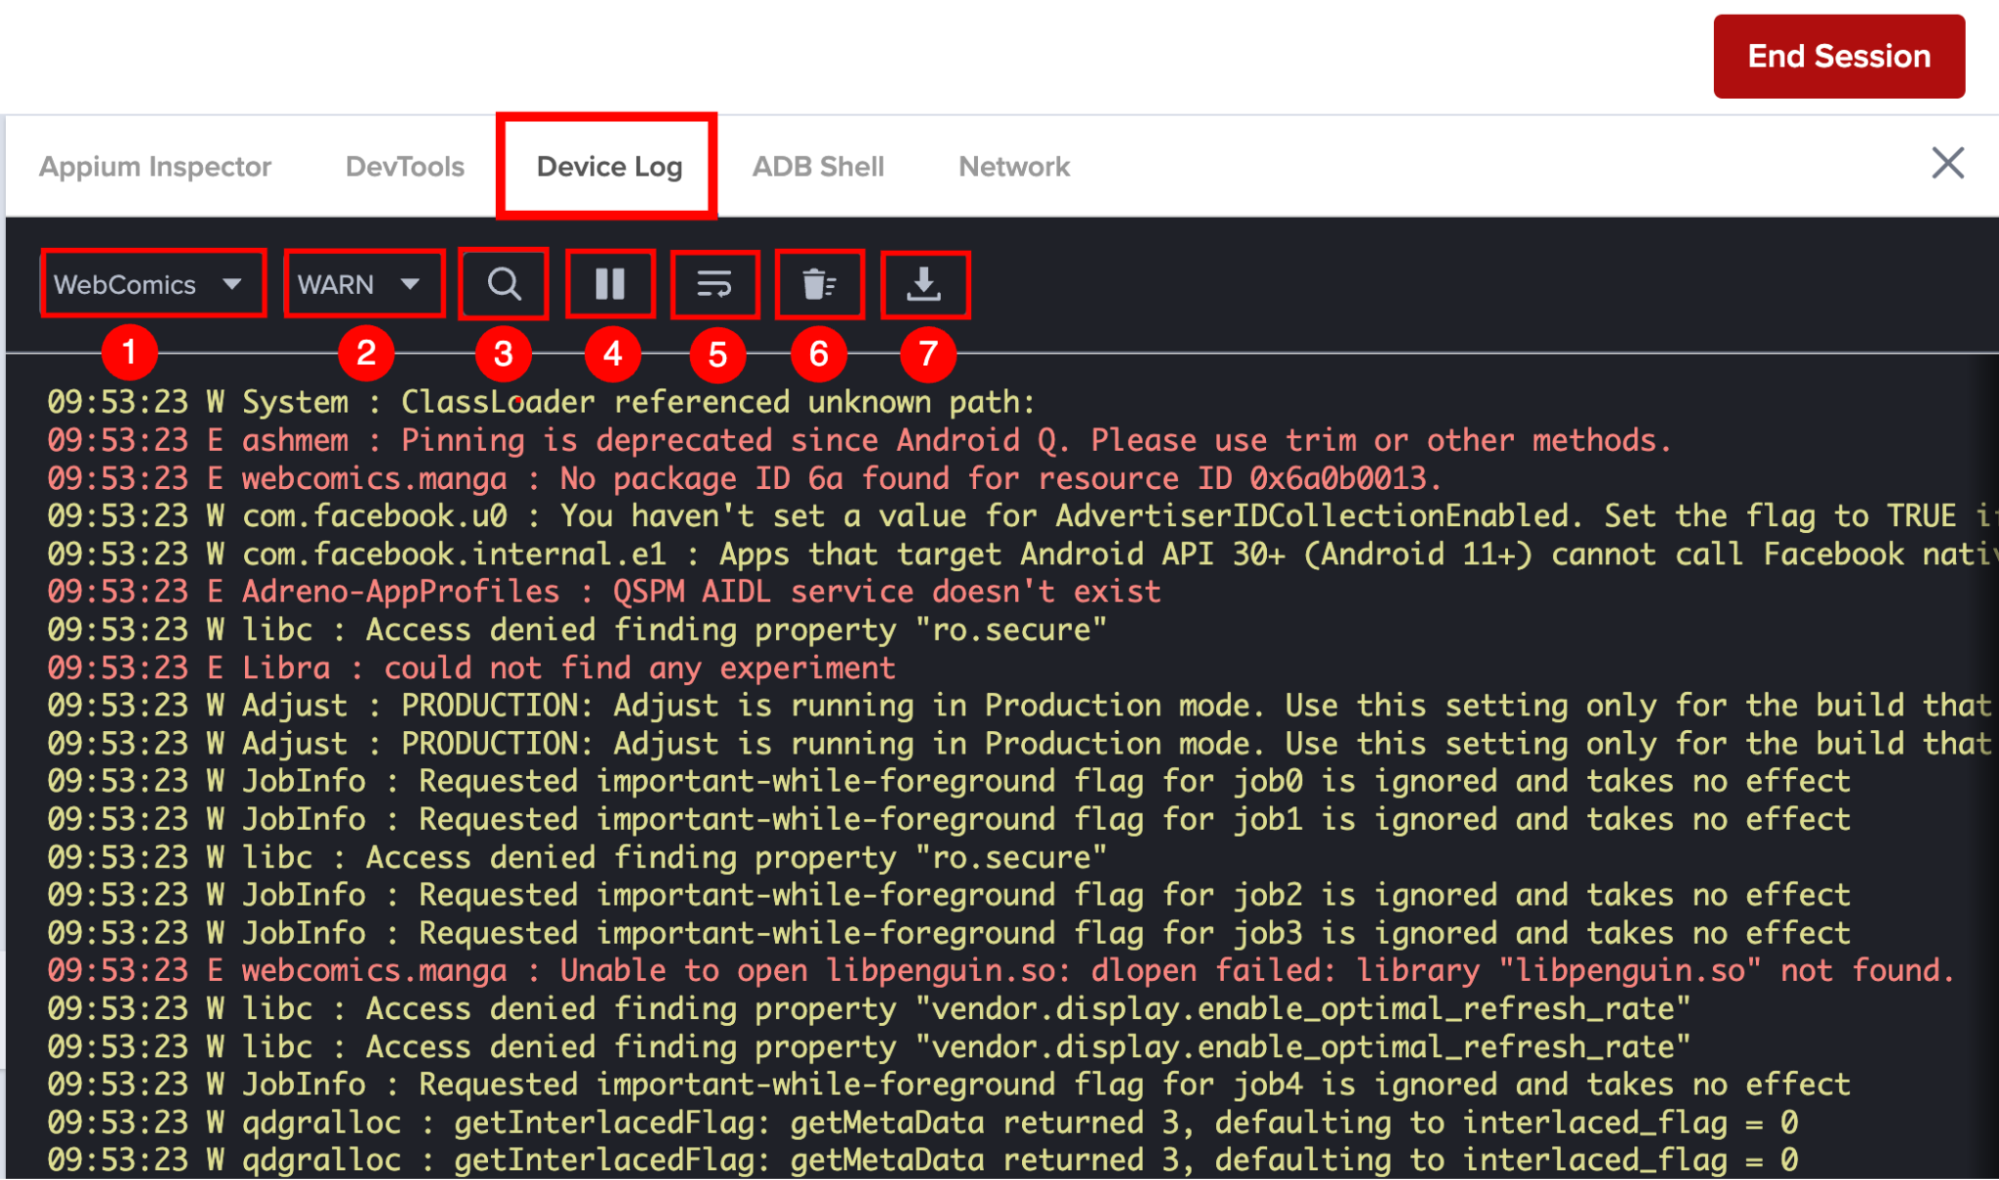
The Device Log provides real-time application and system logs generated during a live testing session. These logs help you monitor application behavior, troubleshoot issues, identify runtime errors, and verify system events during application interactions.
You can use the Device Log to filter log messages, search for specific entries, pause log streaming, clear the current log output, or download the logs for further analysis.
| Ref. | Control | Description |
|---|---|---|
| 1 | Application Selector | Select the application whose logs you want to display when multiple applications or processes are running on the device. |
| 2 | Log Level Filter | Filter the displayed logs by severity level, such as VERBOSE, DEBUG, INFO, WARN, ERROR, or ASSERT, to focus on the most relevant log messages. |
| 3 | Search Log | Search the log output for specific keywords or messages to quickly locate relevant log entries. |
| 4 | Pause Log | Pause or resume the live log stream to inspect log messages without new entries being added. |
| 5 | Wrap Text | Enable or disable text wrapping to improve the readability of long log messages. |
| 6 | Clear Log | Remove all displayed log entries from the log viewer. This clears only the display and does not affect the application's actual log data. |
| 7 | Download Log | Download the current device log as a .txt file for offline analysis, troubleshooting, or sharing with your team. |
The Device Log displays logs in real time. The amount and type of information shown depend on the selected log level and the activity occurring in the application during the testing session.