Connect ADB, Xcode, and libimobiledevice to Sauce Labs Remote Devices
Testing on real devices shouldn't mean maintaining a device lab. But until now, using low-level tools like ADB or Xcode Instruments on cloud devices required a proprietary client and a complex setup.
The Real Device Access API changes that. Reserve a device with a single API call, then connect your existing tools — adb, Xcode, Instruments, idevicesyslog, any libimobiledevice utility — as if the device were on your desk. All you need is a local reverse proxy and your Sauce Labs credentials. No proprietary software. No Java runtime. Just your tools, talking to our devices.
Your existing scripts, profilers, and workflows carry over unchanged. See How It Works for the technical details.
Xcode integration is only supported on iOS 16 and earlier. On iOS 17+, libimobiledevice tools work but Xcode does not. We are working on support for iOS 17+. See Limitations for details.
What You'll Need
curl,jq(to create the session)- The
access-api-connectbinary on yourPATH— pre-built for macOS, Linux, and Windows on the project's Releases page. - Android:
adb - iOS: root access (sudo). macOS or Linux host. Windows is not supported for the iOS path — there is no
/var/run/usbmuxdequivalent.
How It Works
When a device is physically connected via USB, your tools communicate through a local protocol — ADB on Android, usbmuxd on iOS. The Real Device Access API preserves this exact interface but routes the connection over the internet.
The technical challenge is transporting the same bytes that would normally flow over a USB cable — reliably and securely, across the public internet. The solution: when you start a session, the API returns a WebSocket endpoint for your device. A lightweight local reverse proxy encodes the bytes into WebSocket frames, transports them over TLS to the Sauce Labs API, which decodes them and delivers them to the device. Everything in between — the reverse proxy, the WebSocket connection, the TLS encryption — is just transport. Your tools send the same bytes they always do, and the device receives the same bytes it always would.
┌──────────────────┐      ┌──────────────────┐      ┌──────────────────┐      ┌──────────────────┐
│   Your Tools     │      │ access-api-      │      │  Sauce Labs API  │      │  Remote Device   │
│                  │ TCP/ │ connect          │ WSS  │                  │      │                  │
│  adb             ├ unix▶│ (local agent)    ├─────▶│  api.*.saucelabs ├─────▶│  adb daemon      │
│  Xcode           │      │                  │      │  .com            │      │  usbmuxd         │
│  libimobiledevice│      │                  │      │                  │      │                  │
└──────────────────┘      └──────────────────┘      └──────────────────┘      └──────────────────┘
     localhost                  localhost                 internet               Sauce Labs cloud
- Your tools connect to
localhost— they don't know or care that the device is remote. - The local agent (
access-api-connect) accepts the local connection (TCP for Android,/var/run/usbmuxdfor iOS), encodes the bytes into WebSocket frames, and forwards them to the Sauce Labs API over TLS. A single multiplexed WebSocket carries every concurrent connection, so parallel work like Xcode debugging next toidevicesyslogstays fast. - The Sauce Labs API decodes the frames and delivers the raw bytes to the device in our cloud.
- The remote device receives the same protocol stream it would over USB.
Setup
1. Create a Session and Get the WebSocket Endpoint
Start a session via Access API:
export BASE_URL="https://api.us-west-1.saucelabs.com/rdc/v2"
export AUTH="$SAUCE_USERNAME:$SAUCE_ACCESS_KEY"

# Create the session
curl -X POST -u $AUTH \
  -H "Content-Type: application/json" \
  -d '{"device": {"os": "android"}}' \
  "$BASE_URL/sessions"
2. Connect Your Tools
Use access-api-connect to bridge your local tools to the remote device. Download the binary for your platform from the Releases page, put it on your PATH, and set the following environment variables:
SAUCE_USERNAME— your Sauce Labs username.SAUCE_ACCESS_KEY— the access key used to create the session.SAUCE_REGION— one ofUS(us-west-1),US_EAST(us-east-4),EU(eu-central-1). Case-insensitive.
(If you need a non-standard endpoint, set SAUCE_API_URL instead — it takes precedence over SAUCE_REGION.)
Android:
access-api-connect $SESSION_ID
The agent listens on local TCP port 7001. Every accepted TCP connection is bridged to the device's ADB daemon over a WebSocket transport — no extra websocat or socat needed. Once it prints Ready, point adb at it:
adb connect localhost:7001
adb thinks it's talking to a device on the local network. In reality, every command — adb shell, adb install, adb push — travels through the agent to the remote device.
Verify with adb devices — you should see localhost:7001 listed.
iOS (macOS or Linux, requires root):
sudo -E access-api-connect $SESSION_ID
The agent takes over /var/run/usbmuxd (moving the original aside to /var/run/usbmuxd.real and restoring it on clean exit) and serves it from a single multiplexed WebSocket. Wait until you see Ready. usbmuxd mounted at /var/run/usbmuxd., then verify:
idevice_id -l
The remote device's UDID should appear. From here, Xcode, Instruments, idevicesyslog, and all libimobiledevice tools will discover and interact with the device as if it were connected via USB. Press Ctrl+C to stop the agent — the original usbmuxd socket is restored automatically.
For full reference (flag-by-flag descriptions, troubleshooting, building from source) see the project README.
Use Cases
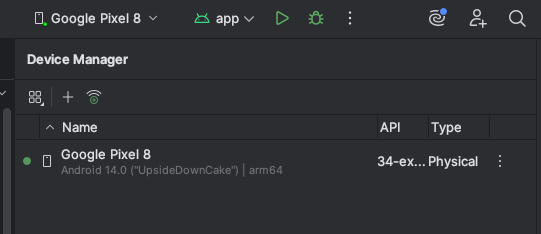
Use our remote devices in Android Studio
Once adb connect localhost:7001 is established, Android Studio automatically detects the remote device. It appears in the device dropdown and you can deploy, run, and debug apps just like a locally connected device. Profiling tools (CPU, memory, network) also work — follow the Android Studio profiling guide.
Take a screenshot via ADB:
adb shell screencap -p /sdcard/screen.png
adb pull /sdcard/screen.png ./screen.png
Port forwarding with adb forward
You can forward a local port to a port on the remote device. This is useful for communicating with services running on the device — for example, a debug server or a local web server inside your app.
adb forward tcp:40000 tcp:50000
This forwards localhost:40000 on your machine to port 50000 on the device. Note that adb reverse (device-to-host forwarding) is not supported — see Limitations.
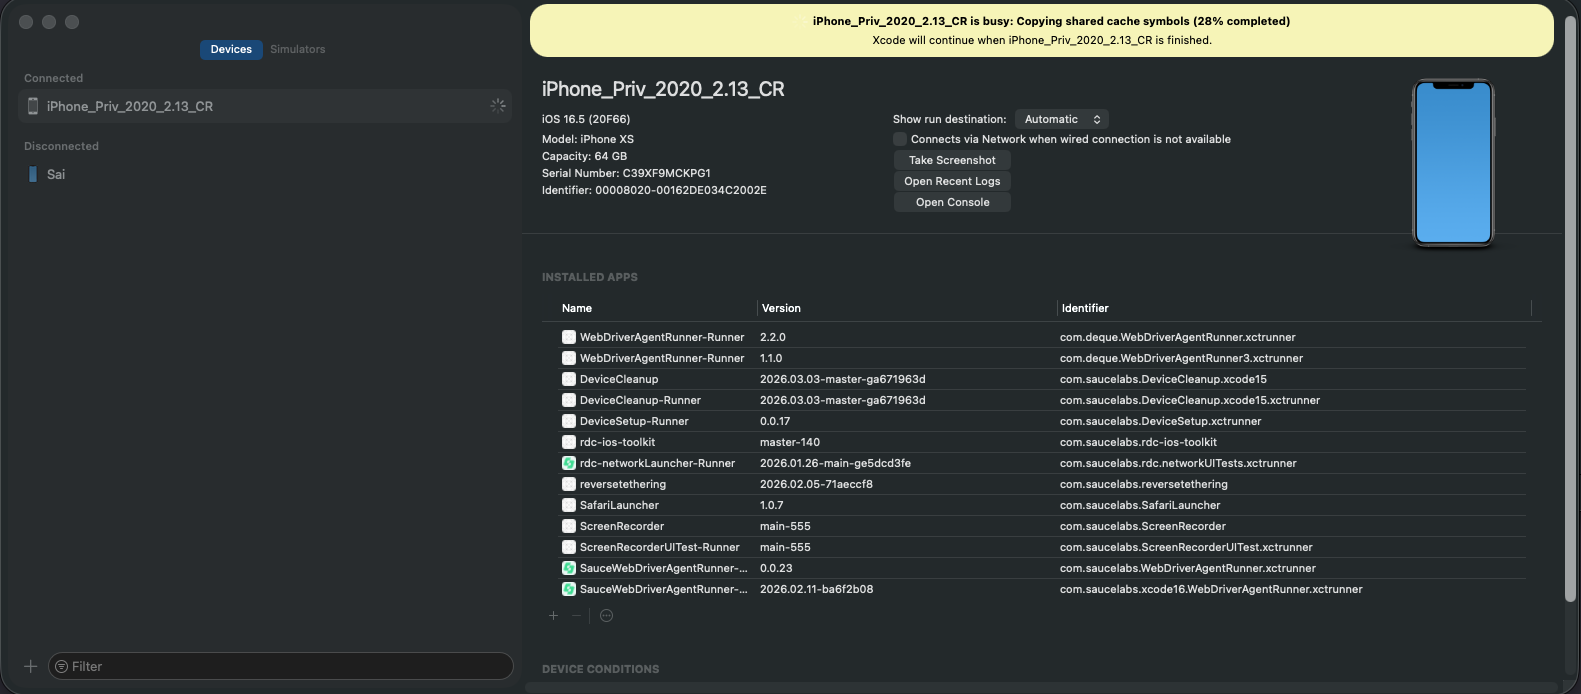
Xcode (iOS 16 and earlier)
After setting up the usbmuxd bridge, close and reopen Xcode. The remote device will appear in Window > Devices and Simulators (Cmd+Shift+2) after a few seconds. Debugging and other Xcode functions work out of the box.
libimobiledevice (all iOS versions)
Stream device logs:
idevicesyslog
Cleanup
Stop the local agent and close the session:
# Stop access-api-connect: just Ctrl+C in the terminal running it.
# On iOS, the original /var/run/usbmuxd is restored automatically.

# Optionally tell adb to forget the local endpoint (Android only):
adb disconnect localhost:7001

# Close the remote session:
curl -X DELETE -u $AUTH "$BASE_URL/sessions/{session_id}"
If the agent was killed uncleanly on iOS, restore the original socket manually once:
sudo mv /var/run/usbmuxd.real /var/run/usbmuxd
Troubleshooting
adb connecttimes out — verifyaccess-api-connectis still running and printedReady. Re-run it with-v(or--verbose) to log a line per accepted connection. ConfirmSAUCE_USERNAME,SAUCE_ACCESS_KEY, andSAUCE_REGIONmatch the region the session was created in.idevice_id -lreturns nothing — ensure you're running as root and the agent has printedReady. usbmuxd mounted at /var/run/usbmuxd. If a previous run left/var/run/usbmuxd.realbehind, the agent refuses to start; restore it once withsudo mv /var/run/usbmuxd.real /var/run/usbmuxdand re-run.- Connection drops after a period of inactivity — the session may have timed out. Check session state with
GET /sessions/{session_id}. - Xcode takes a long time on first connection (iOS) — Xcode downloads iOS device symbols on first connection. Over the tunnel this can take several minutes. Check
~/Library/Developer/Xcode/iOS DeviceSupport/— the folder for your iOS version should be over 1GB once complete. This is a one-time download per iOS version. iOS sessions are not supported on Windows— expected. The iOS path requires/var/run/usbmuxd, which has no Windows equivalent. Run the iOS workflow from macOS or Linux instead; Android works on all three.
Performance over the tunnel
The tunnel adds latency compared to a local USB connection — every byte travels from your machine over the internet to the device and back. For most interactive use (ADB shell, debugging, log streaming) this is barely noticeable. However, operations that transfer large amounts of data can be slower:
Screen recording and live view: Rather than streaming the screen through ADB or Xcode, use the liveViewUrl from the session response to open a browser-based live view that streams directly from our infrastructure.
App installation: Installing via adb install or Xcode pushes the entire binary through the tunnel. Instead, use the installApp API endpoint, which installs from Sauce Labs App Storage directly onto the device. This is significantly faster, and Sauce Labs can instrument your app during installation for features like crash reporting and performance monitoring.
Limitations
adb reverseis not supported — useadb forwardinstead.- iOS access requires root to replace the
/var/run/usbmuxdsocket. - iOS 17+: Xcode integration does not work. iOS 17 introduced a new RemoteXPC protocol that Xcode uses for pairing, debugging, and device management — this protocol is not carried over the usbmuxd tunnel. libimobiledevice tools (
idevice_id,idevicesyslog, etc.) still work on iOS 17+ since they use the older lockdownd protocol over usbmuxd. We are working on support for iOS 17+. - iOS 16 and earlier: Full Xcode support — devices appear in Devices & Simulators, debugging and other Xcode functions work. An Xcode restart may be required after setting up the bridge for the device to appear.