Coresnap Integration Guide
This section guides you through integrating Backtrace for system-wide core dump analysis with Coresnap, our core dump aggregation service. Coresnap is lightweight and non-intrusive to applications when idle.
Coresnap is the Backtrace service that automatically processes coredumps on the machine where it is installed. By default, Coresnap generates Backtrace snapshots from coredumps on the system and sends them to the object store. For those integrating via C/C++ applications, this is the recommended approach.
What You'll Need
- A Backtrace account (log in or sign up for a free trial license).
- Your subdomain name (used to connect to your Backtrace instance). For example,
https://example-subdomain.sp.backtrace.io. - A Backtrace license number.
- A Backtrace project and a submission token.
Install Coresnap and Dependencies
RHEL
To install Backtrace packages, first, install Backtrace's RPM mirror by running the following command:
curl -s https://<LICENSE>:@packagecloud.io/install/repositories/backtrace/stork/script.rpm.sh | sudo bash
Replace <LICENSE> with your license number. If you haven't received your license number yet, contact us. Also, make sure to provide the correct RHEL/CentOS Release Number.
This command configures yum to pull packages from Backtrace's RPM mirror. To verify the proper yum configuration, run the following commands:
# Clean and update yum package listing
$ sudo yum clean; sudo yum update

# Confirm that the backtrace-* packages are available
$ yum list ^backtrace-*
backtrace-coresnap
backtrace-coronerd
backtrace-coroner
backtrace-ptrace
backtrace-hydra
[...]
Then install the required packages:
# Install packages (on machines that submit snapshots)
$ yum install backtrace-coroner
$ yum install backtrace-coresnap
$ yum install backtrace-ptrace
Debian-based Systems (Including Ubuntu)
To install Backtrace packages, first, install Backtrace's APT mirror by running the following command:
curl -s https://<LICENSE>:@packagecloud.io/install/repositories/backtrace/stork/script.deb.sh | sudo bash
Replace <LICENSE> with your license number. If you haven't received your license number yet, contact us. Also, provide the appropriate values for DISTRO and RELEASE based on your system's configuration.
This command configures apt to pull packages from Backtrace's APT mirror. To verify the proper apt configuration, run the following commands:
# Clean and update apt package listing
$ apt-get clean; apt-get update

# Confirm that backtrace-* packages are available
$ apt-cache search ^backtrace-*
backtrace-coresnap
backtrace-coronerd
backtrace-coroner
backtrace-ptrace
backtrace-hydra
[...]
Then install the required packages:
# Install packages (on machines that submit snapshots)
$ apt-get install backtrace-coroner
$ apt-get install backtrace-coresnap
$ apt-get install backtrace-ptrace
FreeBSD
Consult the dedicated page for FreeBSD installation instructions.
Install Morgue Command-Line Querying Tool
To install morgue, you'll need Node.js. Run the following command to install Morgue globally:
$ npm install backtrace-morgue -g
Basic Testing
Now, let's perform a basic test to ensure connectivity to the object store before proceeding.
Testing With Morgue
Login to the object store by issuing the following login command with the credentials provided by Backtrace:
$ morgue login https://yourcompany.sp.backtrace.io
Username: jdoe
Password:
Now, list the contents of the blackhole project. It returns an empty result set, like the example below:
$ morgue list blackhole
jdoe: yourcompany/blackhole as of 1M ago [384 us]
Troubleshooting
If you encounter any issues querying the object store with morgue, ensure that your machine can communicate with yourcompany.sp.backtrace.io via the following TCP ports:
- 443
- 4097
- 6098
- 9040
Integration
Before proceeding, make sure to turn off any services that process coredumps or modify /proc/sys/kernel/core_pattern, such as apport.
Deploy Client Configuration
Coresnap requires a copy of the coroner client configuration file (coroner.cf) provided to you by a Backtrace representative. Place a copy of this file in /usr/local/etc/coroner.cf.
This file needs to be updated for each new project token (see Create Additional Projects)
Prepare Coresnap.conf
Copy the file /opt/backtrace/etc/coresnap/coresnap.conf to either /usr/local/etc/coresnap/coresnap.conf or /etc/coresnap/coresnap.conf. The new file is where you'll changes to the Coresnap configuration when customizing your installation later.
On FreeBSD, copy /opt/backtrace/etc/coresnap/coresnap.conf.sample to /opt/backtrace/etc/coresnap/coresnap.conf instead.
Installing Coresnap does not create the paths /usr/local/etc/coresnap/coresnap.conf or /etc/coresnap/coresnap.conf - If they do not exist, you can create them manually.
Start and Test Coresnap
$ service coresnapd start
or
$ /etc/init.d/coresnapd start
Now, let's test Coresnap by triggering a coredump. One way to do this is by sending a SIGABRT to the PID of a running vim process. However, if your application already correctly handles this signal to generate coredumps, you can use its PID instead:
$ kill -SIGABRT
Verify Object Store
Now, let's verify that the snapshot was sent to the object store. You can do this by re-running morgue list blackhole and checking if it now shows a single crash:
$ morgue list blackhole
* ▁▁▁▁▁▁▁▁▁▁▁▁▁▁▁▁▁▁▁▁▁▁▁▁▁▁▁▁▁▂ 5 seconds ago
Date: Mon Jan 23 2017 17:25:12 GMT-0500 (EST)
Mon Jan 23 2017 17:25:12 GMT-0500 (EST)
Occurrences: 1

jdoe: yourcompany/blackhole as of 1M ago [497 us]
You can also view this via the Web Console UI. Browse to https://<yourcompany>.sp.backtrace.io and login with the credentials you previously created.
Troubleshooting
First Steps
The first step in troubleshooting is to check the system log for messages from the Coresnap service:
$ cat /var/log/syslog | grep coresnap
When Coresnap processes a snapshot successfully, you see a series of log messages similar to the following:
Oct 6 17:49:06 mbreauxpc coresnap[27337]: Crash dump archived in /var/coresnap/archive/pending/a78771dc-b687-4e28-b885-8fa9ed43894d
Oct 6 17:49:06 mbreauxpc coresnap[27338]: Executing slave: /opt/backtrace/bin/ptrace --faulted -o/var/coresnap/archive/sending/a78771dc-b687-4e28-b885-8fa9ed43894d --load=libc- --kv=coresnap.object:a78771dc-b687-4e28-b885-8fa9ed43894d --resource=/var/coresnap/archive/assets/a78771dc-b687-4e28-b885-8fa9ed43894d --core /var/coresnap/archive/pending/a78771dc-b687-4e28-b885-8fa9ed43894d /usr/bin/vim.basic
Oct 6 17:49:07 mbreauxpc coresnap[27339]: Executing slave: /opt/backtrace/bin/coroner -c /usr/local/etc/coroner.cf put blackhole blackhole /var/coresnap/archive/sending/a78771dc-b687-4e28-b885-8fa9ed43894d
Oct 6 17:49:07 mbreauxpc coresnap[847]: crash a78771dc-b687-4e28-b885-8fa9ed43894d processed in 1 second
If you don't see any of these messages, your system or application is not set up to generate coredumps:
- First, check
ulimit -aand ensure that the core file size is unlimited for the user under which the faulting application is running. If it's not, execute aulimit -c unlimitedas that user. - Try running
vimas the same user you'll be running your application as and send it a SIGABRT signal to verify that it generates a coredump. If this does not trigger Coresnap, it means your system cannot generate coredumps.
If coresnap fails after the second step:
- Note the following error message and attempt to manually run the full
ptracecommand listed afterExecuting slave:as the Coresnap user. This helps reveal permissions issues withptracereading the coredump or generating the output file. You can also refer to the Troubleshooting Tools section below.
If coresnap fails after the third step:
- There may be a connectivity issue with sending the snapshot to the object store. Attempt to manually run the coroner command listed after
Executing slave:. If this fails, verify that nothing is blocking traffic on port 6098 between the client and the object store (yourcustomername.sp.backtrace.io).
Troubleshooting Tools
You can use the coresnap list command the view the state of unprocessed coredumps and snapshots that haven't been sent yet:
$ /opt/backtrace/bin/coresnap list

sending/3d22c19c-09c... -s- vim.basic Fri Apr 14 22:48:44 2017 9.45kB
pending/84605573-9de... c-- vim.basic Fri Apr 14 22:49:40 2017 3.12mB
pending/143fc129-afc... c-- vim.basic Fri Apr 14 22:50:01 2017 3.12mB

[pending]/1O/6.24mB [sending]/1O/9.45kB
To retry processing an object in one of these stages, you can use the coresnap retry command:
$ /opt/backtrace/bin/coresnap retry pending/84605573
$ /opt/backtrace/bin/coresnap list
sending/3d22c19c-09c... -sa vim.basic Fri Apr 14 22:48:44 2017 9.45kB
sending/84605573-9de... -sa vim.basic Fri Apr 14 22:53:44 2017 9.44kB
pending/143fc129-afc... c-- vim.basic Fri Apr 14 22:50:01 2017 3.12mB
For an object stuck in pending state
For an object stuck in the pending state, it means Coresnap has not yet generated a Backtrace snapshot. This may indicate a failure when Coresnap runs ptrace against the coredump.
You can try to manually creating a snapshot to submit to the object store by running ptrace --core. By default, Coresnap places coredumps and snapshots in subfolders of /var/coresnap/archive (you can verify this in coresnap.conf). In the example above, the core dump still in a pending state is located at /var/coresnap/archive/pending. You can try creating a snapshot with the following command:
$ ptrace --core /var/coresnap/archive/pending/143fc129-afc* `which vim`
If ptrace is failing, you can try using the bt tool instead:
$ bt --core /var/coresnap/archive/pending/143fc129-afc* `which vim`
For an object stuck in sending state
It means snapshots have not yet been submitted to the object store. If an object gets stuck in pending state, Coresnap may have trouble sending the snapshot. Refer to the If coresnap fails after the third step section above.
Advanced
Now that the Backtrace components are up and running on a basic level, you can proceed with customizations.
Create Additional Projects
By default, coresnap sends everything to the blackhole project. However, it is more beneficial to sort your application snapshots into their respective projects in the object store.
To create a new project, follow these steps:
-
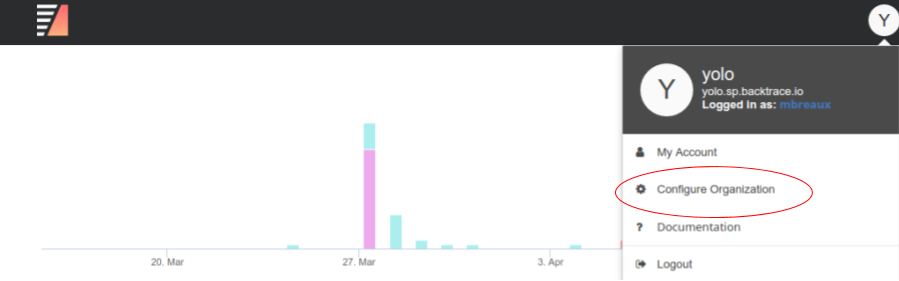
Return to the Web UI and click the Menu Icon.
-
Select Configure Organization.
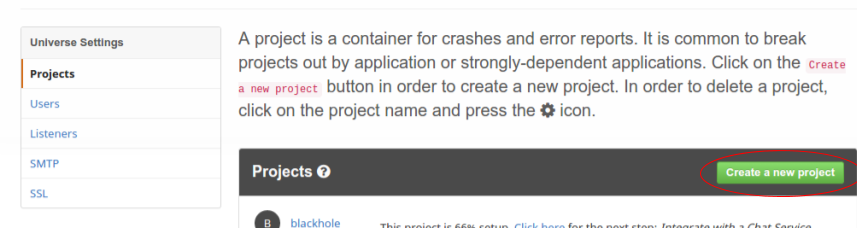
-
On the project listing page, you find an option to Create a new project. Click on it and enter a name for your new project.
-
After creating the project, you need to configure the project's token.
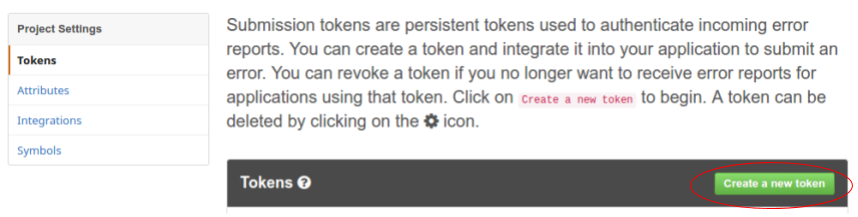
- Select the project from the project listing.
- In the left menu, click on Tokens.
- Click the Create a new token, select your user, and click Create.
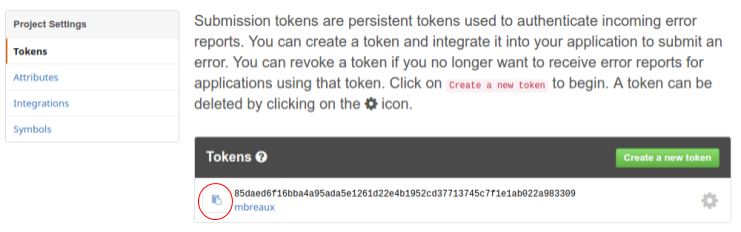
-
To copy the newly created token string, click on the clipboard icon located on the left side of the token.
-
Edit your
/usr/local/etc/coroner.cfand add this token to thetokenssection using the same format as theblackholeproject:projectname =. Repeat this process for each new project you create.
Create Additional Users
If you want to grant UI access to additional users, you can create new user accounts directly in the Web UI. Follow these steps:
- In the Web UI, navigate to the first configuration screen.
- Click on Users.
- Select Create a new User.
- Follow the prompts to create the new user account.
Route Snapshots to the Correct Projects
To ensure that coresnap sends snapshots to the correct projects, follow these steps:
- Edit either
/usr/local/etc/coresnap/coresnap.confor/etc/coresnap/coresnap.conf(depending on which one you created in the previous step) - Locate the line
format.1 = blackholein the file. - Add additional
format.1lines for each project above the blackhole line. Follow this pattern:
format.1 = projectname %e /end-of-executablename$
For this to work correctly, ensure that the token name you added to coroner.cf in the previous section matches the name of the project you set up in the object store Web UI. The projectname in the format.1 line must also match these.
In the pattern, %e specifies that we are matching based on the process' executable name. The part after it is a regular expression match. In this case, we are setting the project and token name to projectname if the executable name ends with end-of-executablename.
In summary, if the executable matches the specified pattern, the snapshot will be sent to the corresponding project.
If you want to customize this further, refer to the inline notes in the coresnap.conf file just above the format.1 line or consult your Backtrace support representative.
Remember to restart coresnapd after making any changes to coresnap.conf.
Configure Workflow Integrations
After you have your Backtrace integration set up, you can configure alerts to your preferred third-party ticketing or messaging services. Refer to the product guide for detailed instructions on setting up workflow integrations.
Attach and Display Attributes
To enhance the querying and grouping capabilities in the Web UI and the morgue command-line tool, you can add custom attributes to your snapshots. Backtrace automatically populates the following attributes to your snapshots:
- hostname
- application
- uname.machine
- uname.release
- uname.version
If you want to add additional key-value pairs to your snapshots, you can use the BACKTRACE_DEFAULTS environment variable. Populate this variable with line-delimited key-value pairs in the format:
version=1.2.3
dc=newyork
Additionally, you can specify a program or script for coresnap to call during snapshot generation to populate these values dynamically.
By default, coresnap executes /opt/backtrace/etc/coresnap/defaults and passes the faulted process' executable name as the first parameter to the script. If needed, you can modify the defaults.command path in the coresnap.conf file.
After making any changes to coresnap.conf, remember to restart coresnapd.
Finally, in the Web UI configuration section, select your project, navigate to Attributes, and click on Create a new attribute. Specify the attribute's name, type, and format, and click Create.
Make sure the attribute name matches the key you set in the BACKTRACE_DEFAULTS.
To display these attributes in the morgue list output, include an aggregation flag such as --select= or --histogram= in your morgue list command. For example:
$ morgue list blackhole --select=hostname
*
#9c5f
hostname: jdoepc
jdoe: yourcompany/blackhole as of 1M ago [529 us]
For more information, refer to the Morgue README.
Go Application Integration
If you want to capture errors from your Go application using Coresnap, make sure to include the environment variable GOTRACEBACK=crash in your application's environment. This enables your application to generate a core dump when it encounters a panic or receives a SIGABRT signal.
Managing Disk Space
Coresnap provides several settings to help you manage your disk space effectively. Take a look at the following options:
#
# Do not archive dumps if the target has less than 10% of
# free space rounded to the next disk block size.
#
dump.quota = 10%

#
# These options dictate how the coresnapd process will behave.
#
[daemon]
#
# The purge.age option specifies when coresnapd should unlink files according
# to the age of the files. The format is
The dump.quota option allows you to specify a threshold for archiving core dumps. If the free disk space falls below this threshold, coresnap won't archive new core dumps. This includes processing snapshots from the core dump, sending the snapshot to the object store, and triggering notifications via workflow integrations. It's recommended to set the quota generously in combination with the purge.age setting.
The purge.age setting determines when coresnap should unlink (delete) archived files based on their age. Combining this setting with dump.quota helps you manage disk space efficiently. If you expect a low error volume and wish to retain files indefinitely, you can set purge.disabled to true.
After making any changes to the configuration, remember to restart the coresnapd process.