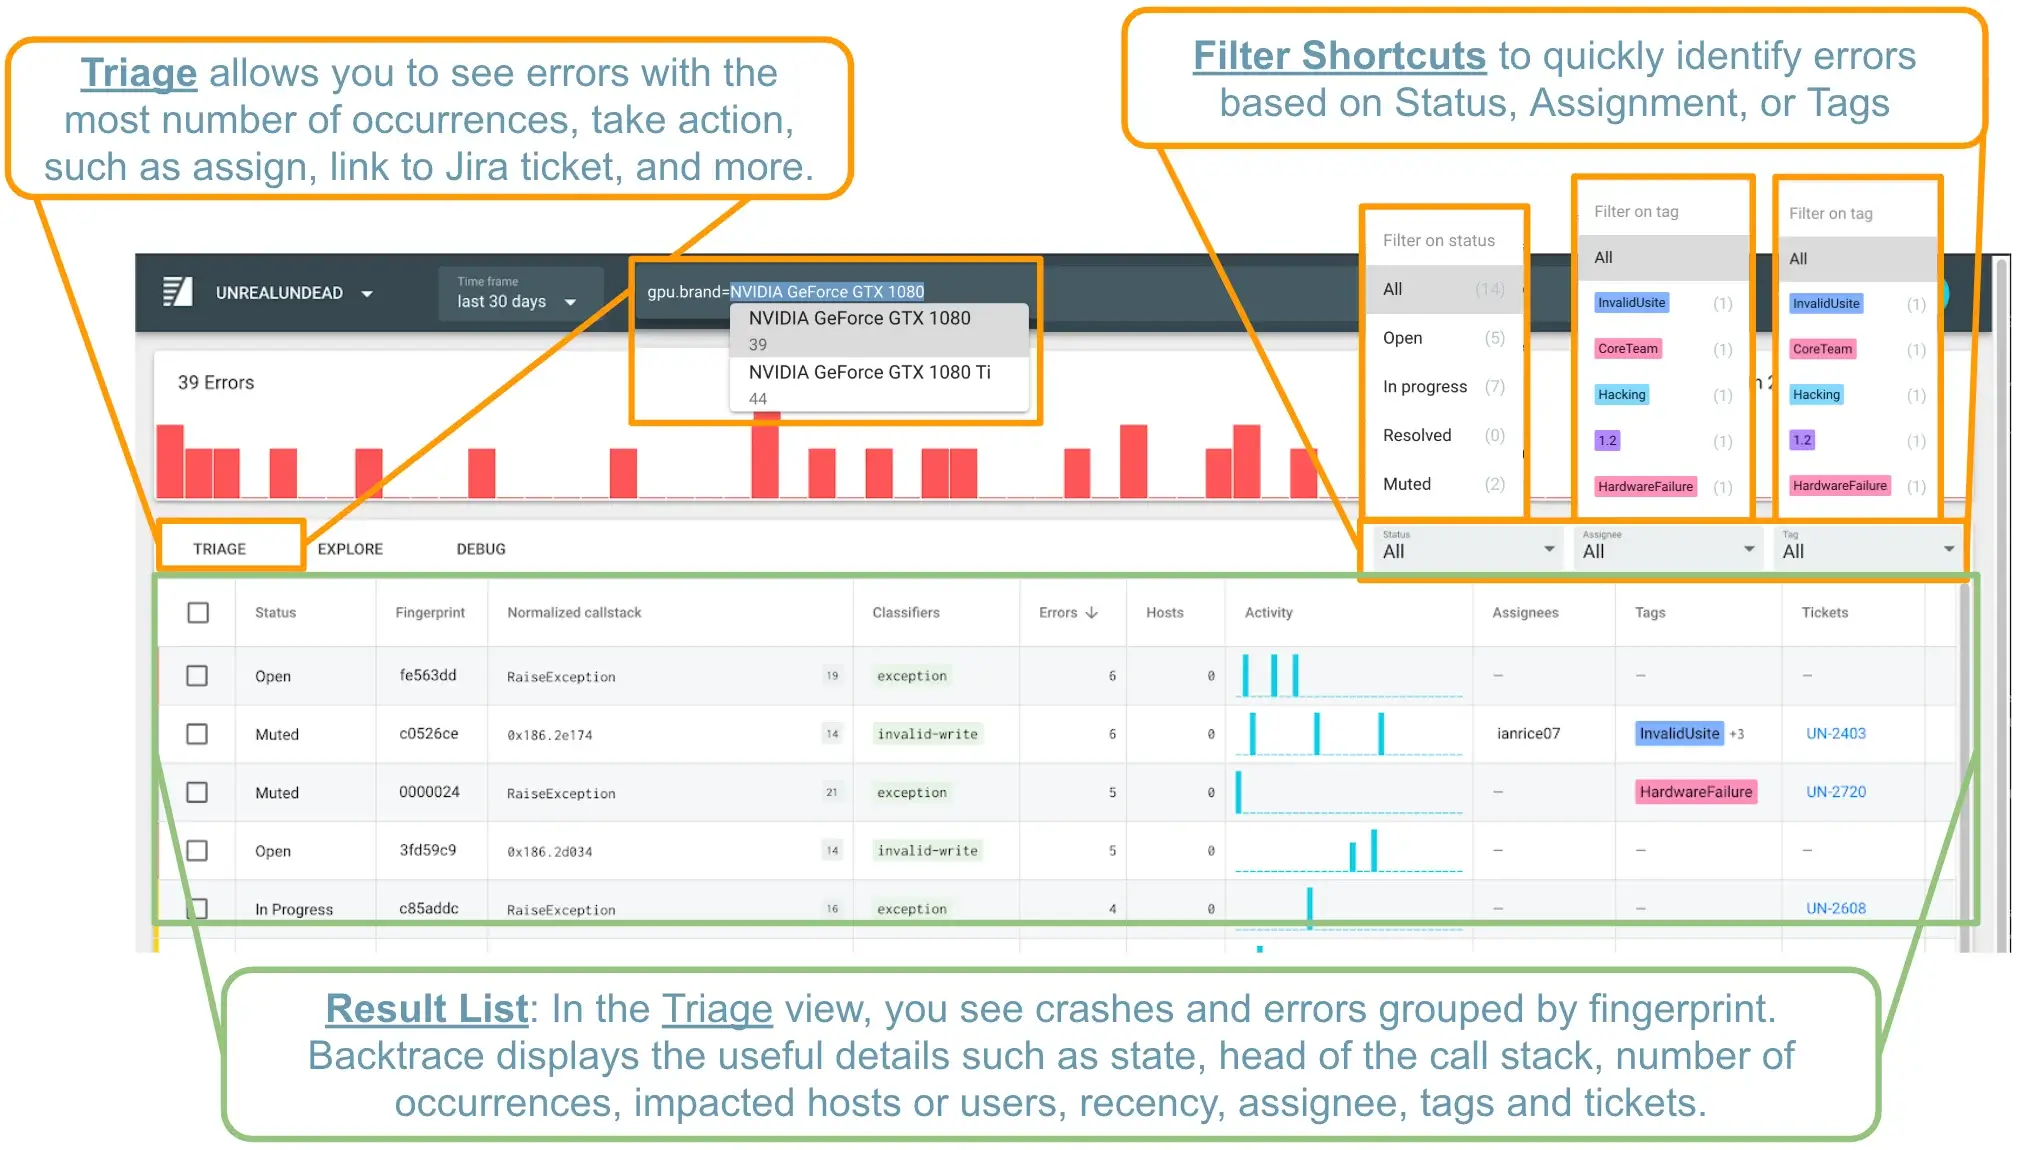
Triage
When opening the Web Console, you will default to the Triage view for the selected project. The Triage view displays crashes or errors grouped by fingerprint (a hash that is generated when processing crashes through Backtrace's deduplication algorithms). The fingerprint is used to signify a unique error with a common root cause.
The Triage view allows you to filter errors (fingerprints) you want to view, provides aggregate information about the fingerprint, and enables actions to take to support resolution of the fingerprint. The following actions are available for users to take on fingerprints:
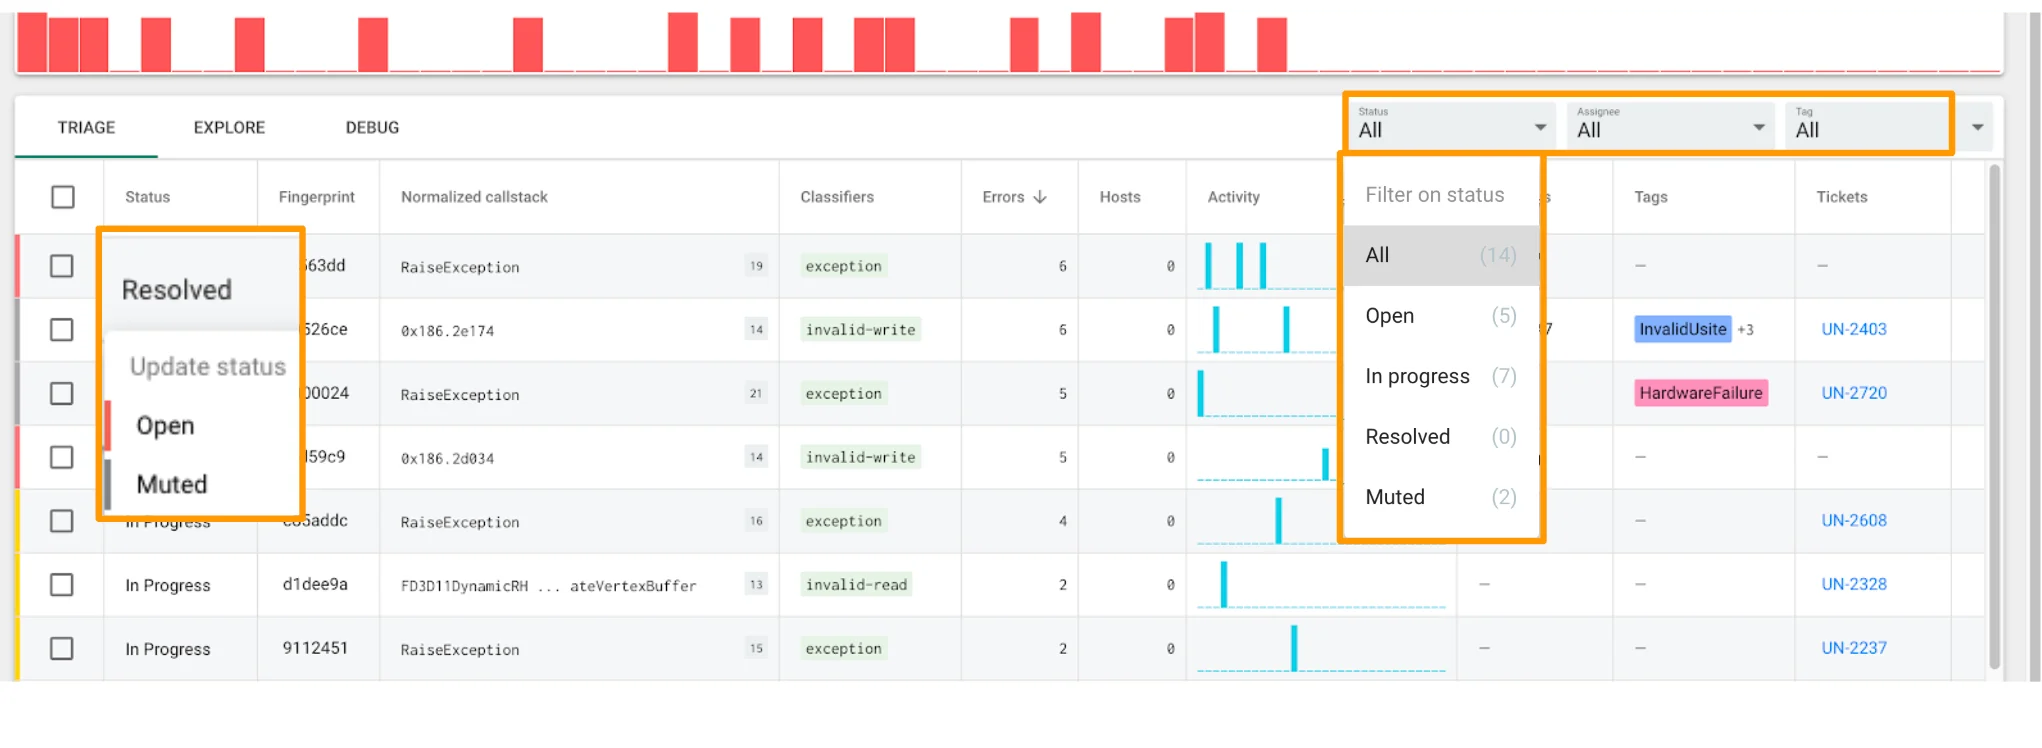
- View and Manage by State - Use Filter Shortcuts like Open, In Progress, Muted or - Resolved to view fingerprints that are relevant to your activity in the Triage view.
- Set Reopen Criteria - Use Resolved Until or Muted Until functionality to tell the system to reopen a fingerprint if it's seen in a future version or after a certain period of time.
- View Details - Each Fingerprint has a Details view which provides more context for the fingerprint, including some analysis of attributes associated to the crashes, a list of all the instances of this fingerprint, ability to tag and comment, and some quick actions to Debug the latest trace or view a larger Instance table list.
- Assign - The fingerprint can be assigned to a user in Backtrace to indicate there is a user that is responsible to resolve it.
- Link to Issue - A user can create a new issue in a 3rd party system like Jira or GitHub issues that is populated with some information about the fingerprint, and a link back to more details about the fingerprint in Backtrace.
- Comment and Tag- A comment thread is available in the Details view of a fingerprint. Tags can be applied to fingerprints for more ad-hoc grouping and classification.
- Merge / Unmerge - If you find 2 or more fingerprints that should really be grouped together, take the Merge action to create a new fingerprint to group future incoming errors into.
View and Manage State
In the Triage view, each fingerprint has a status of Open, Resolved, In Progress or Muted. These states help engineering managers and engineers know which crashes need analysis, which are being actively worked on, which are resolved, and which can be ignored or muted.
We normally see engineering managers start with Open fingerprints so that they can make sure relevant issues are disposed of properly, by taking actions such as assigning to an engineer, linking to Jira issue, marking as Resolved or Muted).
For each fingerprint in the result list you can view and modify data:
- View and modify the state from Open/In Progress to Resolved and Muted.
- View the Fingerprint and hover to get actions to View the Details page or Open the Fingerprint in the Debug view.
- View the head of the callstack and hover to get a few more lines.
- View the number of occurrences and number of impacted hosts or users, and activity history.
- View system applied tags (classifiers), and manage custom tags.
- View and manage assignees and linked tickets.
- Select multiple fingerprints to take the merge action, or other bulk actions, such as assignment, mute, or resolve.
A note on Open, In Progress, Resolved and Muted states:
- Fingerprints can be marked as Resolved or Muted using the state column. Fingerprints that have been marked as Resolved or Muted will stay in that state, to allow you to better organize the expected state of instability in your environment.
- A fingerprint is Open if there are no assignees or linked tickets (and has not been marked as Resolved or Muted). The act of assigning a fingerprint or linking it to an issue will cause the Open fingerprint to be listed as In Progress. By the same notion, a fingerprint that is In Progress and has its assignees removed and tickets unlinked will be listed as Open.
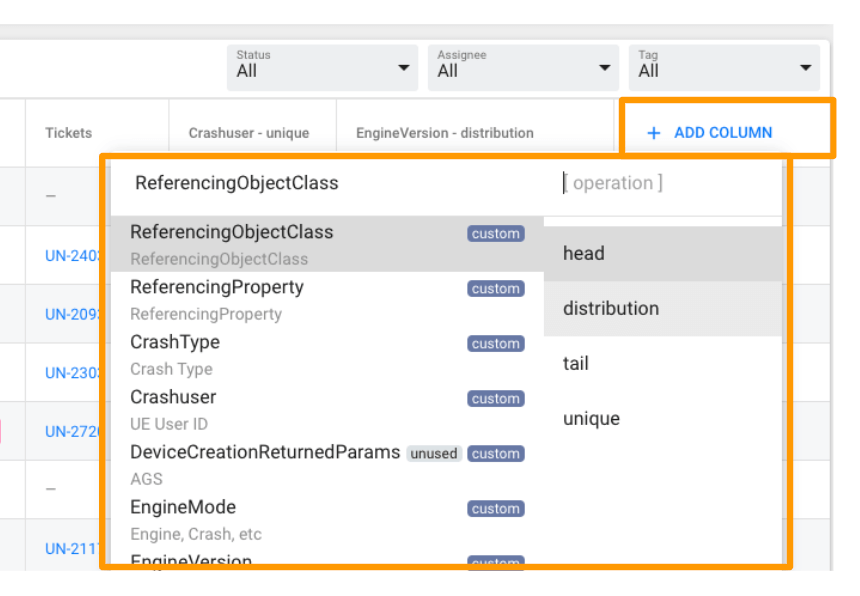
Customize the Columns Displayed in the Triage View
A user can add additional columns to the Triage view to help them better assess priority. A user can choose any of the system or custom attributes and an aggregation visual to see things like a Distribution of Versions or Unique number of Users impacted.
Details Page
Hovering over a fingerprint will allow you to take the action to View Details Page for the fingerprint. The Details Page provides ability to analyze additional attributes across the fingerprint for better identification of patterns.

Other Actions
This section will discuss the actions you can take on a fingerprint.
Assign
The fingerprint can be assigned to a user in Backtrace to indicate there is a user that is responsible to resolve it. This action also sets the state of the fingerprint to In Progress.
Link To Issue
A user can create a new issue in a 3rd party system like Jira or GitHub issues that is populated with some information about the fingerprint, and a link back to more details about the fingerprint in Backtrace. This action also sets the state of the fingerprint to In Progress.
Comments and Tags
A comment thread is available in the Details view of a fingerprint soon. Users can post and edit their comments to assist in the resolution flow. Tags can be applied to fingerprints for more ad-hoc grouping and classification.
Mute or Resolve
You can take explicit Mute or Resolve actions on a fingerprint. Mute a fingerprint when you don't want it to appear as Open or In Progress any more. Mark as Resolved when you think the issue is fixed. Fingerprints that have been marked as Resolved or Muted will stay in that state, to allow you to better organize the expected state of instability in your environment.
Reopen Criteria - Mute or Resolve Until
You can take explicit Mute Until or Resolve Until actions on a fingerprint to specify if/when you would like the fingerprint and any linked issues (i.e. Jira) to be reopened. Customers use this capability to specify which criteria should be used to determine if a fingerprint should be re-opened and to automate issue tracking workflows to respond to regressions.
You can specify conditions such as "until the fingerprint is seen in version {choose version attribute} greater than {value}" or "until the fingerprint is seen again after < 30 minutes | 2 hours | 1 day | 1 week | 1 month>".
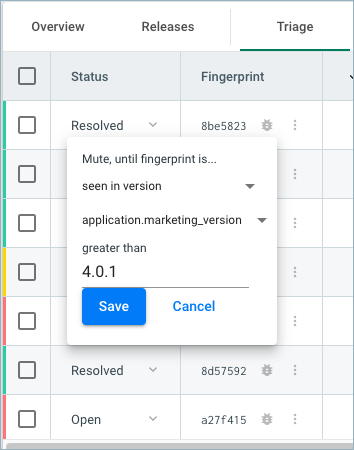
If the conditions are met, the system sets the state to Open, reopens any linked issues, increments the attribute invariant_reopen_count by 1, and populates the invariant_reopen_last_time with the date and time the fingerprint was reopened. With this information populated, engineers and managers can build useful views in Triage and Explore to show regressions that were introduced.
Merge / Unmerge
If you find 2 or more fingerprints that should really be grouped together, take the Merge action after selecting multiple fingerprints in the Triage view to create a new fingerprint to group future incoming errors into. Unmerge from a fingerprint's Details view.
Inspect + Copy/Paste Callstack
By hovering over a fingerprint's callstack (in the "Description" field) it will expand out so you can see more of it. If you want to see or share the full callstack, you can press the "Copy Callstack" button at the top of the window that comes up.
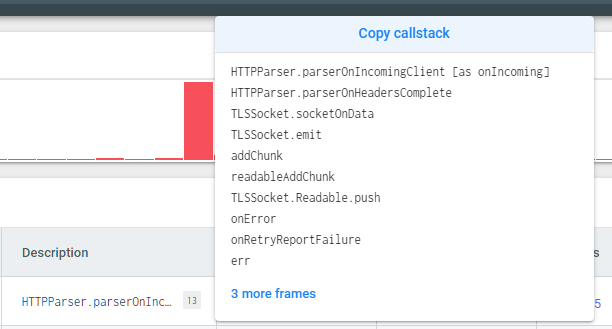
The callstack shown in the UI on hover and the callstack you copy can be slightly different. This is because the callstack you are seeing in the UI has been normalized / deduplicated and grouped into a fingerprint by our processes, whereas the copy button grabs the raw callstack data. While the normalized callstack is great for quickly trying to understand where in your application an error has occurred, copying the callstack will give you more details (including frame + line numbers).
For more context on the deduplication process, see Deduplication Overview.