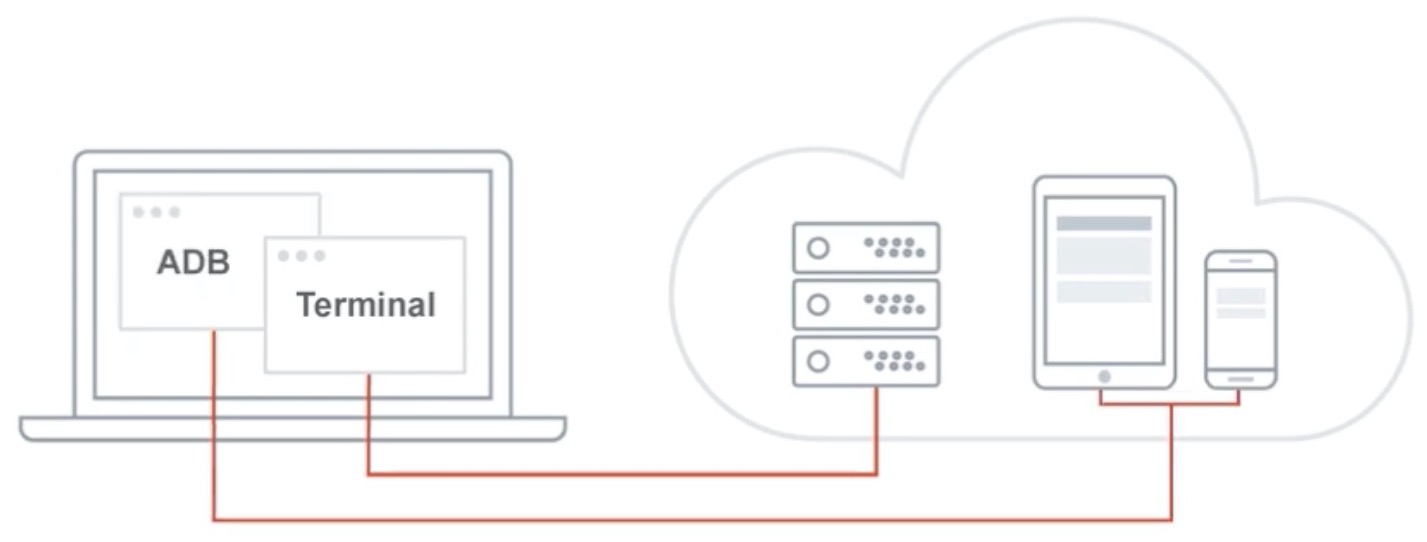
Virtual USB Testing on Real Mobile Devices
Virtual USB (vUSB) is a mobile (app) debugging tool that simulates connecting a Sauce Labs real device directly to your local machine/test runner host. It integrates into your development and test environment, meaning you can use your choice of homegrown development and testing tools to debug.
- Make the most out of your early-stage development or inhouse built testing solution.
- Use a mix of manual and automated testing as it fits your use case.
- Run non-traditional automation frameworks.
- Run adb commands on Android devices.
- Monitor device performance metrics such as CPU consumption, device memory, and network data performance.
- Interact with your app manually in a live test session using browser-based developer tools (e.g., Chrome DevTools, Safari Web Inspector).
What You'll Need
Enterprise Plans Only- A Sauce Labs account (Log in or sign up for a free trial license)
- Your Sauce Labs Username and Access Key
- For security reasons, you'll need to have Sauce Labs Private Devices enabled as part of your enterprise pricing plan to use Virtual USB. This feature allocates a dedicated pool of Sauce Labs real devices to your organization only.
- Windows, macOS, or Linux operating system.
- Administrative rights to install software on your machine.
- Have Java Development Kit (JDK) installed.
- A mobile native app or web app.
- If you're testing an iOS app:
- macOS or Linux required (not supported for Windows).
- Have Xcode command line tools installed (macOS only).
- If you're testing an Android app:
- Android Debug Bridge (ADB) version higher than 1.0.39.
- Android Studio 4 or higher.
- If you need to use Sauce Connect, you'll need to have the client installed first.
vUSB is currently only supported for test automation. Debugging with any IDE, and attaching debuggers with Xcode and Android Studio, are not advised and won't be supported at this time). iOS17 is not supported at this time. We will soon introduce a new CLI tool to connect to a device and run automated tests.
Using Virtual USB
See Virtual USB CLI Reference for a full list of vUSB test configuration commands and options. You can also view them directly in the vUSB client by running java -jar virtual-usb-client.jar --help.
Download Client
- Click below to download the latest Virtual USB client to your local machine where you have your command line tools and test enginees installed/set up.
For Virtual USB release history, see our changelog.
Gather Credentials
-
Have your Sauce Labs
usernameandaccessKeyhandy. You can find these under Account > User settings. -
Have your
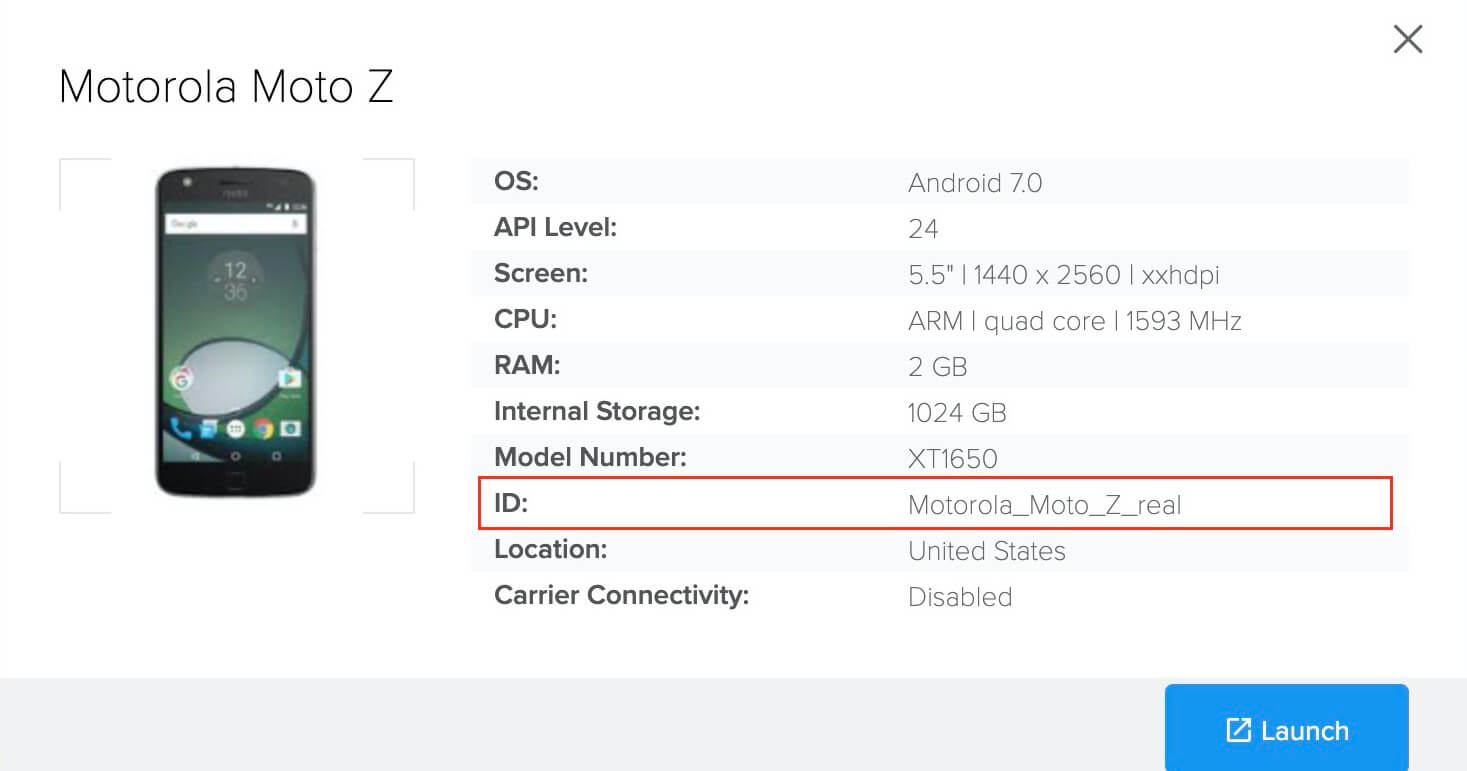
--deviceNamehandy. This is the ID of the device that you want to use for testing. To find this, go to Live > Cross Browser > Mobile Real > Find Your Private Device > Details.
The device you choose will be allocated specifically to you while your session is active. Other users in your organization will see it marked In Use.
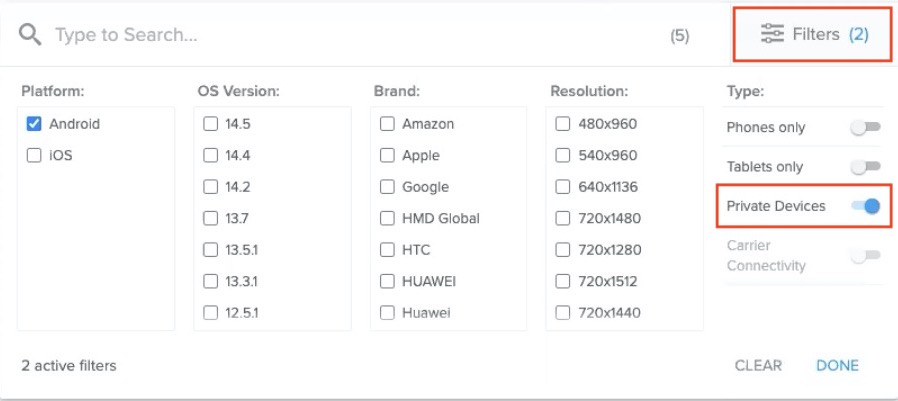
As a reminder, vUSB only works on private devices (marked with a ![]() ). A quick way to find your organization's private devices from the device list is to click Filters and toggle Private Devices.
). A quick way to find your organization's private devices from the device list is to click Filters and toggle Private Devices.
Start Server
-
On your local machine, launch a command line terminal window and use
cdto navigate to the folder where you downloaded the vUSB client. -
In your terminal, enter the
servercommand, followed by--datacenter US,--datacenter EUor--datacenter US_eastto specify the Sauce Labs xxU.S. or E.U. Data Center. This establishes the connection from your local machine to our Real Device Cloud, where your private devices are hosted.
java -jar virtual-usb-client.jar server --datacenter US
Once you've executed the above command line, it becomes a session data log, running continuously in the background. Do not close it, and keep it separate from terminals you'll use in forthcoming steps.
Optional: Set Verbose Logging
If you'd like to set verbose or very verbose logging, you can specify -v or -vv as the first argument, respectively. Example:
java -jar virtual-usb-client.jar -v server --datacenter US
Optional: Set Up a Local Server Proxy
If you need to use a proxy to get access to external resources, you can launch a proxy tunnel or device proxy tunnel using the proxy flags compatible with the server command. This is not the same as starting a Sauce Connect Tunnel.
Optional: Set Environment Variables
Setting your Sauce Labs username and accessKey as environment variables provides an extra layer of security for your credentials when you reference them from within your tests.
Start Test Session
- In this step, you'll establish the connection to your device and start a vUSB test session. This needs to be done in a separate terminal session. This terminal session will only log if a connection is successful or not. During the session with the device(s) the logs can be found in the terminal that you'll have started in the previous step.
A vUSB session officially doesn't have a timeout. The only timeout that can be triggered is the timeout of a manual/live session that has been opened from method 1 or 2. The reason for this is that a manual/live testing timeout triggers a disconnection of the device and closes the already running vUSB session.
There are two ways to start a test session:
Method 1: Connect to existing live testing session
Start a live test directly on Sauce Labs, then use the command terminal to connect the test to your vUSB client.
First, launch your test on Sauce Labs (Live > Cross Browser > Mobile Real > Find your Private Device > Launch). Next, locate your --sessionId by opening a new command line terminal and running the sessions command, along with your credentials.
java -jar virtual-usb-client.jar sessions --username $SAUCE_USERNAME --accessKey $SAUCE_ACCESS_KEY
If Sauce Connect Proxy is required to access your corporate network or your local machine for secure test data, you'll need to select a SAUCE CONNECT PROXY from the dropdown before launching your device.

This will return a list of your active test sessions.
List of active sessions
d03a1b81-158d-4bb4-bcc9-074e43dd8465   Samsung Galaxy S10  ANDROID  10
c7729c7a-56a9-46cf-ba96-958709a86b4f   iPhone XS           IOS      14.3
e21abb6f-a08e-4685-ba6e-8c6586dd4264   iPhone SE 2020      IOS      14.3
Copy the --sessionId of your desired test, then run that along with the connect command and your credentials.
java -jar virtual-usb-client.jar connect --sessionId d03a1b81-158d-4bb4-bcc9-074e43dd8465 --username $SAUCE_USERNAME --accessKey $SAUCE_ACCESS_KEY
If your vUSB test session launch is successful, you'll see a success message:
- Android
- iOS
localhost:7000 online
localhost:-1 online
/var/run/usbmuxd.If you are running vUSB as a non-root user you will need to provide the password for the root user and an Apple system notification popup will appear: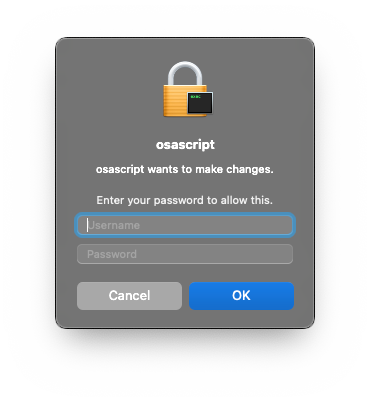 If you are running vUSB as a root user you will not be prompted for a password and the socket will be moved automatically. You will see the following message in your server logs:
11:13:12.347 INFO com.saucelabs.vusb.client.server.usbmuxd.SocketMover - The socket at /var/run/usbmuxd needs to be moved
11:13:12.347 INFO com.saucelabs.vusb.client.server.usbmuxd.SocketMover - This will require administrator privileges!
or
Method 2: Start new session with vUSB client from command line
Open a new command line terminal window and run the startSession command, followed by your username, accessKey, and --deviceName:
- Android
- iOS
java -jar virtual-usb-client.jar startSession --username $SAUCE_USERNAME --accessKey $SAUCE_ACCESS_KEY --deviceName Motorola_Moto_Z_real
java -jar virtual-usb-client.jar startSession --username $SAUCE_USERNAME --accessKey $SAUCE_ACCESS_KEY --deviceName iPhone_XS
To use Sauce Connect Proxy: launch a tunnel in the Sauce Connect client, then add your --tunnel-identifier, which the vUSB client will use to retrieve and secure test data. You can also set up a device proxy using proxy command options.
If you require video recordings and device logs to be generated for the virtual USB session created via this method (accessible via SauceLabs account on the website), include the --artifactsEnabled optional flag when using the startSession command. Otherwise, the test report associated with this session will only contain metadata (i.e. device info, start/end timestamps, etc.).
If your vUSB test session launch is successful, you'll see a success message:
- Android
- iOS
--sessionId, a port number, and a link. Click the link to see your device in action, running your tests in real time. You must be logged into Sauce Labs for the link to work.
The port number is needed when you want to connect the device to ADB (see step 7).d03a1b81-158d-4bb4-bcc9-074e43dd8465 Motorola Moto Z ANDROID 7.0 https://app.us-west-1.saucelabs.com/live/mobile/dataCenters/US/devices/shared/9299h0c88a7-e2b6-41bc-9509-5-8a5d765490371e2c9a
localhost:7000 online
--sessionId and a link (no port number for iOS).d03a1b81-158d-4bb4-bcc9-074e43dd8465 iPhone XS IOS 14.3 https://app.us-west-1.saucelabs.com/live/mobile/dataCenters/US/devices/shared/9299h0c88a7-e2b6-41bc-9509-5-8a5d765490371e2c9a
localhost:-1 online
/var/run/usbmuxd.If you are running vUSB as a non-root user you will need to provide the password for the root user and an Apple system notification popup will appear:If you are running vUSB as a root user, you will not be prompted for a password and the socket will be moved automatically. You will see the following message in your server logs:11:13:12.347 INFO com.saucelabs.vusb.client.server.usbmuxd.SocketMover - The socket at /var/run/usbmuxd needs to be moved
11:13:12.347 INFO com.saucelabs.vusb.client.server.usbmuxd.SocketMover - This will require administrator privileges!
No timeout is triggered if the returned link is not opened.
- Android only: Link ADB to your test session device by running
adb connect, followed by the port number:
adb connect localhost:7000
Test and Debug
- Now, you can debug and run tests on your app. We advise you to use our Sauce App Storage to upload the apps and run tests against them.
Attaching a debugger is not supported due to the amount of data that the iOS device symbols will need to be downloaded to your local machine. This process occurs automatically when you're connecting to a Sauce Labs iOS device for the first time via a remote debug vUSB session with Xcode. Xcode will attempt to download the iOS device symbols over the vUSB tunnel, causing a lag that can last from a few minutes to an hour..**
- What to Do: Go to
~/Library/Developer/Xcode/iOS DeviceSupport/and check the used iOS version of the phone to see if the symbols have been downloaded. The total used space per OS should be more than 1GB. If they are less than 1MB, delete the folder and restart Xcode again so it can re-fetch them. This a one-time action that you won't need to do again for future tests.
The adb reverse command is not supported. Please rethink your implementation and think about using adb forward instead.
Close Test
-
When you've finished testing, we recommend closing your vUSB session so that other users can use the device. There are a few ways to do this:
-
If you started a test session by connecting to a live session on Sauce Labs (Option 1), close it out by running the
disconnectcommand, followed by your--sessionId.- Android Only: You'll also need to disconnect your device from ADB. Run
adb disconnectfollowed by your<IPAddress>:<portNumber>:
adb disconnect localhost:7000 - Android Only: You'll also need to disconnect your device from ADB. Run
-
If you started your test session with
startSession(option 2), close it out by running thedeleteSessioncommand, followed by your--sessionIdand credentials.
java -jar virtual-usb-client.jar deleteSession --sessionId 37D274BC3A65A34BB3DA4DDF7B77E341 --username $SAUCE_USERNAME --accessKey $SAUCE_ACCESS_KEY-
Android Only: You'll also need to disconnect your device from ADB. Run
adb disconnectfollowed by your<IPAddress>:<portNumber>:adb disconnect localhost:7000 -
The third option, regardless of your test setup, is to close the browser window where the device session is running.
-
If you've lost track of your --sessionId, you can recover it using the sessions command to generate a list of your active device sessions.
java -jar virtual-usb-client.jar disconnect --sessionId 37D274BC3A65A34BB3DA4DDF7B77E341
Example Use Cases
ADB commands
You can execute adb commands on the device connected over vUSB as you would normally also use. This is a simple example to capture a screenshot and pull it to your local machine.
#Create a temporary folder to save a screenshot.
mkdir tmp
#Capture a screenshot and save to /sdcard/screen.png on your Android divice.
adb shell screencap -p /sdcard/screen.png

#Grab the screenshot from /sdcard/screen.png to /tmp/screen.png on your PC.
adb pull /sdcard/screen.png /tmp/screen.png

#Delete /sdcard/screen.png.
adb shell rm /sdcard/screen.png

#open the screenshot on your PC.
open /tmp/screen.png
Android port forwarding with adb forward
There are cases in which you want to set up arbitrary port forwarding, which forwards requests from your local machine port to a different port on the connected Android device through vUSB.
This is the app code we use for the below example.
The following example sets up forwarding of host port 40000 (laptop/CI) to device port 50000 (the Android device) where we change text in the app.
-
Start a server
-
Connect to a device with for example
startSession -
Get the app installed. Advice would be to use Android Studio and run the app on the remote device (Android Studio will automatically detect the remote device).
-
Open the shared url in your browser
-
Click on "Menu → Virtual USB". You will find two commands on the screen. They are:
adb forward tcp:40000 tcp:50000
echo GOOSE | nc localhost 40000 -
Execute the commands to get the following result
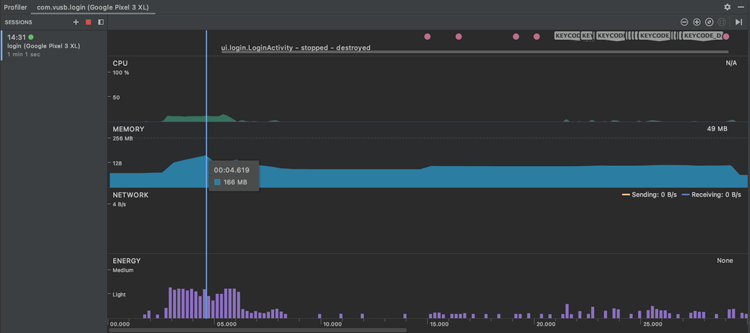
Android Studio Debugging
To for example profile your Android app you can follow the instructions as mentioned here. This can result in the following data.