Jira Integration with Backtrace
Integrate your Backtrace and Atlassian Jira instances to create and update issues in Jira for errors reported to Backtrace.
What You'll Need
- A Backtrace account (log in or sign up for a free license)
- A Jira instance
Connect to Jira
To set up the Jira integration for a project, connect your Backtrace account to a Jira instance.
Jira administrator permissions are required to create and delete Jira connections.
Jira Cloud
To connect to a Jira Cloud instance, install the Backtrace for Jira app.
- Go to Project settings > under Workflow > select Integrations.
- Click +, then select Issue tracking > Jira Cloud.
- Click Install Jira Plugin.
- From the Atlassian Marketplace, click Get it now.
- Select the Jira Cloud instance to connect with, then click Get it now again.
- After the plugin is installed, click Get Started.
- Enter the URL for your Backtrace instance, then click Continue to Backtrace to configure the Jira Cloud integration in Backtrace.
If you have multiple Jira Cloud instances, repeat the steps above to create separate connections for each one.
Jira Server
Support for Atlassian Server products ends on February 15, 2024. You may want to consider moving to Jira Cloud.
To connect to a Jira Server instance, enter a connection name, the Jira instance URL, and select the authentication type. The next steps will depend on the authentication type you select. The available authentication types are:
- Basic Auth: Requires a username and password. For more information, see Basic Auth.
- OAuth 1.0: Requires an RSA key pair and a new application link in Jira. The public key is required to create a new application link in Jira, while the private key is required for the configuration in Backtrace. You can either generate the RSA key pair or use the RSA key pair generated by Backtrace. For more information, see OAuth 1.0.
- OAuth 2.0: Requires an OAuth 2.0 integration and a new external application link in Jira. For more information, see OAuth 2.0.
Your Jira Server instance might restrict the authentication method to OAuth only. If you require basic authentication, contact your Jira admin.
If your network is configured to restrict external web traffic, you may need to allowlist the following IP address for the workflows.backtrace.io domain: 3.94.174.222
Basic Auth
- Go to Project settings > under Workflow > select Integrations.
- Click +, then select Issue tracking > Jira Server.
- Complete the following:
- Connection name: Enter a name to identify your integration.
- Jira Server url: Enter the URL for your Jira instance.
- Auth type: Select Basic Auth.
- Enter the Username and Password for your Jira instance.
- Click Continue to configure the integration.
OAuth 1.0
Set Up the Connection in Backtrace
- Go to Project settings > under Workflow > select Integrations.
- Click +, then select Issue tracking > Jira Server.
- Complete the following:
- Connection name: Enter a name to identify your integration.
- Jira Server url: Enter the URL for your Jira instance.
- Auth type: Select OAuth 1.0.
- Do one of the following:
- If you want to use the RSA key pair generated by Backtrace:
- Under Generate Private RSA key, select Yes.
- Click Continue.
- Copy the public RSA key.
- If you want to provide your own RSA key pair:
- Under Generate Private RSA key, select No.
- In the Private RSA key field, enter the private key from the
jira_privatekey.pemfile. For information on how to generate an RSA key pair, see below. - Click Continue.
- If you want to use the RSA key pair generated by Backtrace:
Generate an RSA key pair
- Generate an 1024-bit private key:
openssl genrsa -out jira_privatekey.pem 1024
- Create an X.509 certificate:
openssl req -newkey rsa:1024 -x509 -key jira_privatekey.pem -out jira_publickey.cer -days 365note
You can modify the expiration date, but you may need to update the connection more frequently.
- Extract the private key (PKCS8 format) to the jira_privatekey.pcks8 file:
openssl pkcs8 -topk8 -nocrypt -in jira_privatekey.pem -out jira_privatekey.pkcs8
- Extract the public key from the certificate to the jira_publickey.pem file:
openssl x509 -pubkey -noout -in jira_publickey.cer > jira_publickey.pem
Create an application link in Jira
- In Jira, go to Jira settings (cog icon) > Applications > Application links.
- Click Create link.
- For Application type, select Atlassian product.
- Enter an application URL, then click Continue. If you see a warning that the URL is invalid, ignore it and click Continue again.
- In the form, enter the following:
- Application Name: Backtrace
- Application Type: Generic Application
- Service Provider Name: Backtrace
- Consumer Key: BacktraceIO
- Shared Secret: Backtrace
- Request Token URL: https://backtrace.io/
- Access Token URL: https://backtrace.io/
- Authorize URL: https://backtrace.io/
- Create Incoming Link: No
- Click Continue. On the Application links page, you'll see an application called Backtrace.
- Next to the Backtrace application, from the Actions column, click the blue crayon icon.
- In the Configure Backtrace dialog, select Incoming Authentication.
- Enter the following:
- Consumer Key: BacktraceIO
- Consumer Name: Backtrace
- Public Key: The public key that you copied from Backtrace or the public key from the
jira_publickey.pemfile that you generated.
- Click Save, then Close.
Connect the Jira Server app with Backtrace
- In Backtrace, go back to the setup for the Jira Server integration.
- Click Continue to complete the setup in Jira.
- Click Authorize. You'll be redirected to your Jira Server instance.
- Click Allow. You'll be redirected to Backtrace to configure the integration.
OAuth 2.0
Set Up the Connection in Backtrace
- Go to Project settings > under Workflow > select Integrations.
- Click +, then select Issue tracking > Jira Server.
- Complete the following:
- Connection name: Enter a name to identify your integration.
- Jira Server url: Enter the URL for your Jira instance.
- Auth type: Select OAuth 2.0.
Create an external application link in Jira
- In Jira, go to Jira settings (cog icon) > Applications > Application links.
- Click Create link.
- For Application type, select External application.
- For Direction, select Incoming.
- Click Continue.
- In the form, enter the following:
- Name: Backtrace
- Redirect URL: https://workflows.backtrace.io/api/workflows/plugins/jira-server/external/oauth/2.0/callback - Make sure to replace the domain with the actual domain the Workflows service will be using.
- Permission: Select Write.
- Click Save.
- From the Credentials page, copy the Client ID and Client Secret.
Connect the Jira Server app with Backtrace
- In Backtrace, go back to the setup for the Jira Server integration.
- Enter the Client ID and Client Secret.
- Click Continue to complete the setup in Jira.
- Click Authorize. You'll be redirected to your Jira Server instance.
- Click Allow. You'll be redirected to Backtrace to configure the integration.
Configure the Integration
- Go to Project settings > under Workflow > select Integrations.
- Click +, then select Issue tracking > Jira Cloud or Jira Server.
- Select a Jira instance, then click Continue.
- Configure the settings as required.
For more information about the settings, see Jira Integration Settings. - Click Save.
Jira Cloud (Legacy)
- Go to Project settings > Workflow Integrations.
- Click +, then select issue tracking > Jira.
You can configure the following settings:- Jira API (required): The Jira Endpoint URL (see below for examples).
- Email (required): email associated with your Jira instance. For some users, the username of the Jira instance may be used.
- API Token (required): Jira API Token obtained here. Some Jira instances also support passwords in lieu of API Tokens, but that functionality is deprecated and will be removed.
- Project Key (required): The Jira Project Key.
- Issue Type: Jira Issue Type. Defaults to Bug if not present.
- Subject (required): Content to put in the Summary field of the ticket.
- Custom Field Mapping - Labels: See below
- Custom Field Mapping - Description: See below
- Custom Fields: See below
Next: After filling in the integration-specific settings, proceed to Common Settings to finish configuring the integration.
Jira URL Examples
The Jira URL generally takes one of the following formats:
- https://yourhost.yourdomain.com/rest/api/2/
- https://yourhost.yourdomain.com/jira/rest/api/2/
- https://yourname.atlassian.net/rest/api/2/ (for Atlassian-hosted Jira sites)
Atlassian now also offers a v3 API that is currently in Beta, at this time v3 is not currently supported. Be sure to use a v2 endpoint. For more detailed information, see the reference for Jira's REST APIs.
Jira Integration Settings
Data Synchronization
With data synchronization, Backtrace will sync resolution Status and Assignee fields with Jira issues. The following settings are available:
- Data synchronization from Backtrace to Jira: The Status and Assignee fields will be updated in Jira when issues are updated in Backtrace.
- Data synchronization from Jira to Backtrace: The Status and Assignee fields will be updated in Backtrace when issues are updated in Jira.
- Assignee and Status Synchronization on Linking: Select the source of truth in the event of a mismatch of these fields between Backtrace and Jira.
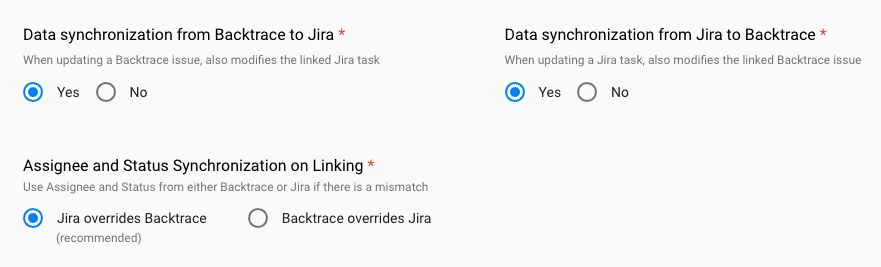
We recommend that you enable both settings for two-way sync.
Manual Jira to Backtrace synchronization setup
You may want to create the webhook manually, if any of these are true:
- you do not want to give Workflows administration access to your Jira Server instance,
- you want to customize the webhook JQL to limit synchronized issues,
- you use OAuth 2.0 with Jira Server, which does not allow managing of webhooks.
To do that, save the integration with Manual setup selected under Data synchronization from Jira to Backtrace, and create the webhook in Jira:
- Go to Jira settings > System > Advanced > WebHooks.
- Click Create a WebHook.
- Set the following:
- URL:
- Enable Events > Issue related events > Issue > updated,
- Make sure that Exclude body is disabled.
- Click Save.
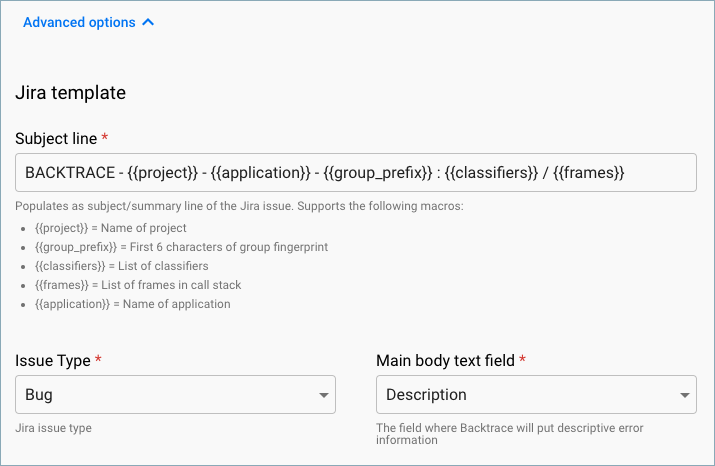
Jira Template
By default, the Jira template is populated with the default fields that are configured for your Jira project. You can change the values for the Subject line, Issue Type, and Main body text field as needed.
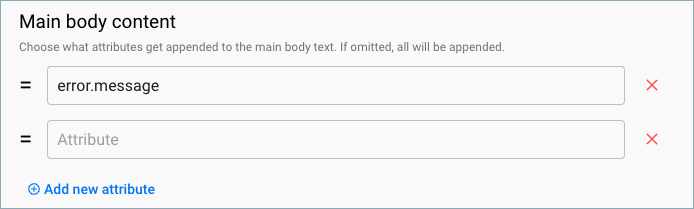
Main Body Content
You can specify attributes to be appended to the description in the Main body content.
The first and last seen attributes are added to the description of the issue in Jira Cloud.
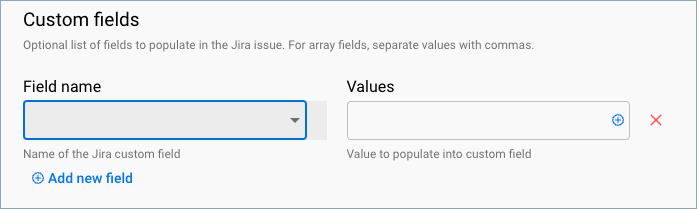
Custom Fields
The Custom fields setting allows you specify additional fields you want to populate in your Jira issue. You can use custom fields when you are using a Jira template with specific fields that are required. If you don't add the required fields, then the integration will fail to create the Jira ticket.
You can use the value of an attribute in the text by preceding it with '$'. For example, $version. For array-type fields (such as labels), separate values with commas. If an error group has more than one value for the specified attribute, the value with the highest count is be used.
You can use combinations of literal strings and attribute values. For example, you can set a field's value to "Hostname: $hostname, Version: $version" and the Jira integration adds the values of those attributes in the string, as expected.
If you refer to an attribute in a custom field with the $attribute syntax, but are not seeing the attribute populated in the field in Jira, make sure you've added the attribute to your Project Settings configuration under Attributes. For more information, see Attributes.
Custom Field Mapping
Backtrace populates the default Description field. If you use a customized template where the field removed or renamed, specify an alternate field name for Backtrace to use in the Main body text field.
Resolved Until Behavior
The Resolved until behavior setting allows you configure the Resolve Until feature for detected regressions with versions applied in Jira issues.
If a linked Jira issue is marked as resolved and the Fix Versions field is applied, Backtrace will reopen the Jira ticket if the errors reoccur in a later version.
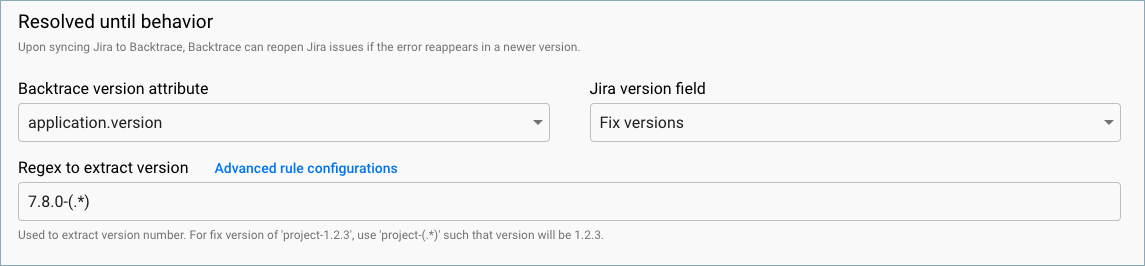
To set up this feature, the Backtrace version attribute has to be mapped to a Jira field (the default is Fix Versions). Select a version attribute in Backtrace and the Jira field that contains the version with fixes. To isolate the version number, apply a regular expression to remove extraneous information.
Advanced Rules Builder
You can use the Advanced Rules Builder to configure advanced rules for custom Fix Versions in Jira. If you have multiple variations for Fix Versions, you can create rule sets using attribute values.

For example, you can create a rule for each development environment and version number match to determine which issues are fixed.
Issue Based Alerts
To further automate your workflow, you can configure automated actions for your Jira workflow integration with issue based alerts. Use issue based alerts to automatically generate issues in Jira based on the conditions and frequency that you specify. For more information, see Issue Based Alerts.
Troubleshooting
If you've set up a Backtrace integration with Jira, but are not receiving any new Jira issues from Backtrace, verify the following:
- Is your Jira endpoint correct? Your Jira endpoint must end in /Jira/rest/api/2/ or /rest/api/2/, depending on your Jira configuration. Atlassian has recently released v3 in Beta, at this time it is not supported. Be sure to use a v2 endpoint.
- Is your project key correct?
- Does the Jira user associated with the email you provided have permissions to create new issues in the project you specified?
- Are you using email/password or username/password combination instead of email/API Token or username/API Token?
- Do you have any required custom fields? If so, you'll need to provide values for these fields in the Custom Fields section of the Backtrace Jira workflow configuration.
- Are you using an Issue Type other than Bug? If so, make sure to specify this in the Issue Type configuration setting.
- Does your screen have fields called Labels and Description? If one of these is missing, you'll need to specify an alternative for these in the Custom Field Mapping section.
- Does your Jira project configuration include all the required fields? For more information, see below.
Required Jira Fields
Backtrace requires the following fields, and automatically populates them based on your settings. You can override the content of any of these settings by specifying their value in the appropriate Backtrace Jira config setting, or by specifying it as a Custom Field.
It's important to ensure that these fields are specified properly, as the Jira API will reject any request that has invalid fields or missing required fields:
- Project Key: Specified by the "Project Key" setting.
- Summary: Specified by the "Subject" setting.
- Issue type: Specified by the "Issue Type" setting, set to "Bug" by default.
- Labels: Backtrace assumes a labels-type field named "labels" and will populate this with the label "Backtrace", but you can override this by adding "labels" as a Custom Field. You can also specify an alternate name for this field with the Custom Field Mapping option.
- Description: Backtrace assumes a text field named "description" and populates this with the main error information, but you can override this by adding "description" as a Custom Field (not recommended). You can also specify an alternate name for this field with the Custom Field Mapping option.
- Reporter: Backtrace expects a field named "reporter", which is used to identify the user who created an issue manually from Backtrace.