Manage Test Cases
After you have generated and saved your test cases, you can return to them at any time to update, organize, duplicate, or delete them as your testing requirements evolve.
All saved test cases, schedules, and test suites are stored in the active Sauce Labs data center associated with your organization. This ensures your test assets remain isolated and accessible in the same regional environment. You can keep your test cases organized and up to date as your application changes.
Visit Your Test Cases
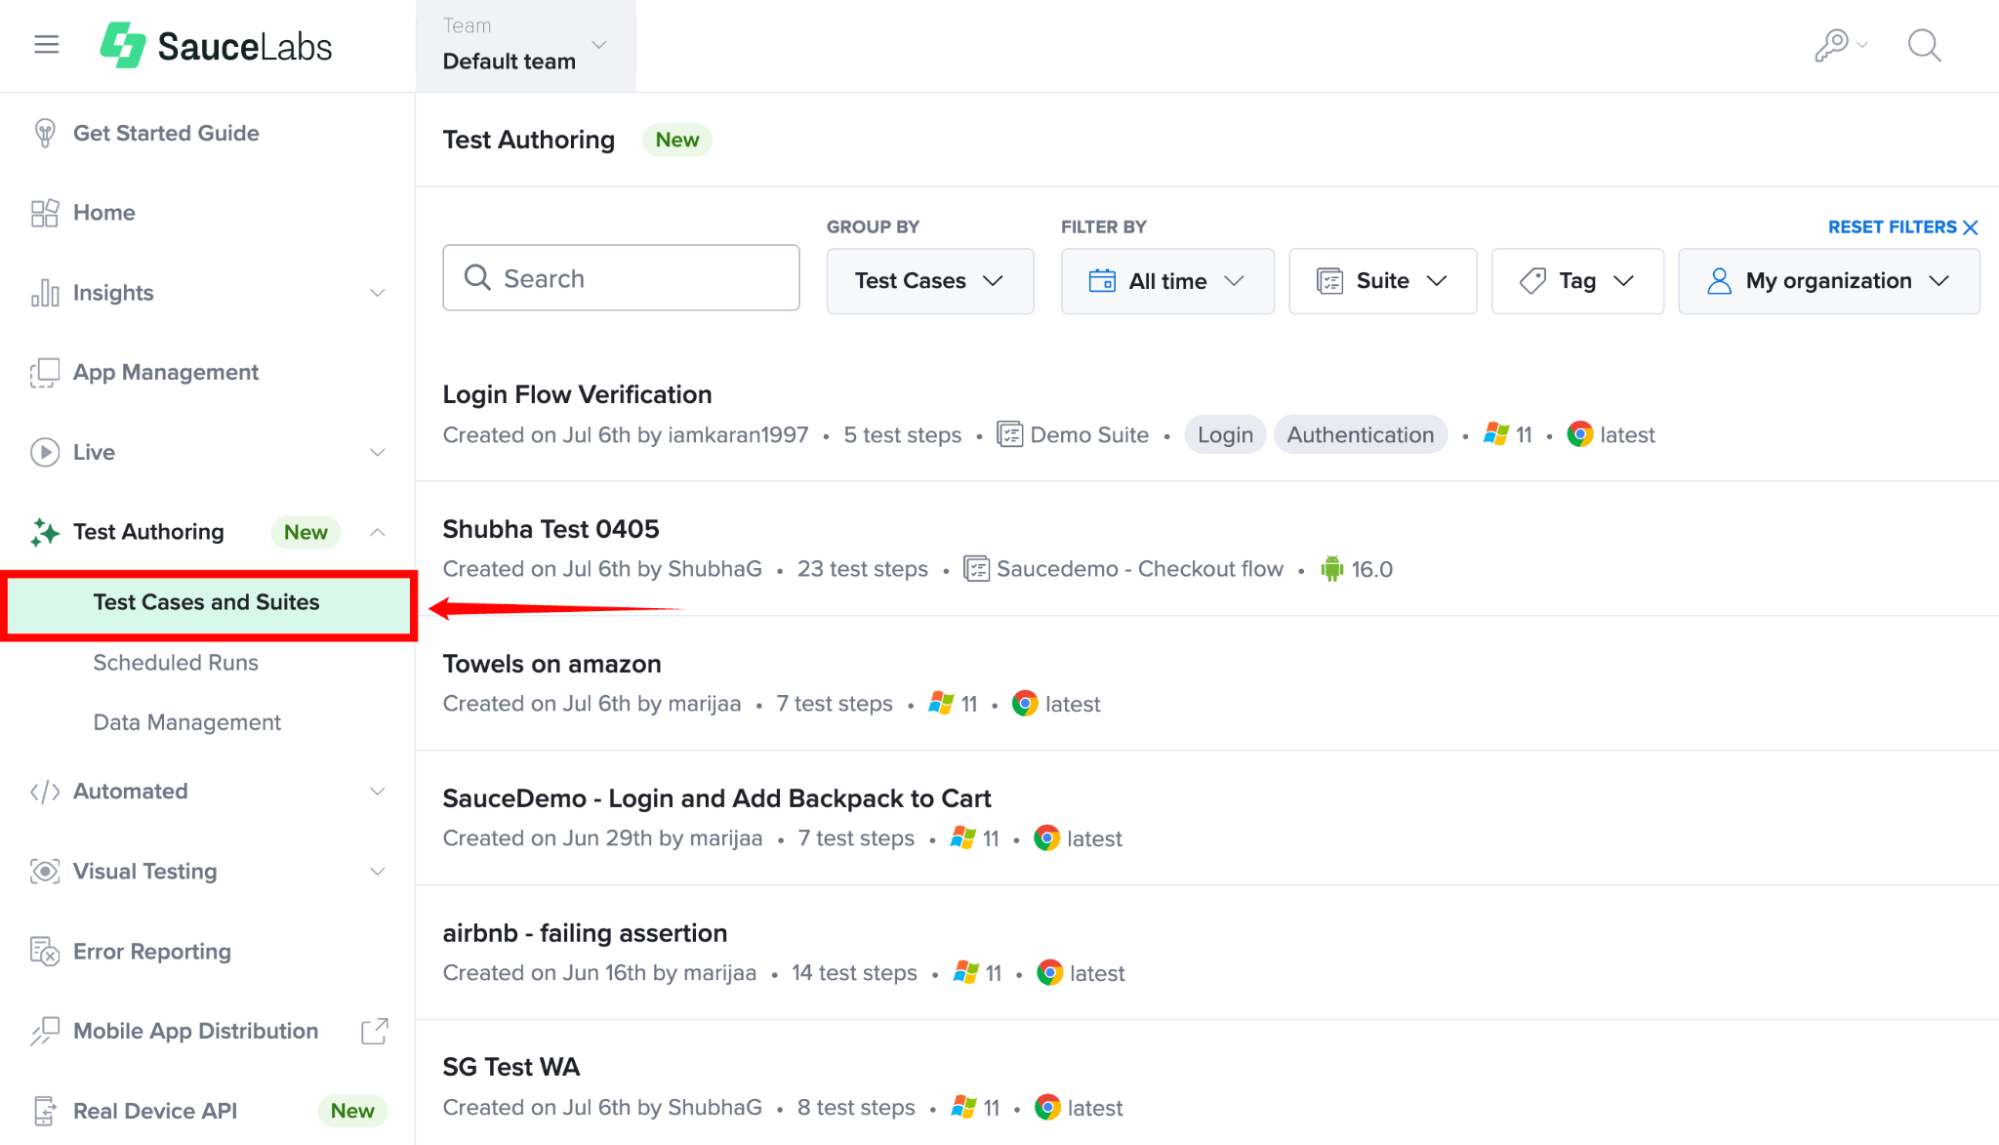
Step 1: Inside your Sauce Labs account, find Test Authoring from the left-hand navigation menu, expand its available options, and select Test Cases and Suites.
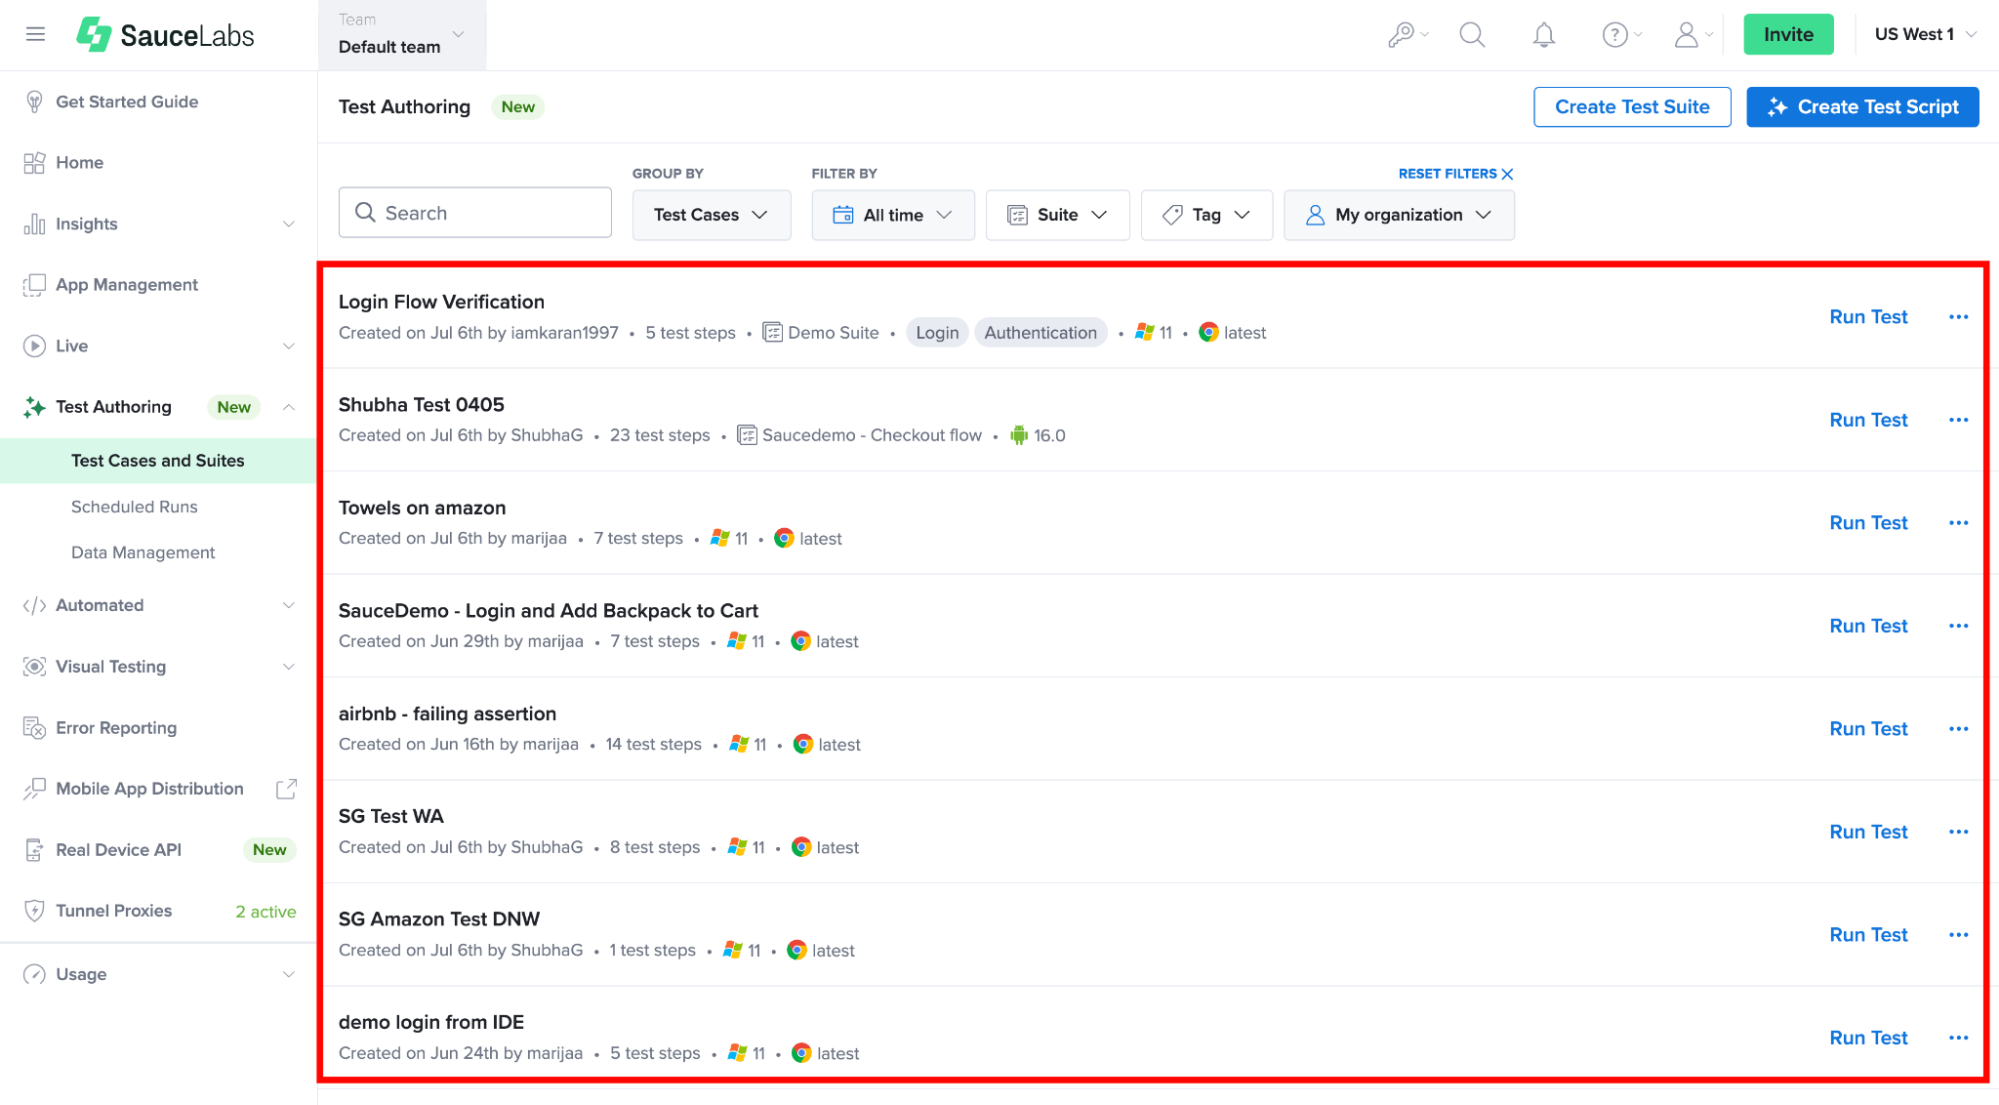
The Test Cases and Suites page displays all the test cases you have generated and saved along with the following details:
- Test case name
- Creator information
- Creation date
- Number of generated test steps
- Test suite information (if applicable)
- Target operating system, browser, or device configuration.
Search and Filter Test Cases
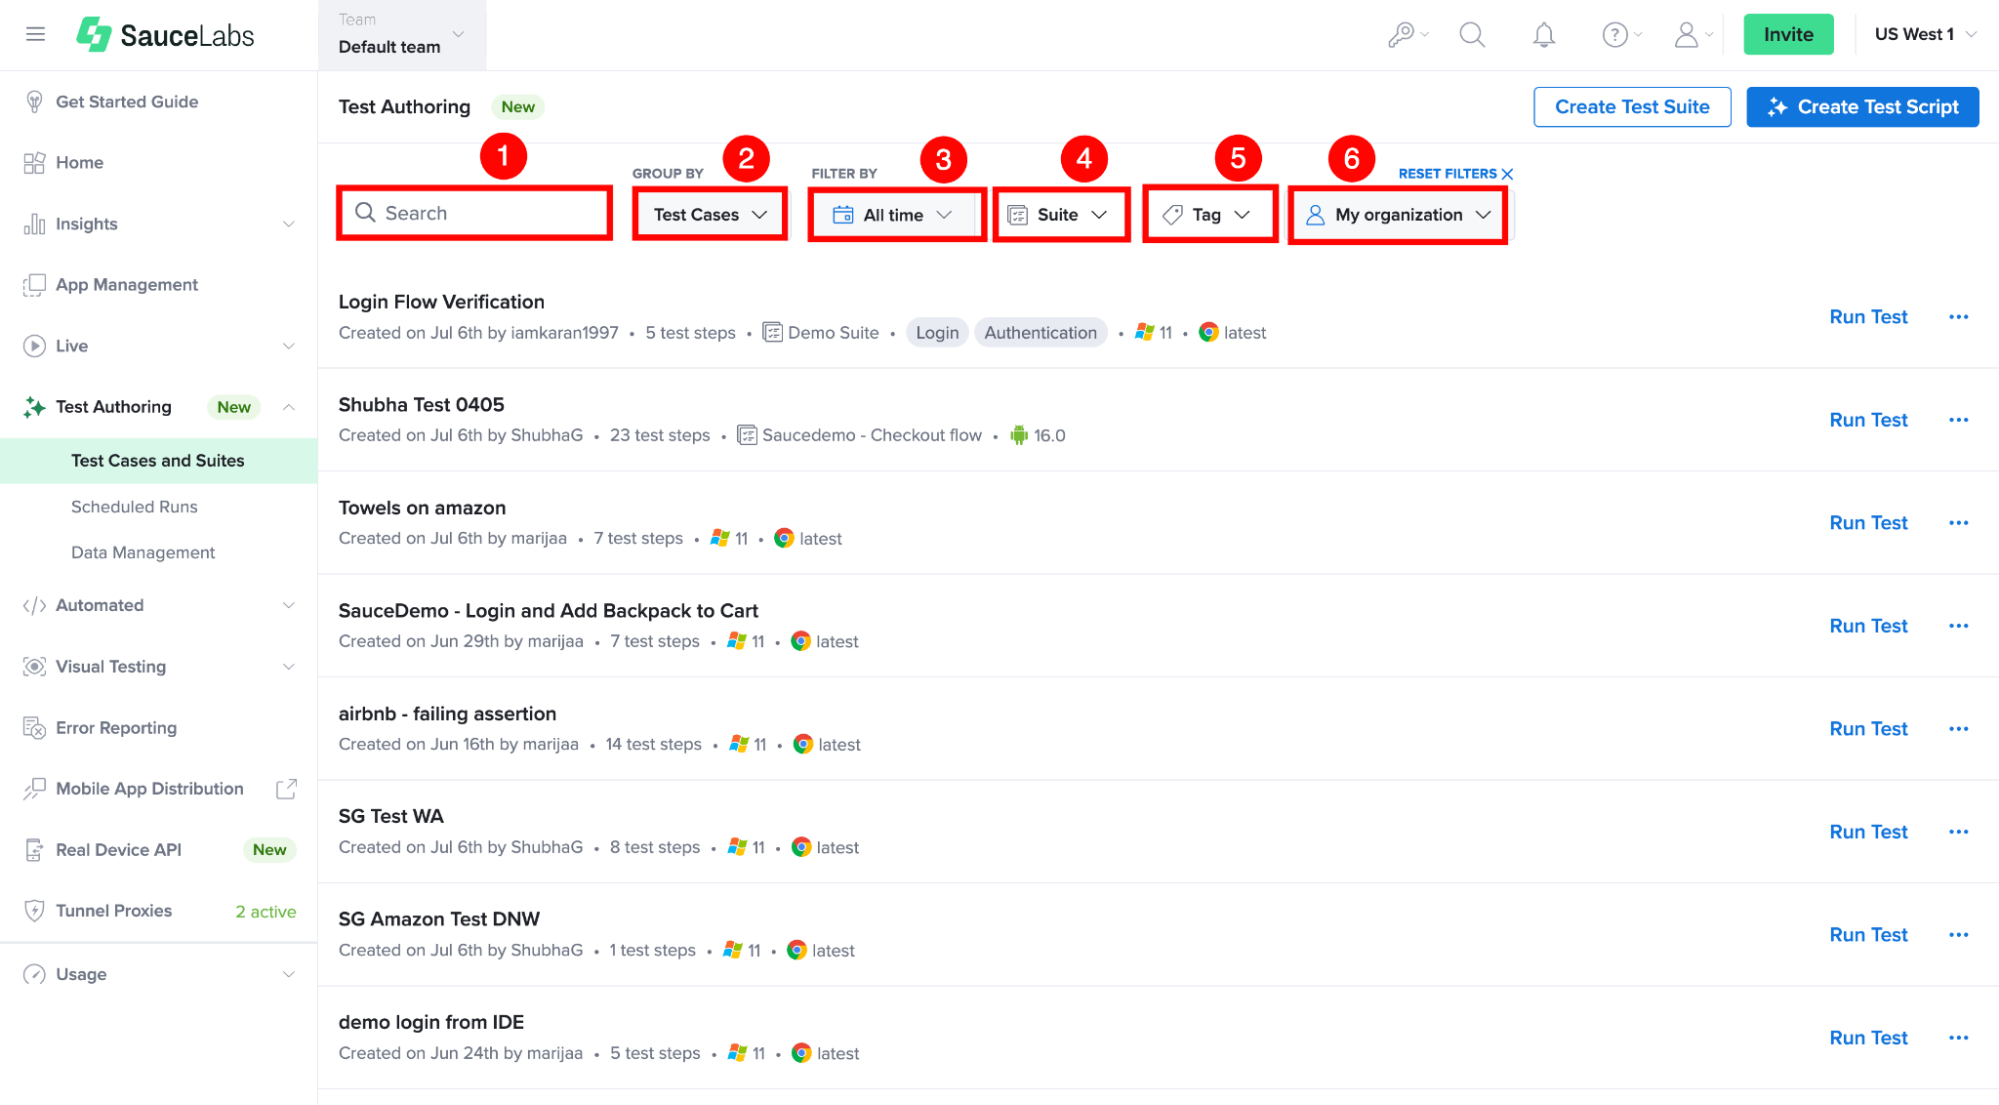
As your test library grows, you can use the available search and filtering options to quickly locate, organize, and manage your test cases.
| Ref. | Options | Description |
|---|---|---|
| 1 | Search | Use the Search bar to quickly locate a specific test case by entering its name. |
| 2 | Group By | View test cases using either the Test Case or Test Suite hierarchy. |
| 3 | Time Filter | Filter test cases based on their creation or modification time to quickly find recently created or older test cases. |
| 4 | Suite Filter | Display test cases associated with a specific test suite or view test cases that are not assigned to any suite. |
| 5 | Tag Filter | Filter test cases using one or more assigned tags to quickly find tests related to a feature, module, priority, release, or other category. |
| 6 | Organization Filter | Filter test cases based on the selected organization to view only the relevant test cases. |
View Test Case Details
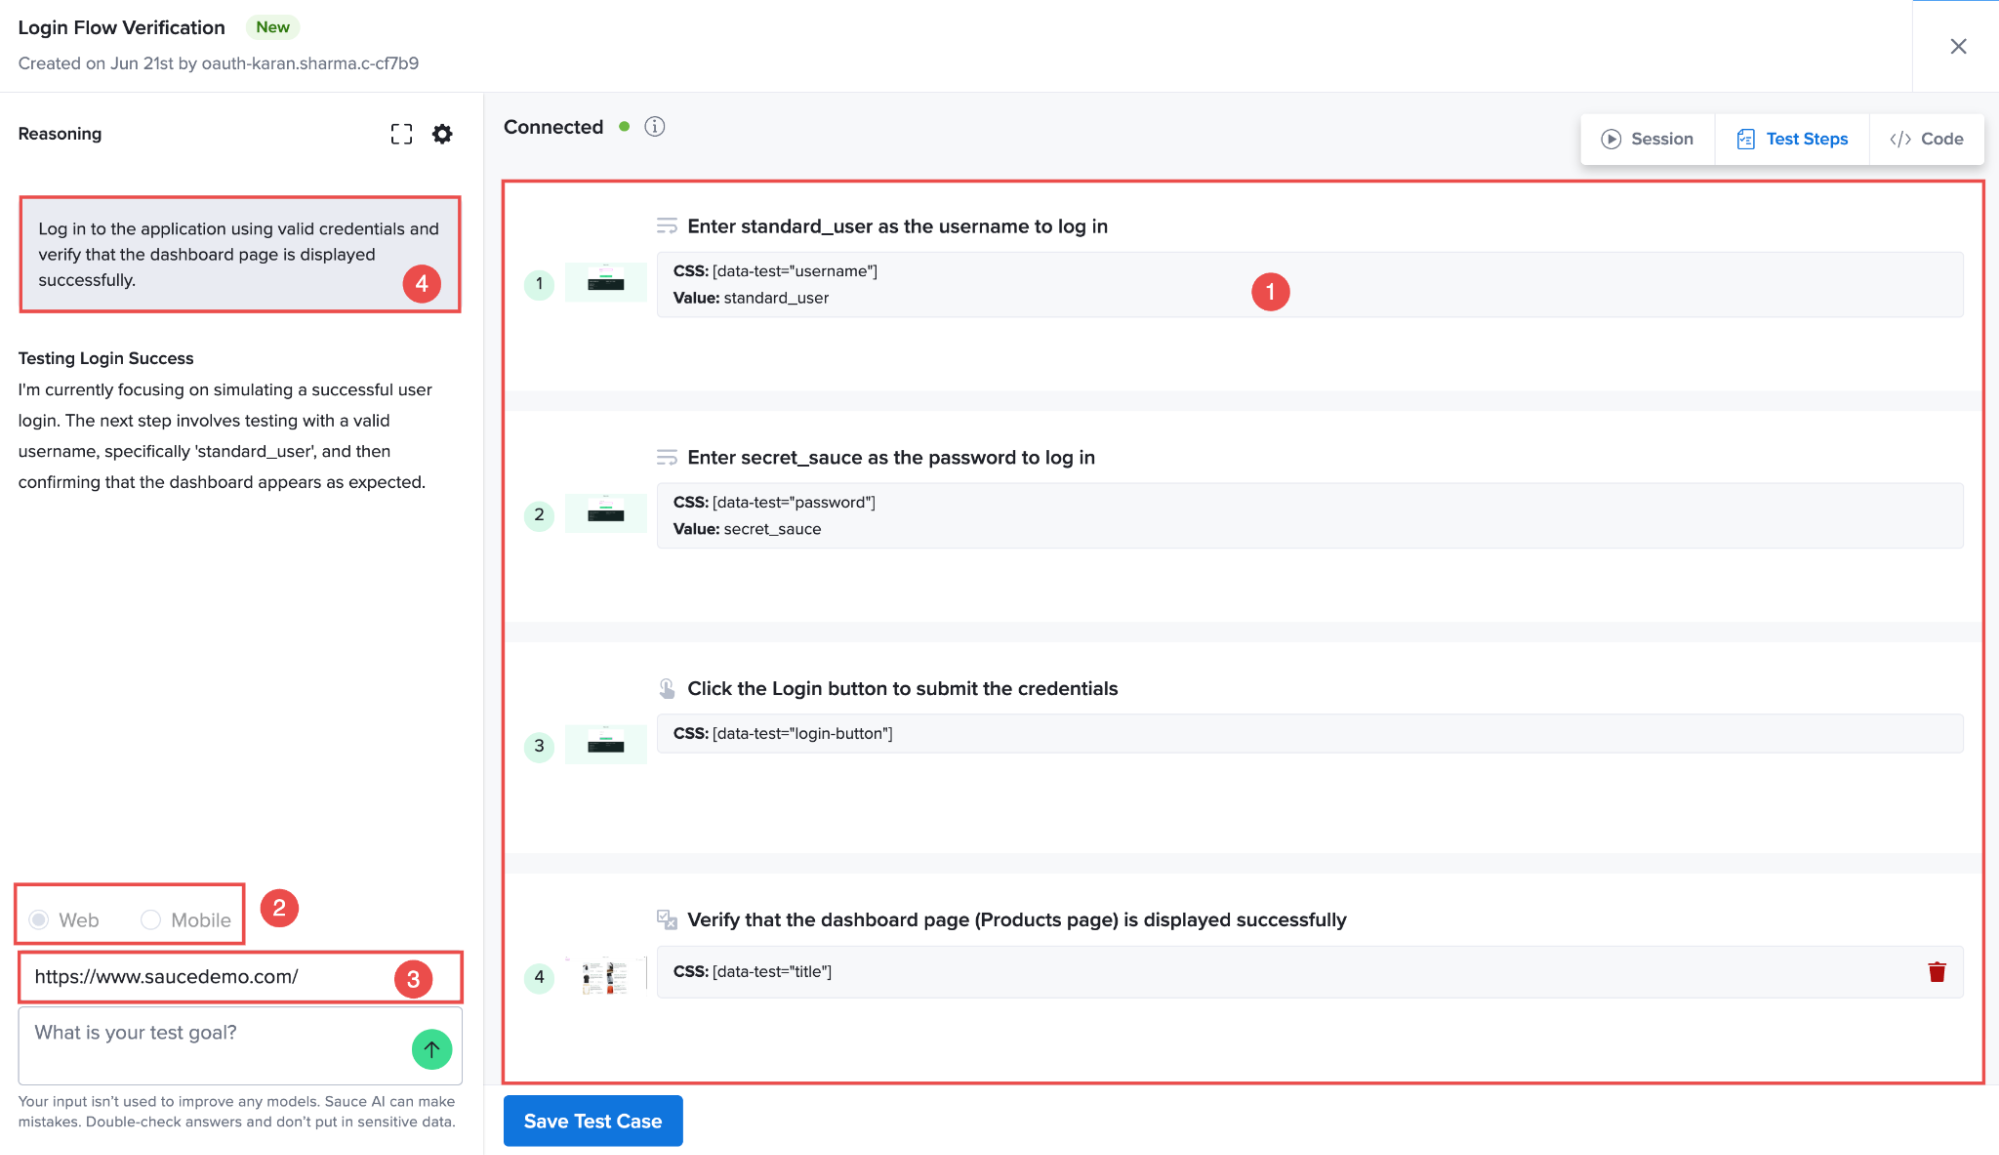
To review an existing test case, click on the test case name of your preference from the list and you will be redirected to the test case workspace providing you with the following information for your review:
| Ref. | Information | Description |
|---|---|---|
| 1 | Test steps and actions | The sequence of automated steps generated for the test scenario. |
| 2 | Target browser or device configuration | The browser, operating system, or device configuration used for the test. |
| 3 | Application details | The application URL or uploaded mobile application build associated with the test. |
| 4 | Test prompts and scenarios | The original prompts and test instructions used to generate the test flow. |
Review and Edit Generated Test Steps
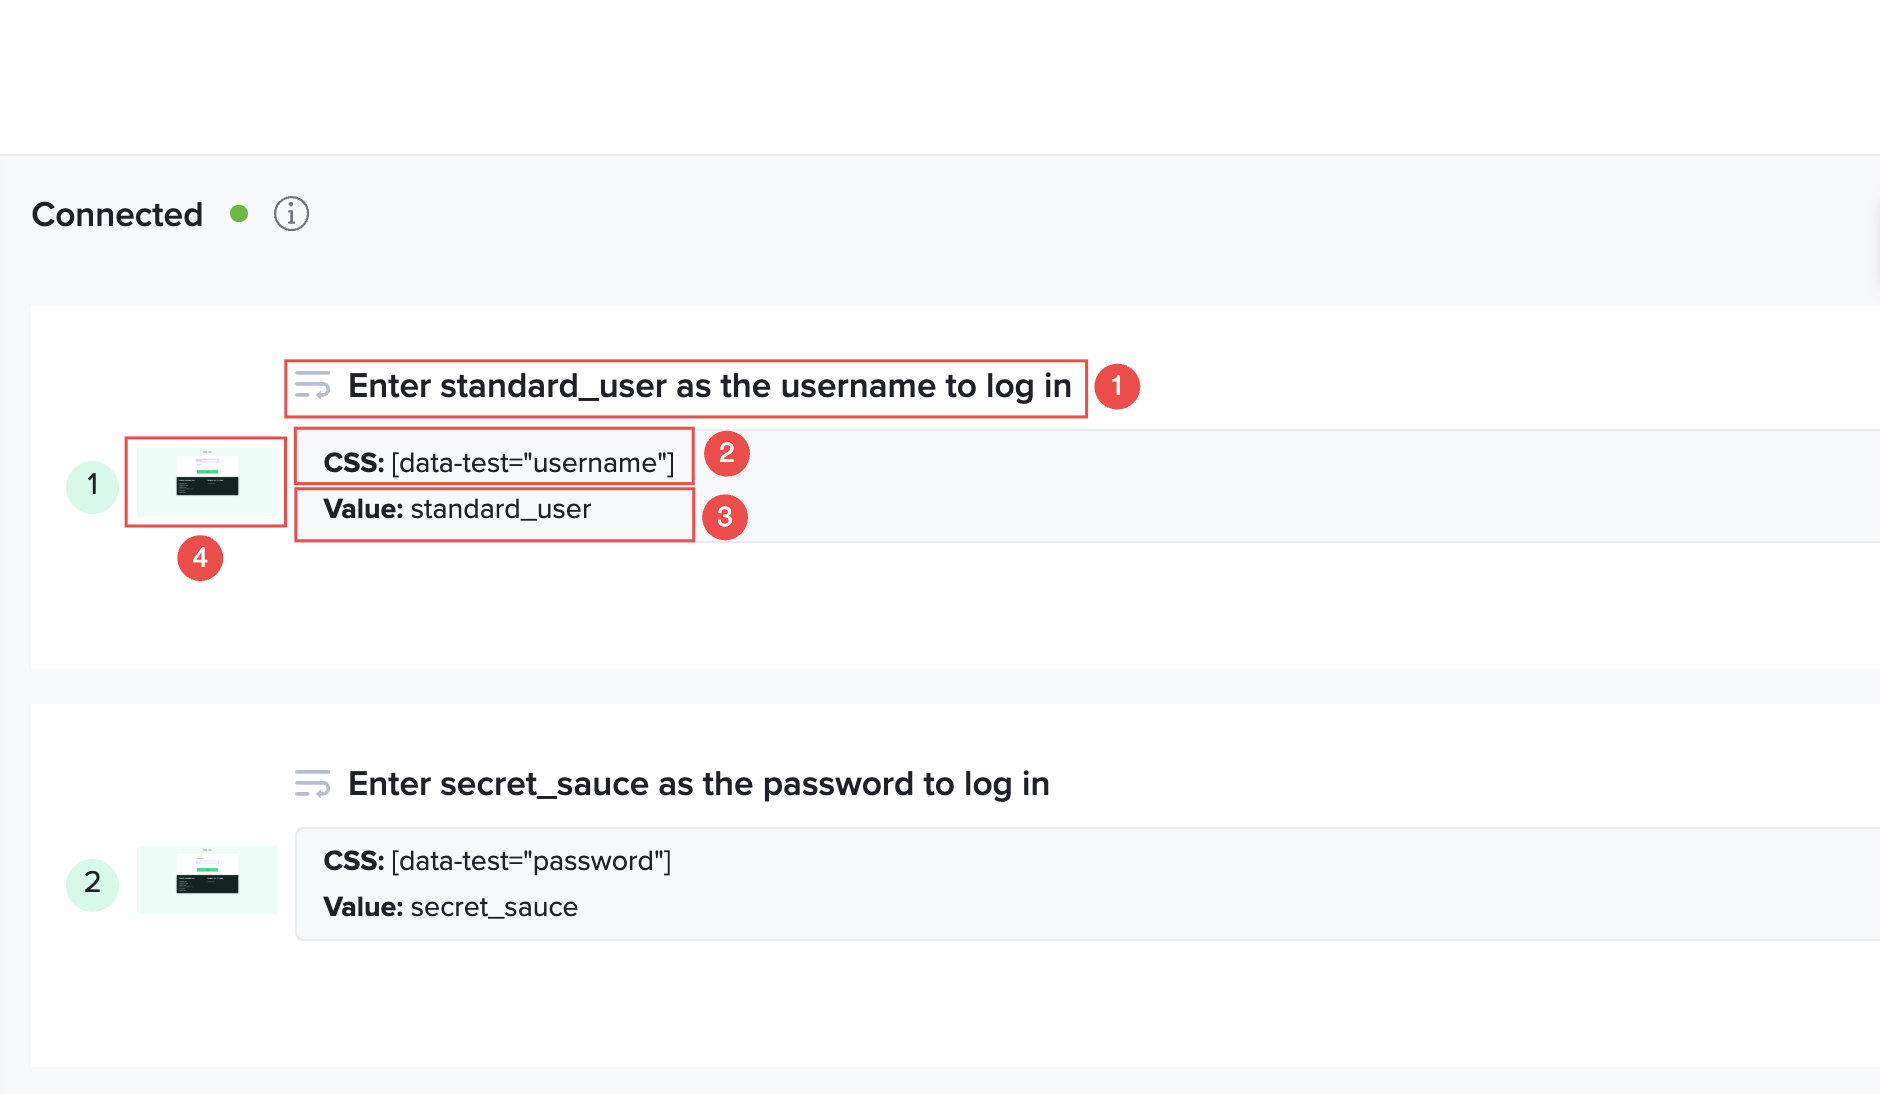
After opening a test case, you can review the generated test steps in a human-readable format. Each step contains detailed information that helps you understand how the automated test interacts with your application.
The following information is available for each generated test step:
| Ref. | Component | Description |
|---|---|---|
| 1 | Step Intent | Displays the purpose of the test step, describing the action performed and the expected interaction with the application. |
| 2 | Element Selector | Displays the locator (such as a CSS selector) used by the automation engine to identify and interact with the application element. |
| 3 | Input Value | Shows the data or value entered during the step, such as usernames, passwords, text inputs, or other user-provided information. |
| 4 | Step Screenshot | Displays a screenshot captured during the test generation process, providing visual confirmation of the application state when the action was performed. |
Refine Test Cases Using Prompt-Based Editing
Refine existing test cases by providing follow-up prompts in natural language. Instead of manually updating individual test steps, you can describe the changes, validations, or additional user actions you want to include in the test flow.
For example, you can provide prompts such as:
“Change step 3 to select the Size M option.”
“After adding an item to the cart, verify that the success message is displayed.”
“Add a validation step to confirm that the user is redirected to the dashboard page.”
“Leave the password field empty and verify that the appropriate validation message is displayed.”
After you submit the refinement prompt, Test Authoring analyzes your request and combines the original test intent with the new instructions.
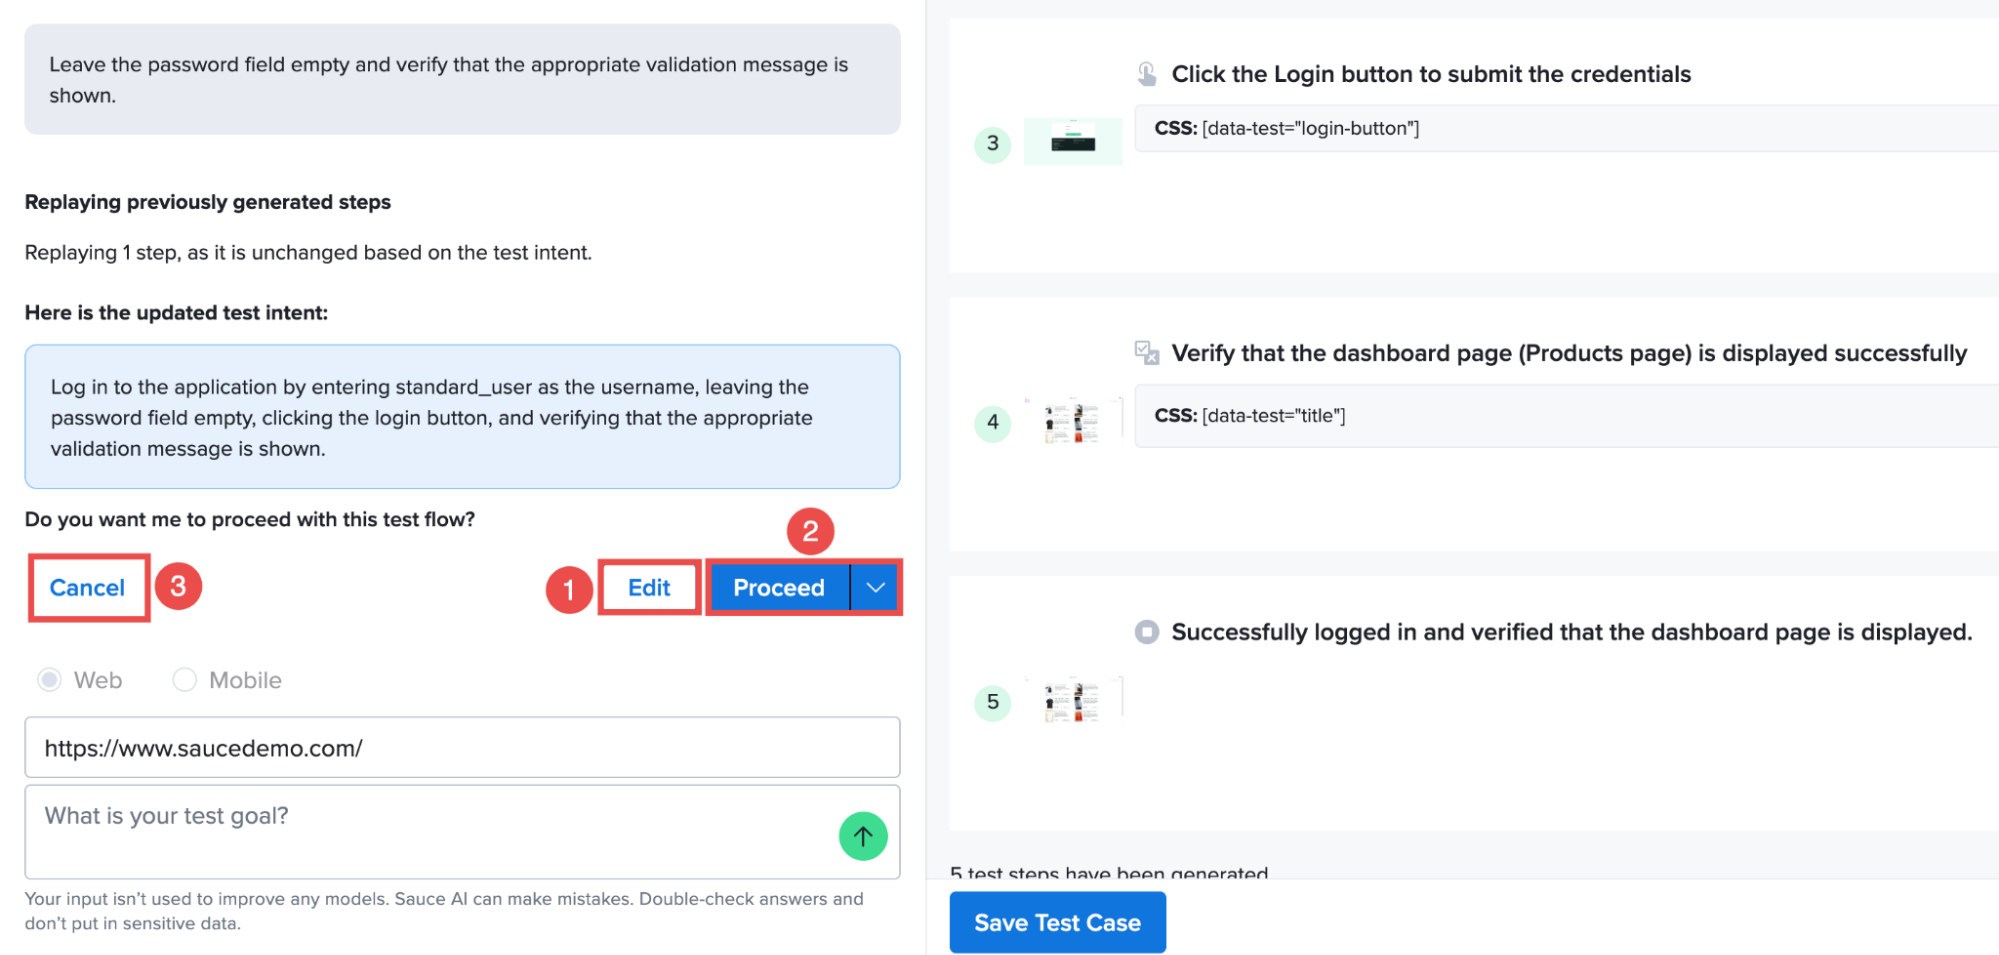
The system then displays the updated test intent along with the proposed test flow for your review. During the review process, you can perform following options:
| Ref | Option | Description |
|---|---|---|
| 1 | Edit | Edit the proposed test intent to provide additional details or adjust the requested changes. |
| 2 | Proceed | Accept the updated test flow and regenerate the test case using step replay. Previously validated steps are replayed and retained, while only the updated or affected steps are regenerated. Use the split button menu to regenerate the entire test case from scratch instead. |
| 3 | Cancel | Discard the refinement and return to the existing test flow without applying the proposed changes. |
After you select Proceed, Test Authoring validates the updated test flow in a live browser or device environment and generates the revised test steps.
You can then review the updated steps, make additional refinements if necessary, and save the modified test case.
Changes made through prompt-based editing are not permanently applied to the test case until you review the generated steps and save the updated test case.
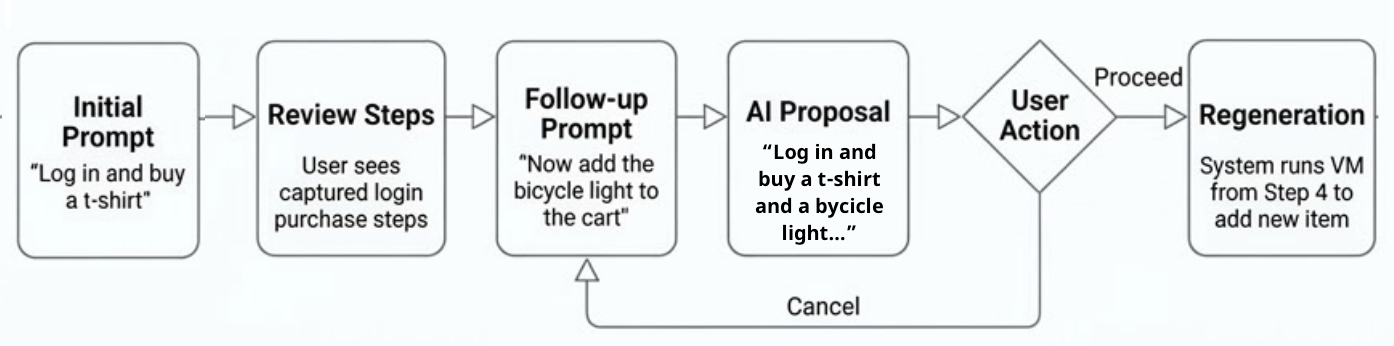
The following diagram illustrates how to refine a test using a follow-up prompt to add a new action.
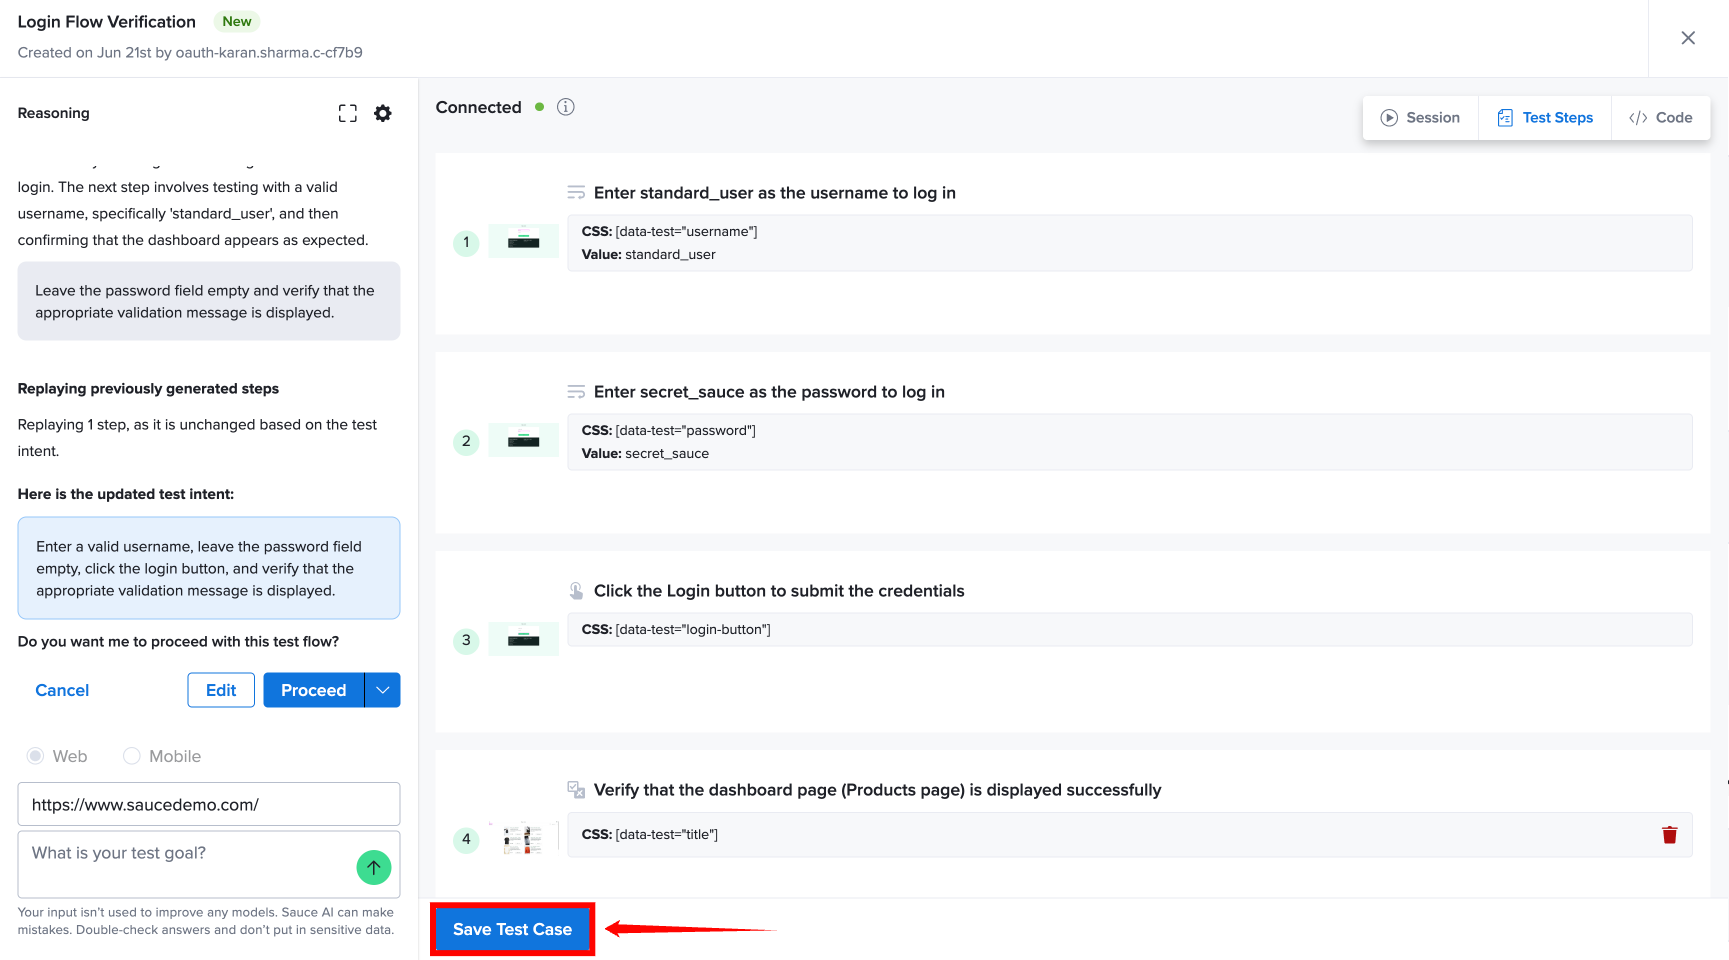
If you are happy with the result, you can Save Test Case at the bottom of the page.
Edit, Rename, or Delete a Test Case
Once your test cases are created and saved, you may need to make changes to them as your testing requirements change. For this purpose, you can edit an existing test case, update its name that aligns with the new goal, update the tags used to organize it, or permanently remove it if it is no longer needed.
Step 1: To access these options, navigate to Test Authoring, select Test Cases and Suites from the available options.
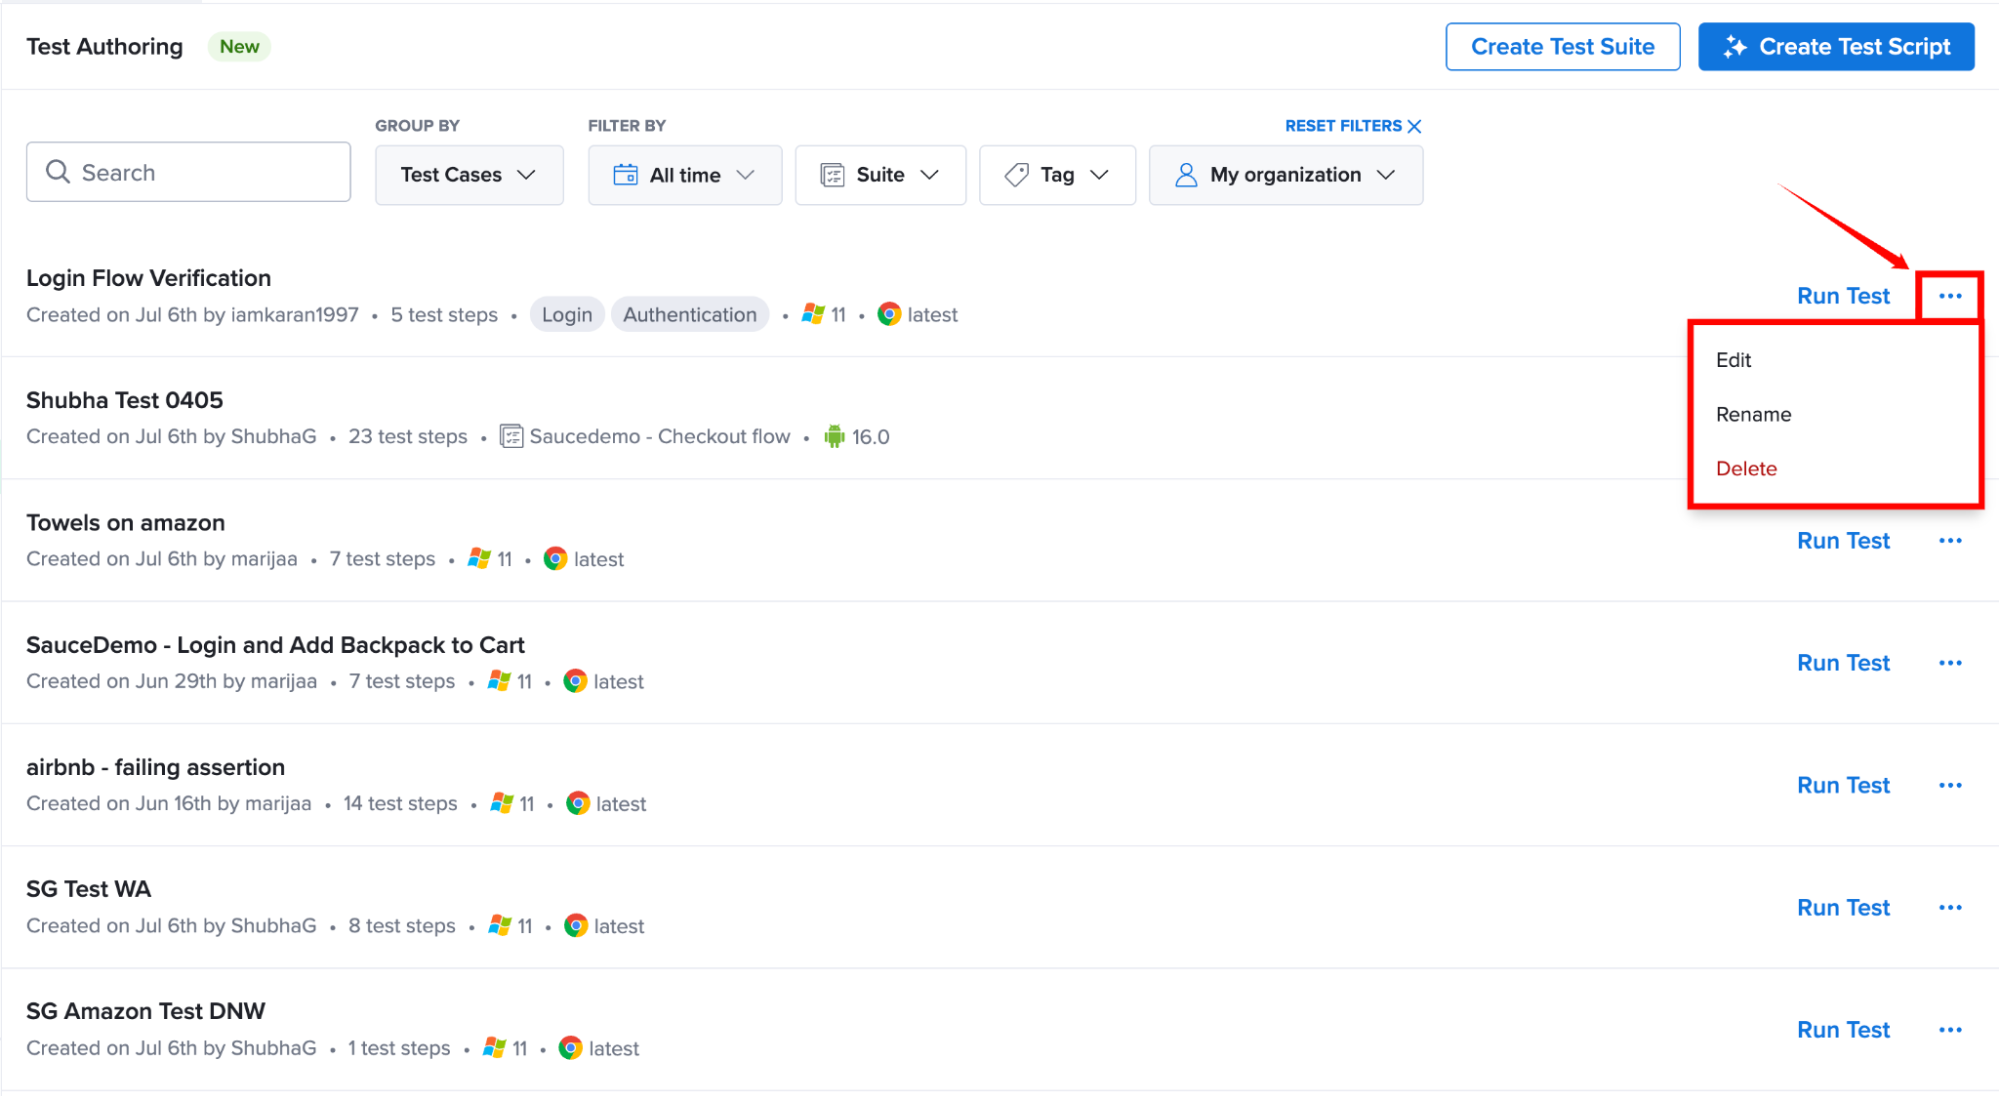
Step 2: Locate the test case that you want to manage, and then click the More Options (⋯) menu next to the test case.
The following management actions are available:
| Actions | Description |
|---|---|
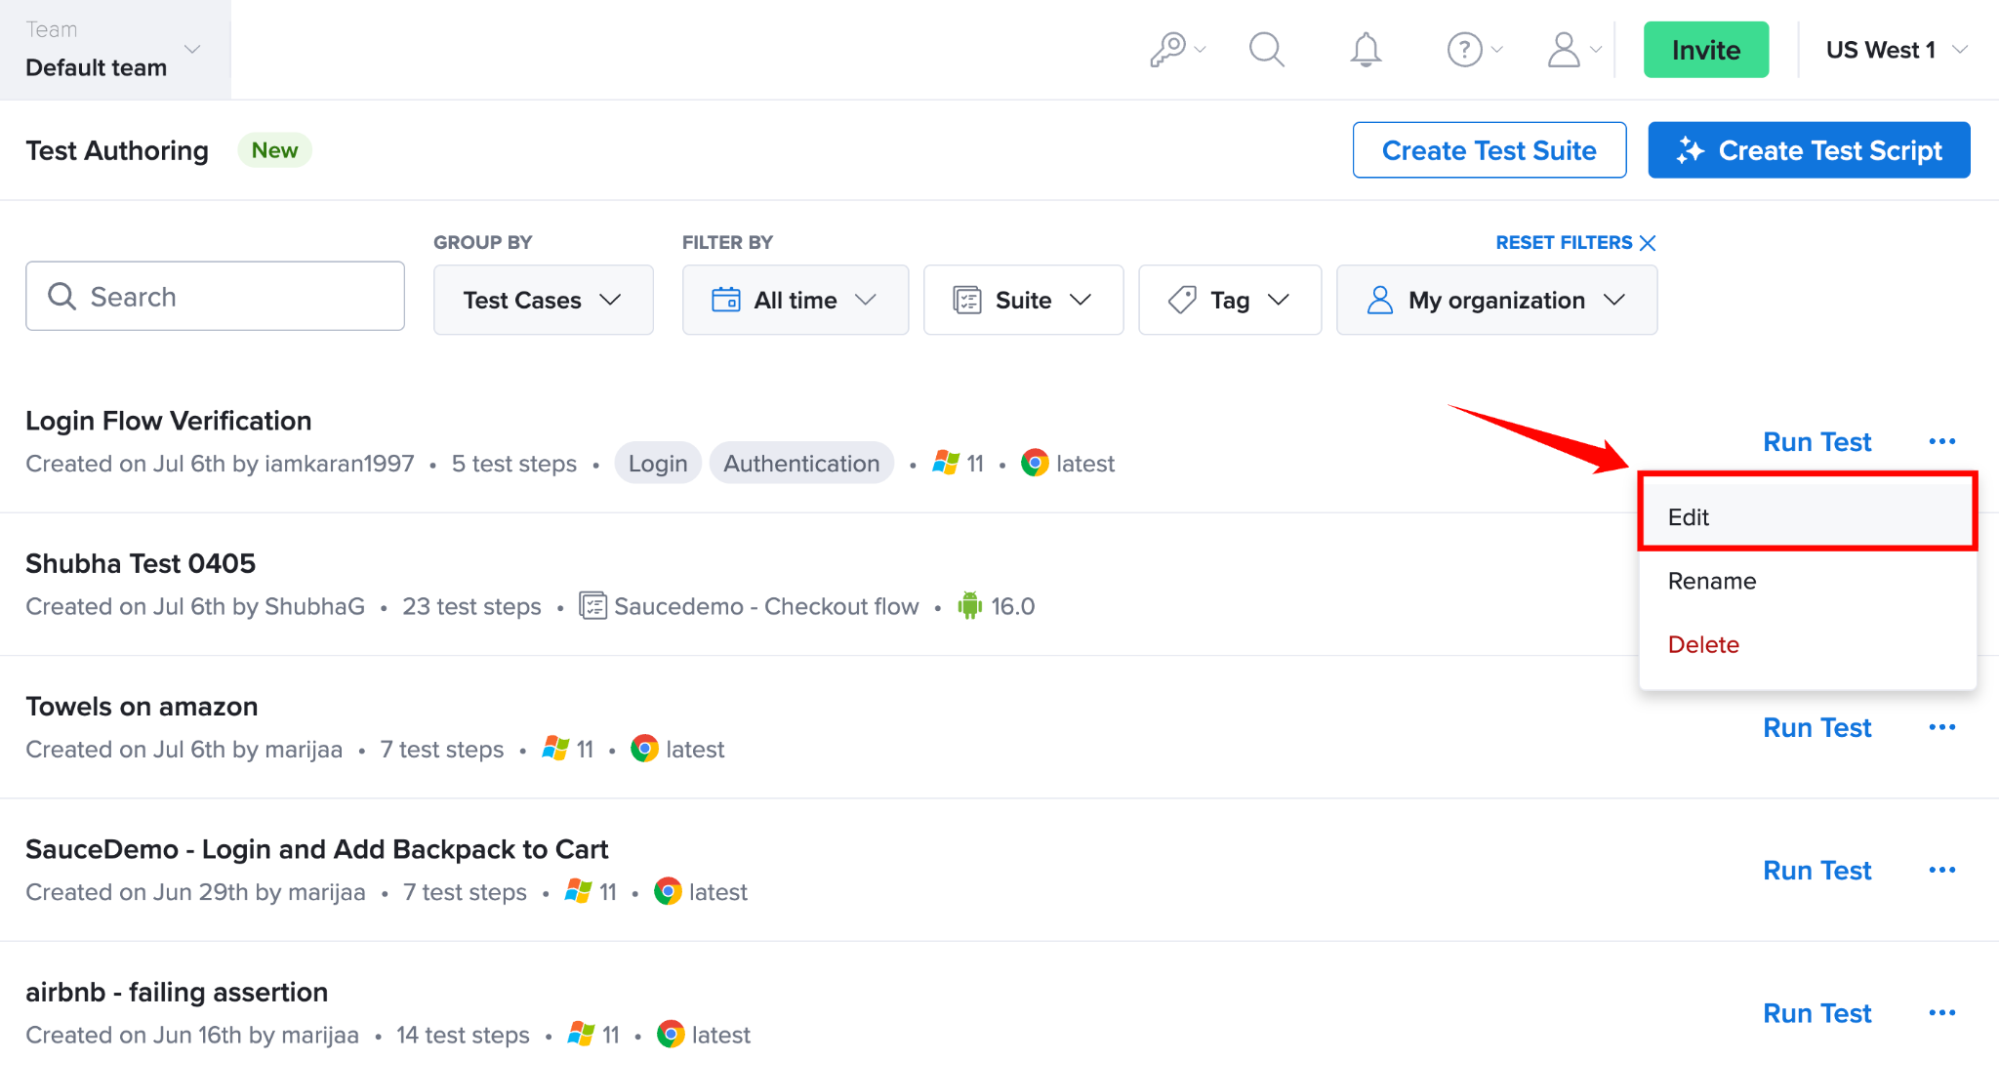
| Edit | Opens the selected test case in the test case workspace, allowing you to:
|
| Rename | Allows you to change the name of the test case without modifying the test steps or execution flow. Using clear and descriptive names helps you identify and organize test cases in your test library. |
| Delete | Permanently removes the selected test case from the Test Cases and Suites library. Once deleted, the test case and its associated details can no longer be accessed. Confirm the deletion only when the test case is no longer required. |
Manage Tags
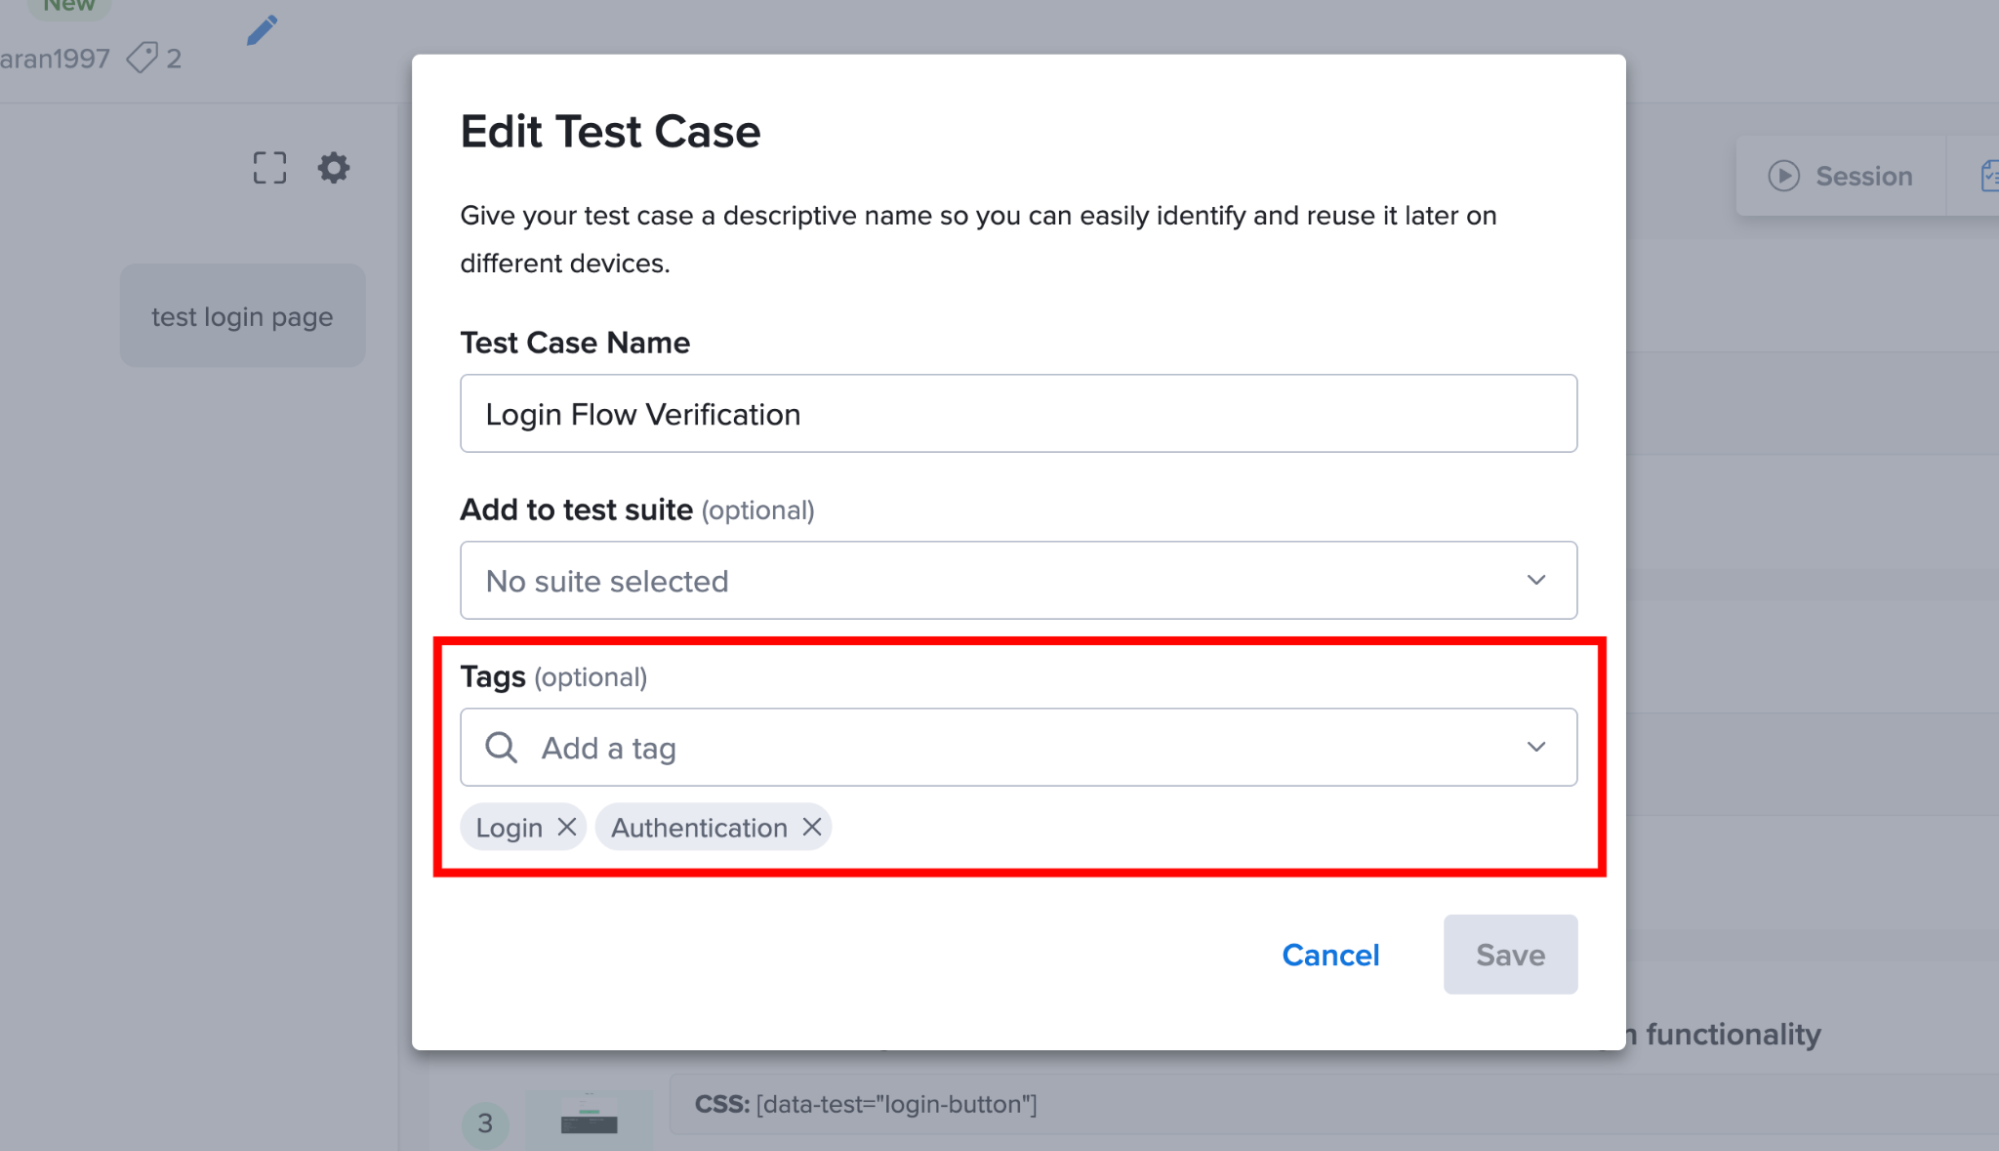
You can update the tags assigned to a test case at any time to keep your test cases organized and searchable.
If you remove a tag from all test cases, it gets removed entirely from your organization.
Step 1: Open the test case you want to update, then click Edit to modify its details.
Step 2: In the Edit Test Case dialog, add, remove, or update the tags as needed, then click Save to apply your changes.
Manually Edit Individual Test Steps
After generating a test case, you can manually edit individual test steps directly in the test case editor. Manual editing allows you to modify a specific step without using a prompt to update the entire test case.
You can:
- Edit captured step values.
- Replace hard-coded values with data variables.
- Add an assertion.
- Delete a step.
Edit a Test Step
You can modify a value captured in an individual test step or replace a hard-coded value with a data variable.
Step 1: In the generated test case, locate the step you want to modify and click the Edit icon.
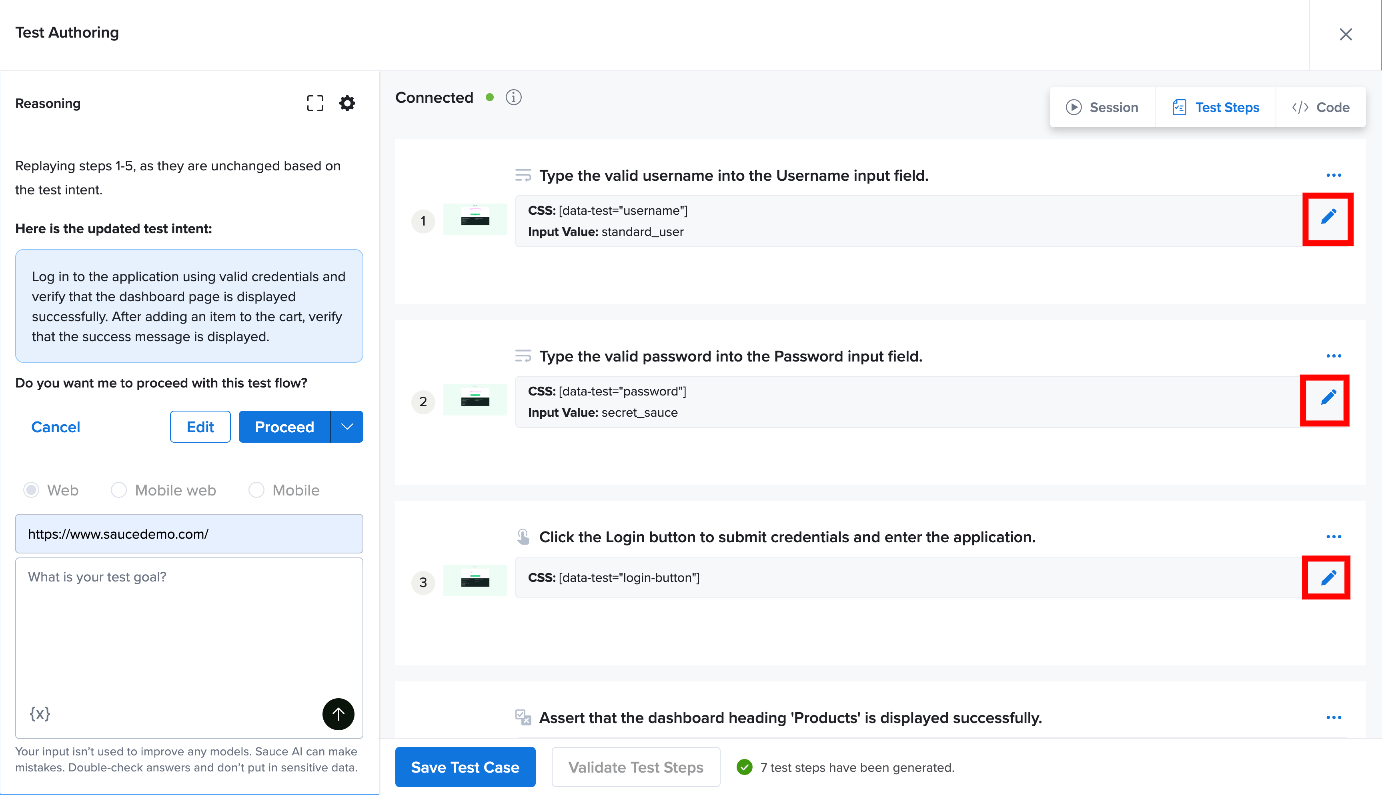
Step 2: Update the captured value as needed. You can enter a new value directly or replace the existing hard-coded value with a data variable.
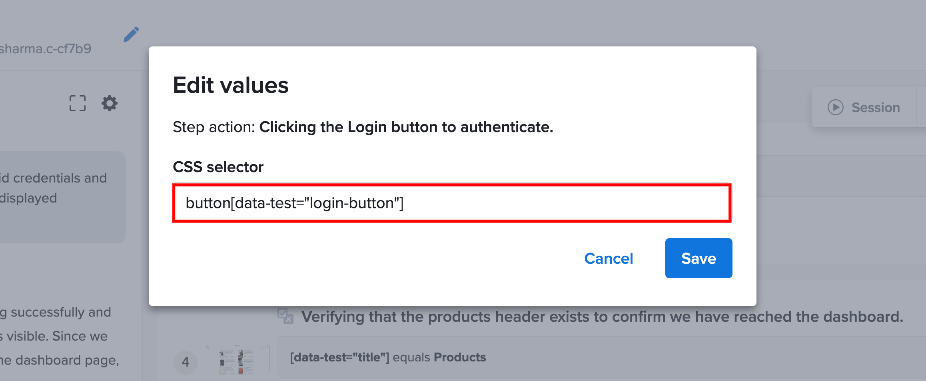
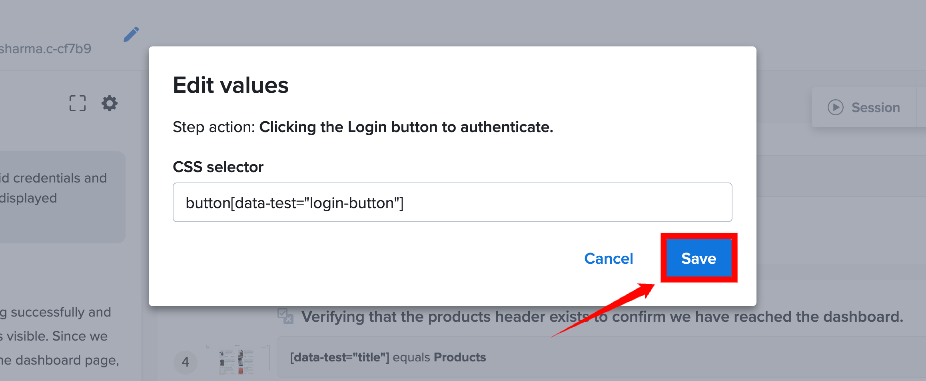
Step 3: Click Save to apply the changes. The updated value is displayed in the test step.
Replace a Hard-Coded Value with a Data Variable
You can replace a hard-coded value in a test step with a data variable. This allows the value to be provided dynamically when the test is executed instead of being fixed in the test case.
Step 1: Locate the test step containing the hard-coded value and click the Edit next to the step.
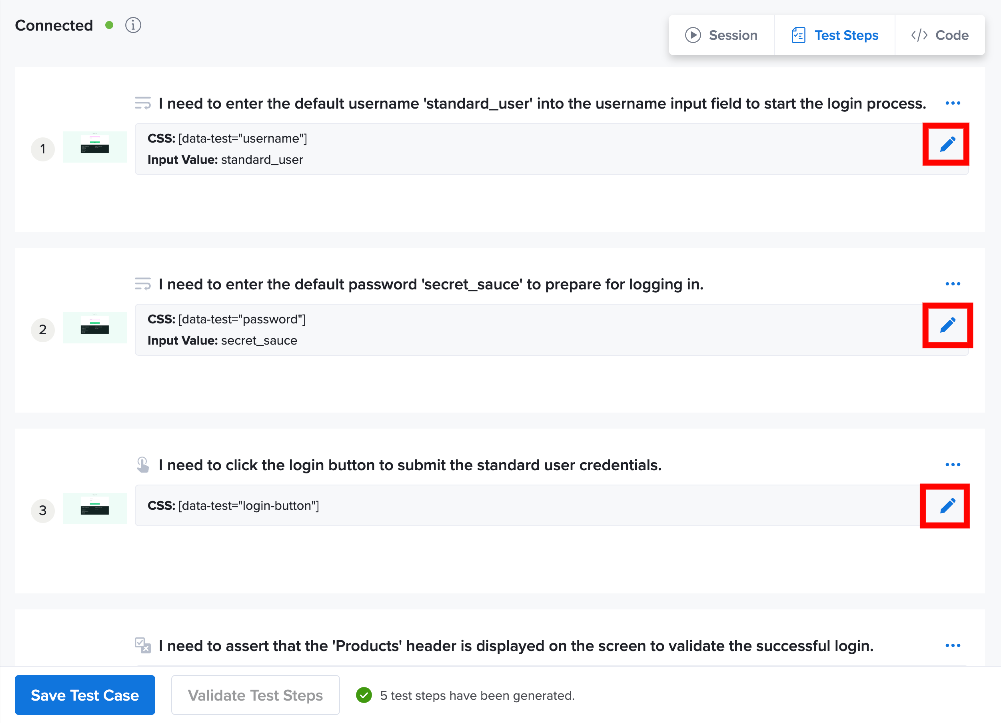
Step 2: Select the option to replace the captured value with a data variable.
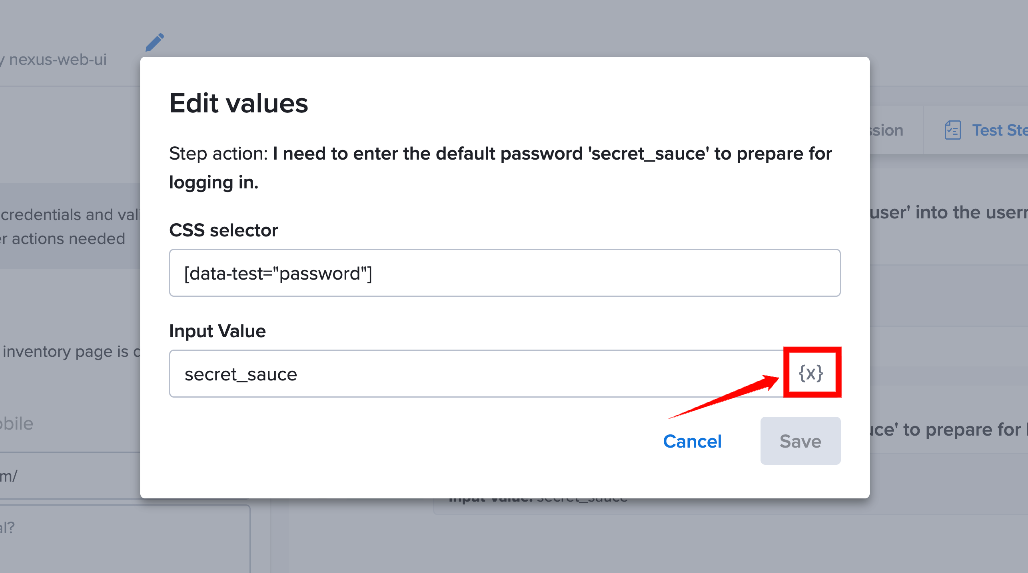
Step 3: Select or enter the variable you want to use. For example, you can replace a hard-coded password with a password data variable.
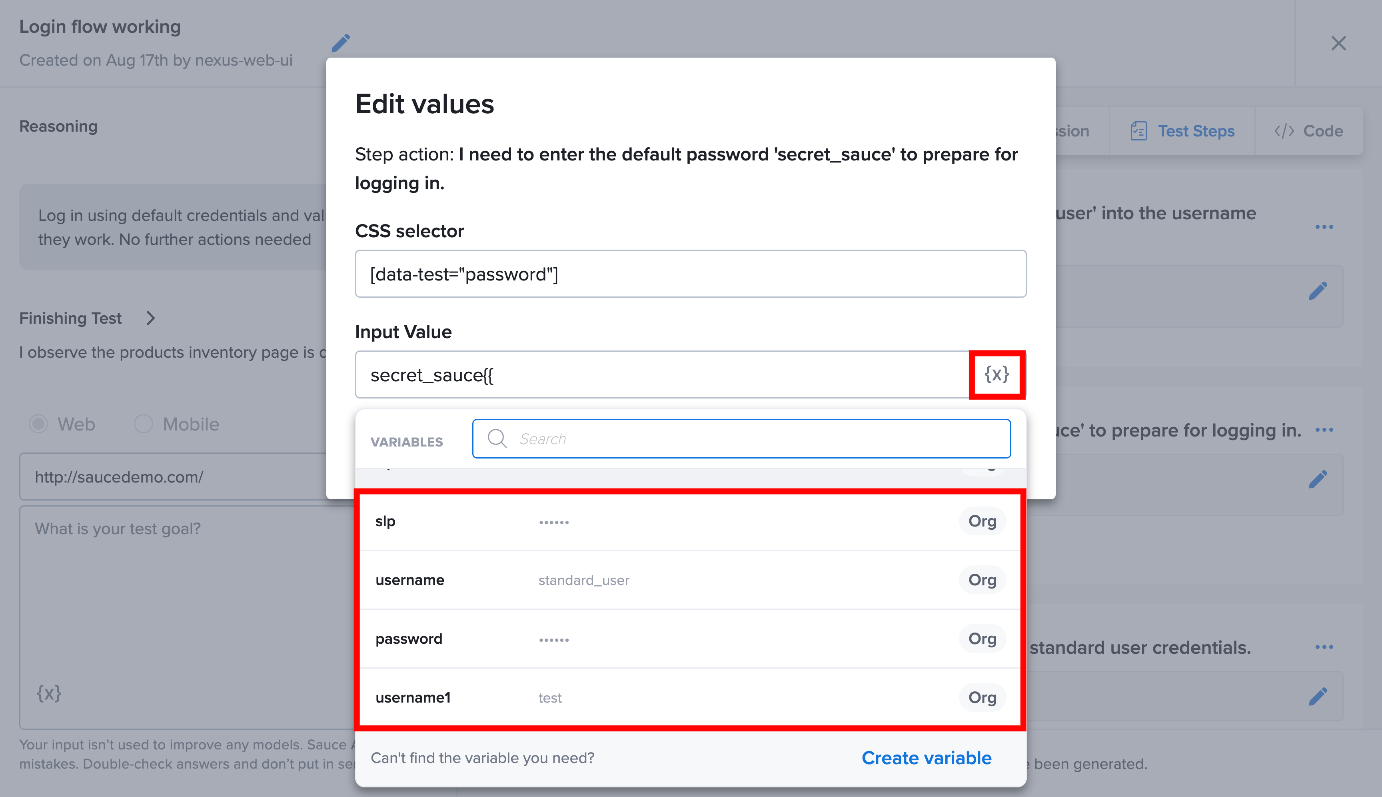
Step 4: Click Save to apply the change. The test step now uses the selected variable when the test is executed.
Add an Assertion
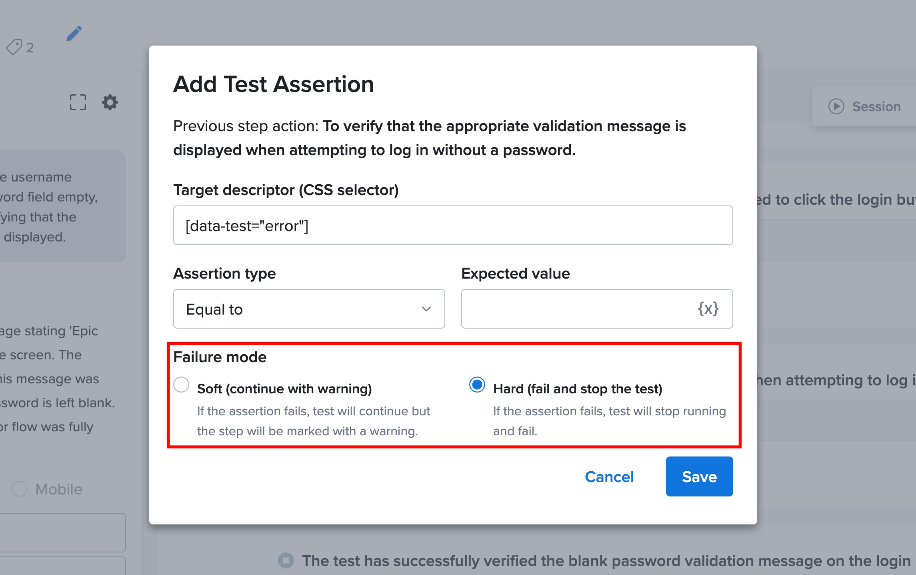
You can add an assertion to verify an expected result during test execution. Every assertion has a failure mode that decides what happens when the check fails: a soft assertion marks the step with a warning and lets the test continue, and a hard assertion stops the test at that step. For more information, see Assertions.
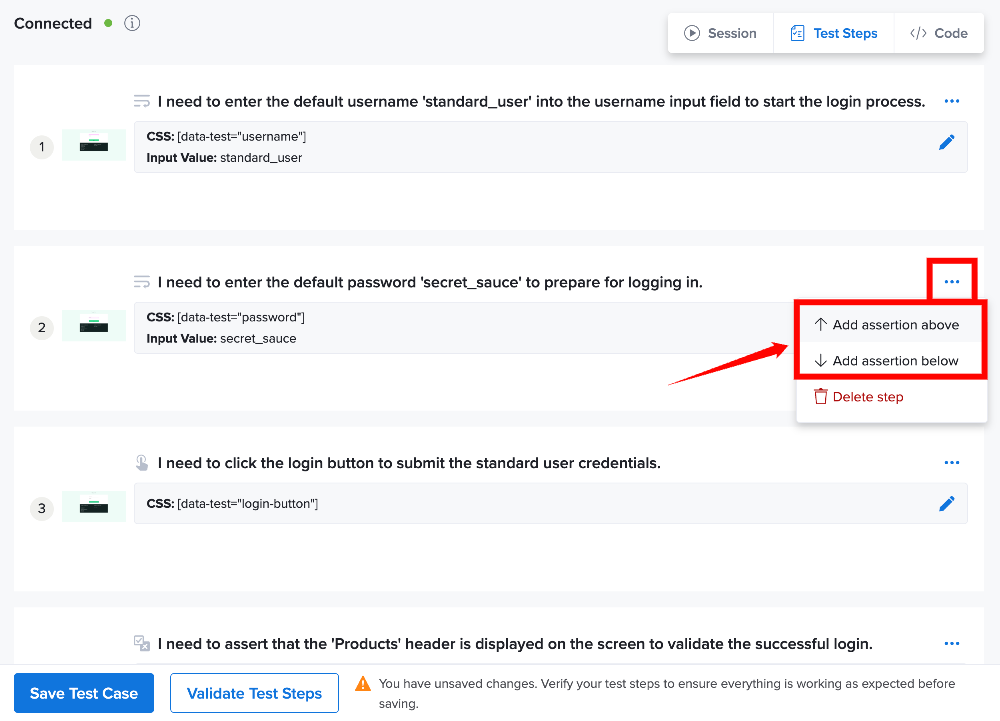
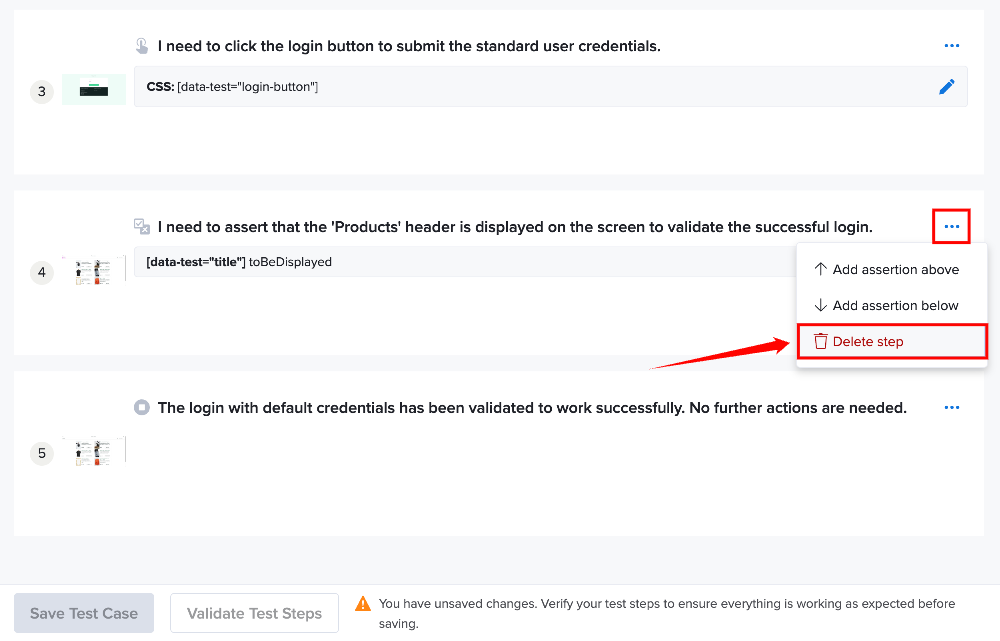
Step 1: Locate the test step next to which you want to add an assertion, click the More options (…) menu, and select Add assertion above or Add assertion below.
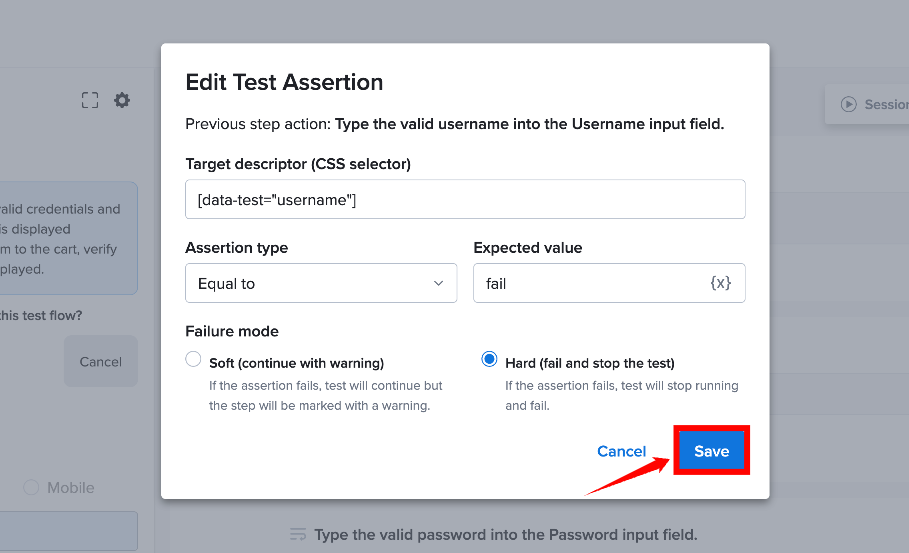
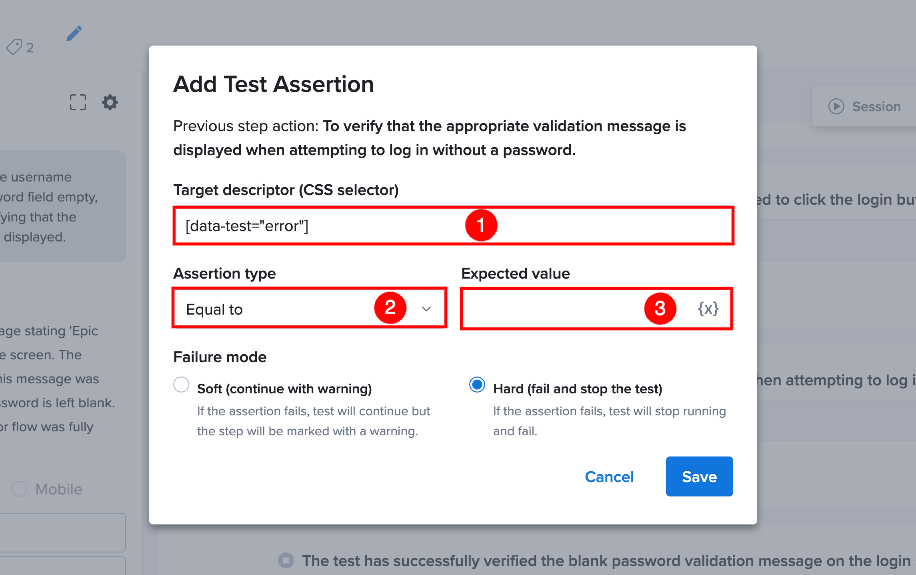
Step 2: In the Add Test Assertion dialog, configure the assertion:
| Ref. | Field | Description |
|---|---|---|
| 1 | Target descriptor (CSS selector) | Enter the CSS selector of the element you want to check. |
| 2 | Assertion type | Select how the element is compared with the expected value, for example Equal to. |
| 3 | Expected value | Enter the value the element is expected to have. To use a stored value, click the {x} icon and select a Data Variable. |
Step 3: Under Failure mode, select Soft (continue with warning) or Hard (fail and stop the test). An assertion with no override inherits the default failure mode set for the test case.
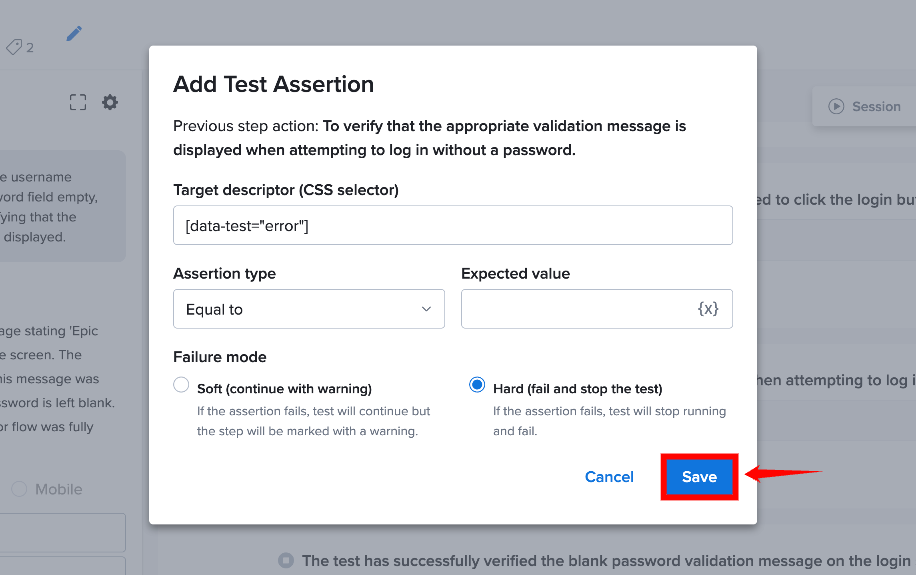
Step 4: Click Save to add the assertion to the test case.
Delete a Test Step
If a test step is no longer needed, you can remove it directly from the test case using the More options menu. Locate the step you want to remove, click the More options (…) menu, and select Delete step. The selected step is removed from the test case.
Validate Manual Changes
After manually editing one or more test steps, the test case indicates that there are unsaved changes. To ensure that the end-to-end test flow remains correct after these changes, it is recommended to validate the test steps.
Validation replays the test flow to verify that the steps are reachable and that your edits are valid. Any manual changes are retained and respected by the authoring agent as you continue to build or maintain the test case through prompts.
Step 1: After completing your edits, locate the unsaved changes message and click Validate to verify that the updated test steps can be executed correctly.
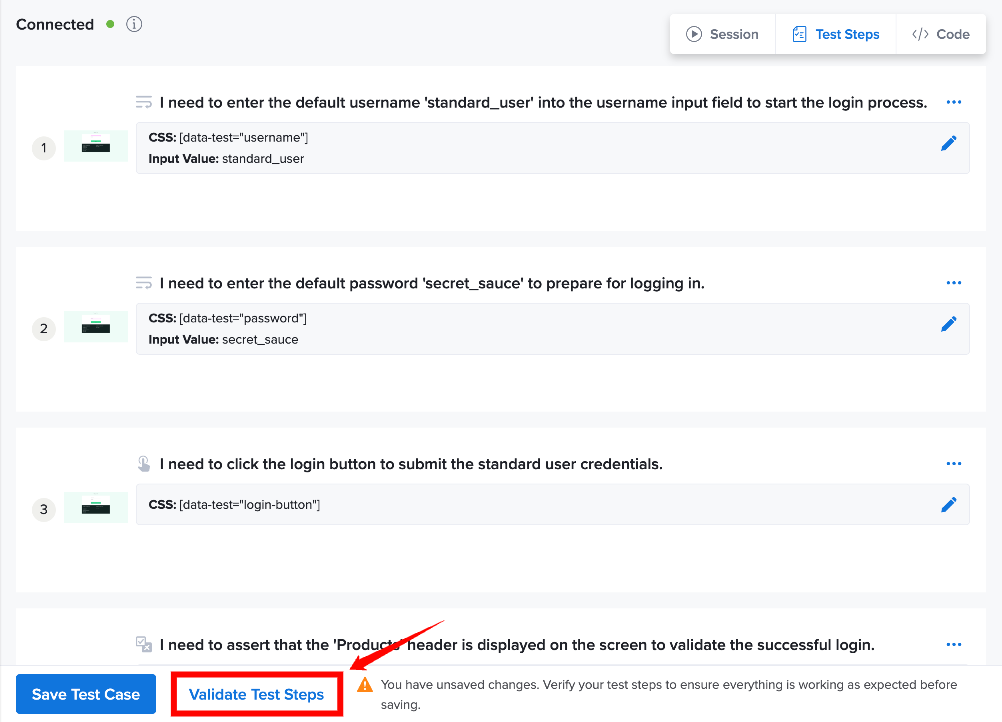
Step 2: The system validates the generated and manually updated test steps to check whether they are runnable. Review the validation results and make additional changes if needed.
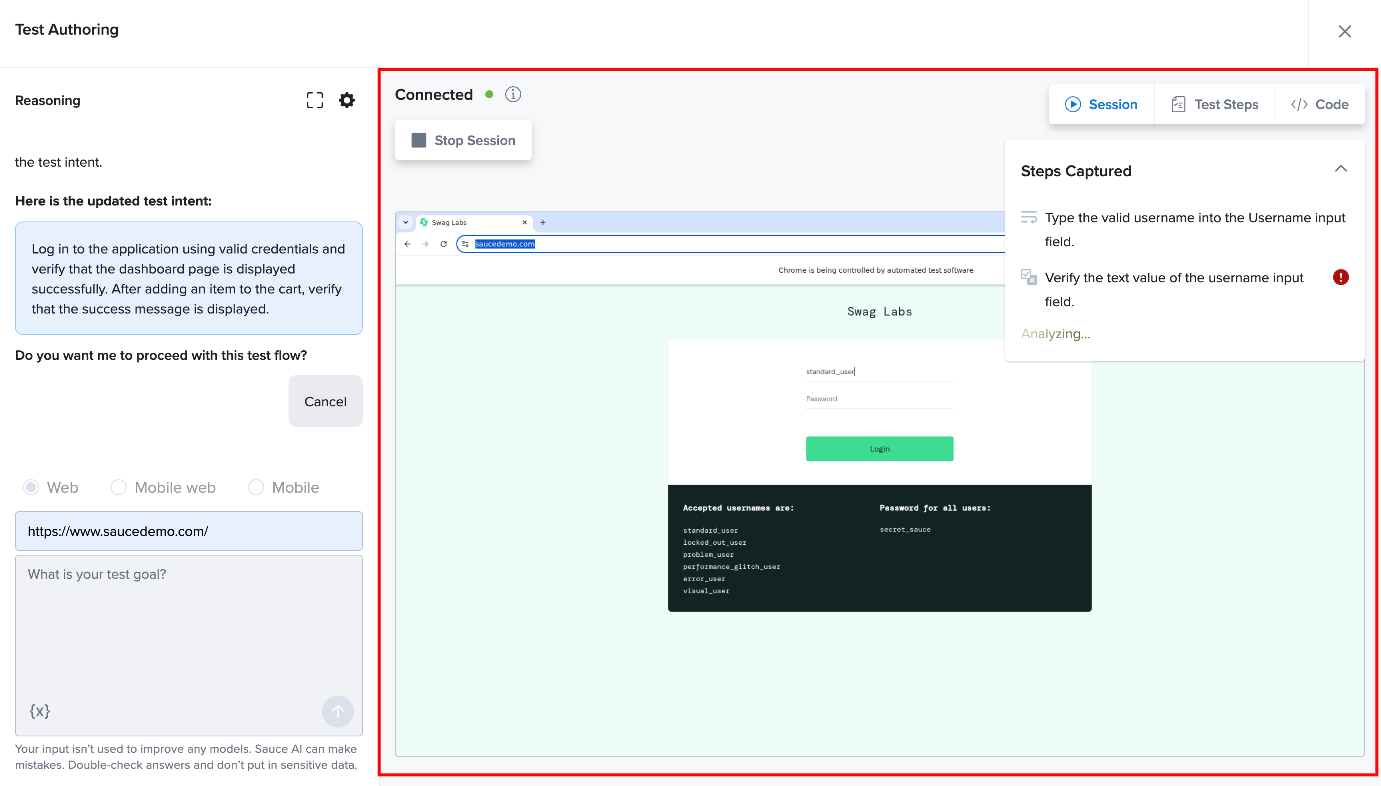
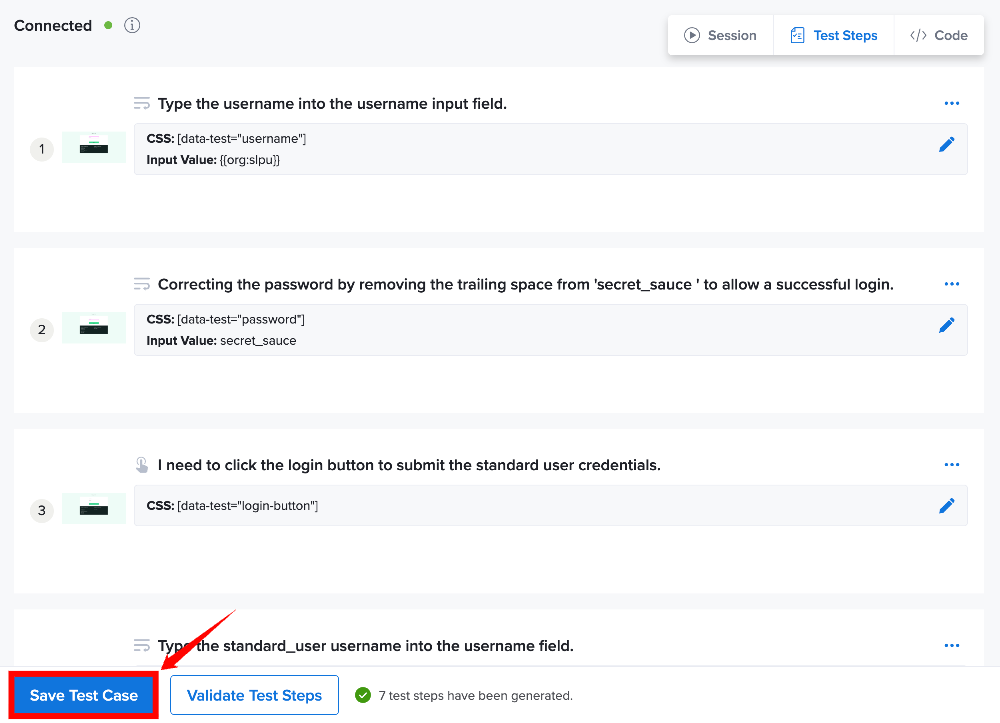
Step 3: After the steps have been successfully validated, click Save Test Case to save your changes.