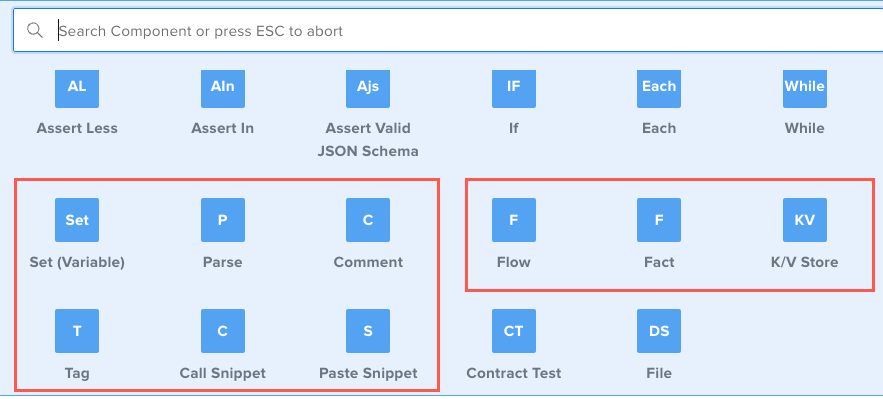
Other Test Components
Here are some other components that you can add to a test using the Composer. This guide describes each component and shows you how to add them to tests. To learn how to access the components and create a test using the Composer see Writing API Tests with the Composer.
What You'll Need
- A Sauce Labs account (Log in or sign up for a free trial license).
- Familiarity with the API Testing Composer.
Tag
The Tag component within the Composer enables you to dynamically tag the resulting document of a test execution. You can add different tags based on dynamic events happening during the test execution, such as a certain value retrieved in the payload. You can assign multiple tags to each test by adding more 'tag' components to it.
This is different from the tags applied when you first create the test. That feature enables you to search for that tag(s) filter in your Project Tests tab or Dashboard tab.
Parameters
| Fields | |
| Tag | | REQUIRED | STRING | |
Examples
Here's an example of how you could use a tag in the Composer tab.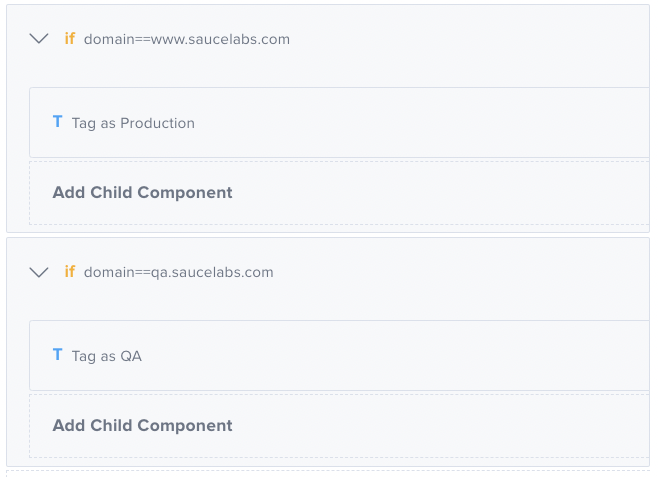 You can also add tags to the test details screen when you create or edit a test.
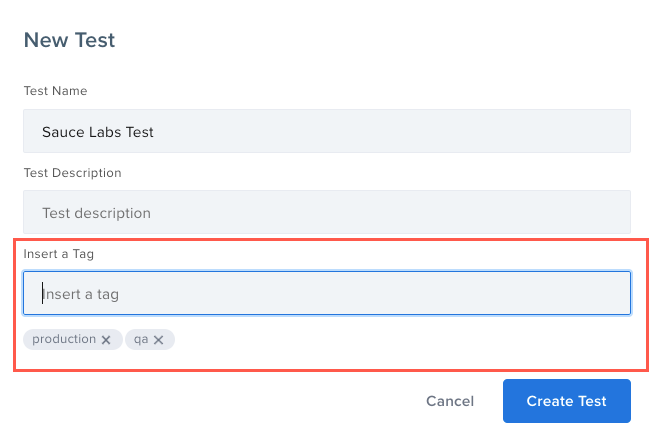 Static tags will be displayed in your Tests list.
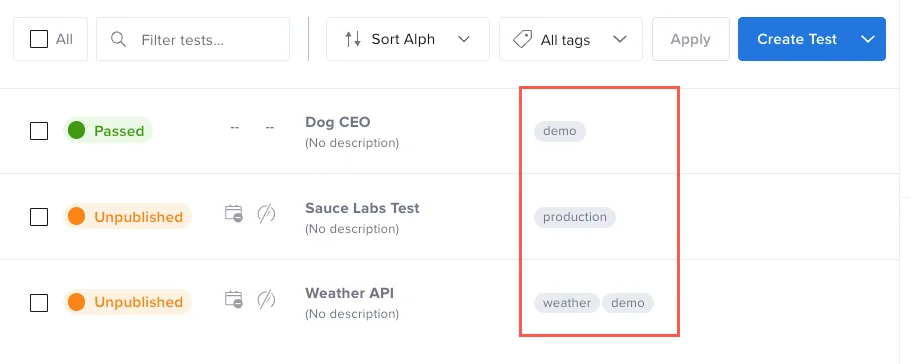 All tags, dynamic and static will mark the test execution documents. On your project Dashboard, you can filter events by tags.
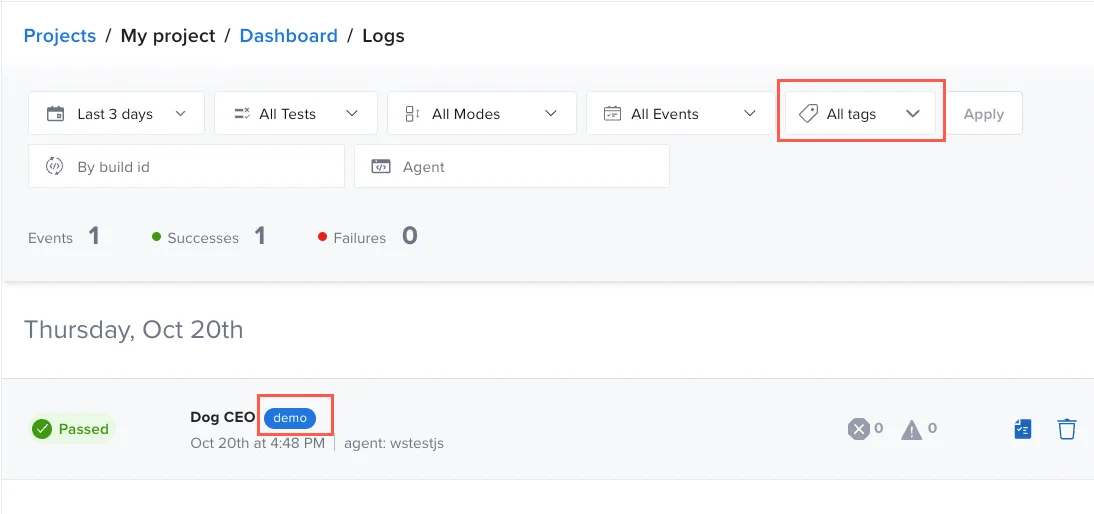
Code View Example
- id: tag
  value: Production
Set (Variable)
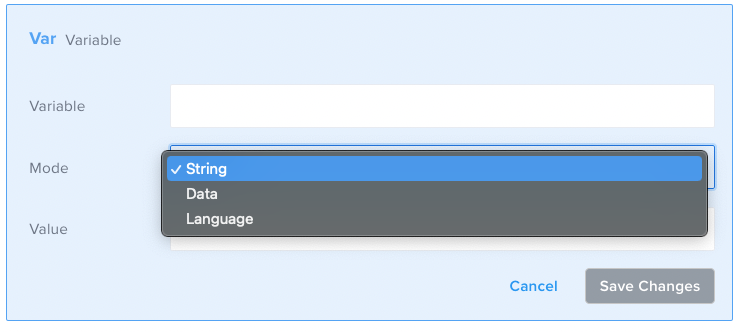
In Sauce Labs API Testing you can create variables in several different ways by using SET (variable). This component has different modes that allow you to create variables in different ways, such as String, Data, and Language.
Parameters
| Fields | |
| Variable | | REQUIRED | STRING | |
| Mode | | REQUIRED | STRING, DATA, or LANGUAGE | |
| Value (depends on ‘Mode = String’) | | REQUIRED | DATA | |
| Data (depends on ‘Mode = Data’) | | REQUIRED | DATA | |
| Lang (depends on ‘Mode = Language’) | | REQUIRED | JAVASCRIPT or TEMPLATE | |
| Body (depends on ‘Mode = Language’) | | REQUIRED | DATA | |
Javascript and Template.-
Lang: Javascript
In this mode you can create your variable by writing a JavaScript script in the
Bodyfield. It can be a complete script with variable declarations or loops. -
Lang: Template
In this mode you can create your own template in the same way as it is done for Request Body, the advantage here is that you can print the variable to check if all is correct (Body cannot be printed).
Code View Examples
- id: set
  var: product
  mode: string
  value: t-shirt
- id: set
  var: product
  mode: string
  value: ${payload.name}
- id: set
  var: product
  mode: object
  object: '["Bluetooth Headphones","Long Sleeve Shirt","Baseball Cap"]'
- id: set
  var: product
  mode: object
  object: payload.filter(it=>it.name=='Bluetooth Headphones')
- id: set
  var: jsonData
  mode: lang
  lang: javascript
  body: |-
    var pieces = token.split('.')
    var b64payload = pieces[1]
    var decoded = Buffer.from(b64payload,'base64').toString()
    var json = JSON.parse(decoded)
    return json
- id: set
  var: new_product
  mode: lang
  lang: template
  body: >-
    {
        "id": 4,
        "name": "T-Shirt",
        "price": ${price},
        "category": "1",
        "description": "This is product ${id}!",
        "quantity": 5,
        "imageURL": "http://image.com",
        "color": ["red", "green"],
        "createdAt": "${D.format (D.nowMillis(), 'yyyy-MM-DD')}",
        "updatedAt": "${D.format (D.nowMillis(), 'yyyy-MM-DD')}T${D.format(D.nowMillis(), 'HH:mm:ssz')}"
      }
Parse
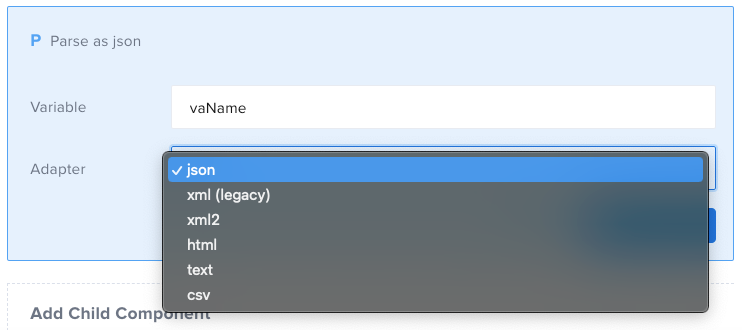
This component allows you to parse a string into structured data, using one of the available parsers.
Parameters
| Fields | |
| Variable | | REQUIRED | STRING | The name of the variable you want to parse. |
| Adapter | | REQUIRED | json, xml, etc. | The parser to use |
Examples
Set a variable (which will be a plain string) as a list of colors.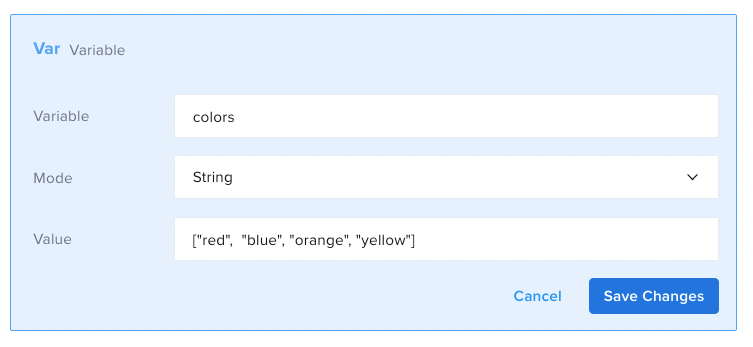 Next, use the Comment component to see what happens if you print “colors[1]” before and after parsing it into JSON.
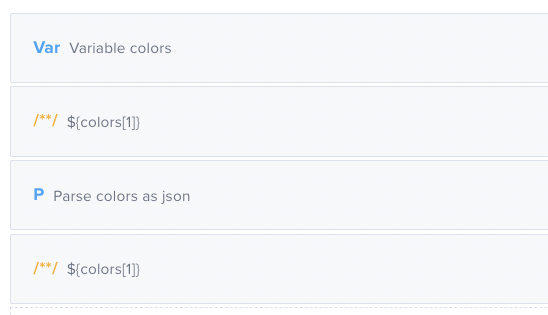 Here are the results of the above test:
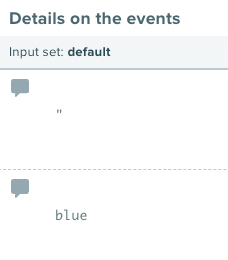 Before parsing the string, the test will consider the variable
 colors as one big string so colors[1] will print “ as that is the second character in the string. After parsing the string into JSON the system can traverse through the variable as a JSON, so colors[1] will print the second element in the JSON array: blue.Code View Examples
- id: parse
  var: varName
  adapter: json
- id: parse
  var: fileName
  adapter: csv
Comment
This assertion allows you to print out (in test reports) information. It can have two sorts of values, as described below.
Parameters
Examples
The first is a normal string value. An example of that would be to explain what a specific WHEN loop is being used for. Similar to when you write comments in code.This is a comment
The value of the ID is ${payload.id}
Code View Example
- id: comment
  text: This is a comment
- id: comment
  text: The value of the ID is ${payload.id}
Flow
This component allows you to pause or stop a test entirely.
Parameters
| Fields | |
| Command | | REQUIRED | 'stop', 'wait' | This parameter defines the action you want to take. 'Stop' will stop the test. 'Wait' will pause the test for a number of milliseconds defined in the 'Value' parameter. |
| Value | | REQUIRED | INTEGER | Depends on 'Command = wait'. The number of milliseconds you want to pause the test for. |
Examples
This component is especially useful when combined with theIf component. See the examples below: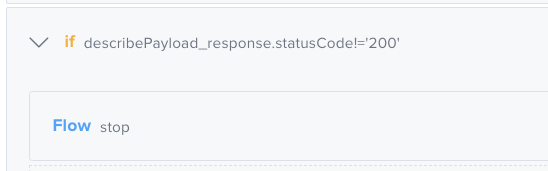 If the statusCode is not
 200, the test will be halted; none of the remaining assertions will be checked.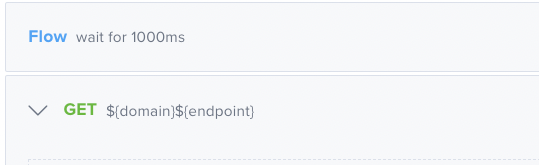 In this example, the test will wait 1000 milliseconds before performing the
 GET request.Code View Examples
- id: flow
  command: stop
- id: flow
  command: wait
  value: 1000
Fact
The Fact component enables you to add information (facts) about the nature of the test execution, along with static or dynamic data. It's used to control the behavior of Email notifications, which (if enabled) alert you to test failures.
Test activity is tracked using test ID number. This may not work if you're testing in multiple environments (i.e., production, staging, QA), as an incident could be environment-specific. When a Fact component is added to a test, it will inform our system which environment the execution relates to so that the incident signature will carry the environment as well.
Parameters
| Fields | |
| Identifier | | REQUIRED | STRING | Should be unique within the test. |
| Label | | REQUIRED | To provide an understanding of the Fact. |
| Value | | REQUIRED | STRING | String value that supports the template language (i.e., |
The Fact component should be set as high up in the test as possible. If the test fails before it reaches the Fact, then it will not be set.
Learn how to improve the email notifications, disable the notifications and set the thresholds by checking the examples.
Code View Examples
- id: fact
  identifier: environment
  label: environment
  value: ${env}
Call Snippet
Looking to create or update a snippet? See Snippets.
Creates a Call component that will invoke the snippet. If the snippet changes, all the tests containing the Call component to that snippet will inherit the changes.
Paste Snippet
This allows you to paste the entire snippet inside the test, which you can then edit as needed. The pasted components will lose any reference to the original snippet.
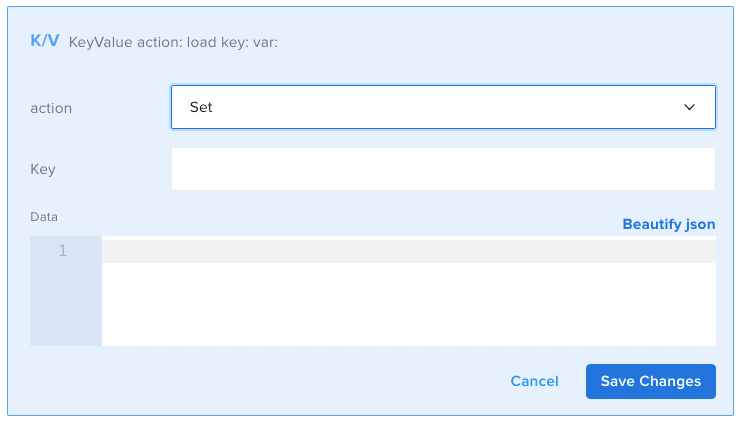
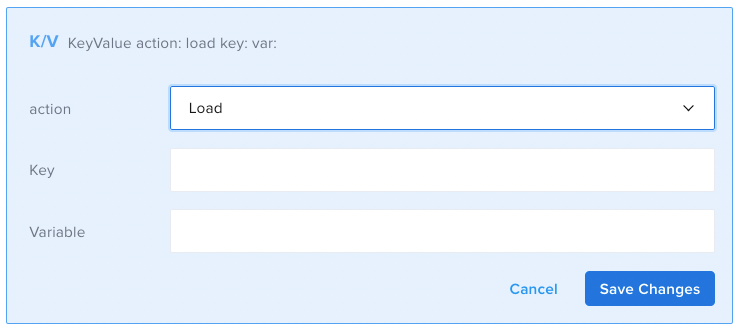
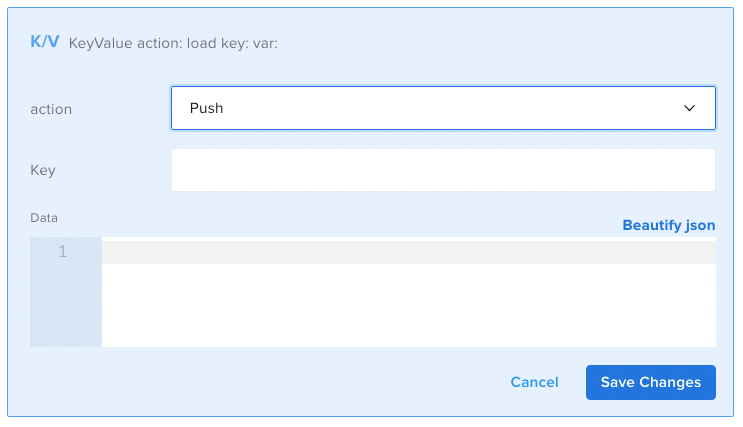
K/V Store
The Key/Value store allows you to create temporary key/value pairs that can be accessed across different tests. The Key/Value store is accessed via the Key/Value Store Component.
These Key/Value pairs are temporary. They expire after 24 hours has elapsed since the last update to the value itself.
Methods
The Key/Value Store component has four methods available for use:
- Set: creates a new key/value pair in the Key/Value store. The value is entered in the Data field.
- Load: recalls a value from the Key/Value store when provided with a key.
- Push: adds a value to the end of an existent value of the datatype "Array" in the Key/Value store. If no such key exists, it will create a new array containing the passed in value. The passed in value is entered in the Data field.
- Pop: removes a value from the end of an existent value of the datatype "Array" in the Key/Value store.

Code View Examples
- id: kv
  key:
  action: load
  var:
- id: kv
  key: prods
  action: load
  var: kvprods
- id: kv
  key:
  action: pop
  var:
- id: kv
  key:
  action: set
  object:
- id: kv
  key: adasd
  action: set
  object: products[0].name
- id: kv
  key: prods
  action: set
  object: '[products[0].color]'
- id: kv
  key:
  action: push
  object: